自建Docker 镜像源加速的方法
十一月 23, 2024 [C/C++] #obsidian #代理与科学上网 #容器 #编译链接一、简介
今天(2024年6月7日),GFW正式DNS污染+SNI阻断了docker.com及其相关域名。从国内解析得到的IP地址为Twitter/Facebook的IP,符合大墙DNS污染的特征。而如果使用海外解析得到的正常IP地址从国内访问则会被SNI重置阻断链接。
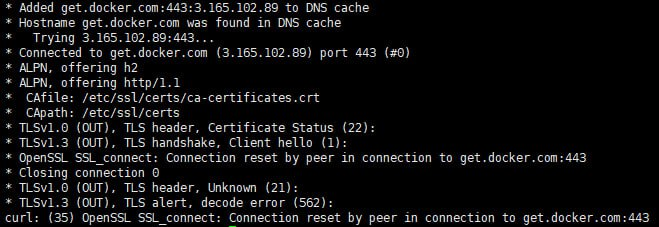
与此同时,上交镜像站等一系列中国大陆公益镜像站点也“接上级主管部门通知,暂时关闭 Docker Hub 镜像缓存服务”。(通知链接 1 2)
更新:南京大学、中科大、上海交大 目前明确停止docker镜像 网易之前死了 腾讯微软据说内网可用 阿里登陆后就可以拿到子域名 百度好像也挂了 dockerproxy被墙
不得不说这对中国docker用户是一个重大打击,因此学会自建一个Docker镜像变得十分重要。本文主要介绍两种方法:1.利用Cloudflare workers搭建 2.服务器自建。
二、利用Cloudflare Worker搭建
搭建完成后的使用方法:
docker pull xxxxx.com/mysql/mysql-server
点击Cloudflare,创建一个新项目,然后将如下代码复制进去即可。创建完成后可以选择绑定自己的域名使用。
'use strict'const hub_host = 'registry-1.docker.io'const auth_url = 'https://auth.docker.io'const workers_url = 'https://你的域名'/** * static files (404.html, sw.js, conf.js) *//** @type {RequestInit} */const PREFLIGHT_INIT = { status: 204, headers: new Headers({ 'access-control-allow-origin': '*', 'access-control-allow-methods': 'GET,POST,PUT,PATCH,TRACE,DELETE,HEAD,OPTIONS', 'access-control-max-age': '1728000', }),}/** * @param {any} body * @param {number} status * @param {Object} headers */function makeRes(body, status = 200, headers = {}) { headers['access-control-allow-origin'] = '*' return new Response(body, {status, headers})}/** * @param {string} urlStr */function newUrl(urlStr) { try { return new URL(urlStr) } catch (err) { return null }}addEventListener('fetch', e => { const ret = fetchHandler(e) .catch(err => makeRes('cfworker error:\n' + err.stack, 502)) e.respondWith(ret)})/** * @param {FetchEvent} e */async function fetchHandler(e) { const getReqHeader = (key) => e.request.headers.get(key); let url = new URL(e.request.url); if (url.pathname === '/token') { let token_parameter = { headers: { 'Host': 'auth.docker.io', 'User-Agent': getReqHeader("User-Agent"), 'Accept': getReqHeader("Accept"), 'Accept-Language': getReqHeader("Accept-Language"), 'Accept-Encoding': getReqHeader("Accept-Encoding"), 'Connection': 'keep-alive', 'Cache-Control': 'max-age=0' } }; let token_url = auth_url + url.pathname + url.search return fetch(new Request(token_url, e.request), token_parameter) } url.hostname = hub_host; let parameter = { headers: { 'Host': hub_host, 'User-Agent': getReqHeader("User-Agent"), 'Accept': getReqHeader("Accept"), 'Accept-Language': getReqHeader("Accept-Language"), 'Accept-Encoding': getReqHeader("Accept-Encoding"), 'Connection': 'keep-alive', 'Cache-Control': 'max-age=0' }, cacheTtl: 3600 }; if (e.request.headers.has("Authorization")) { parameter.headers.Authorization = getReqHeader("Authorization"); } let original_response = await fetch(new Request(url, e.request), parameter) let original_response_clone = original_response.clone(); let original_text = original_response_clone.body; let response_headers = original_response.headers; let new_response_headers = new Headers(response_headers); let status = original_response.status; if (new_response_headers.get("Www-Authenticate")) { let auth = new_response_headers.get("Www-Authenticate"); let re = new RegExp(auth_url, 'g'); new_response_headers.set("Www-Authenticate", response_headers.get("Www-Authenticate").replace(re, workers_url)); } if (new_response_headers.get("Location")) { return httpHandler(e.request, new_response_headers.get("Location")) } let response = new Response(original_text, { status, headers: new_response_headers }) return response;}/** * @param {Request} req * @param {string} pathname */function httpHandler(req, pathname) { const reqHdrRaw = req.headers // preflight if (req.method === 'OPTIONS' && reqHdrRaw.has('access-control-request-headers') ) { return new Response(null, PREFLIGHT_INIT) } let rawLen = '' const reqHdrNew = new Headers(reqHdrRaw) const refer = reqHdrNew.get('referer') let urlStr = pathname const urlObj = newUrl(urlStr) /** @type {RequestInit} */ const reqInit = { method: req.method, headers: reqHdrNew, redirect: 'follow', body: req.body } return proxy(urlObj, reqInit, rawLen, 0)}/** * * @param {URL} urlObj * @param {RequestInit} reqInit */async function proxy(urlObj, reqInit, rawLen) { const res = await fetch(urlObj.href, reqInit) const resHdrOld = res.headers const resHdrNew = new Headers(resHdrOld) // verify if (rawLen) { const newLen = resHdrOld.get('content-length') || '' const badLen = (rawLen !== newLen) if (badLen) { return makeRes(res.body, 400, { '--error': `bad len: ${newLen}, except: ${rawLen}`, 'access-control-expose-headers': '--error', }) } } const status = res.status resHdrNew.set('access-control-expose-headers', '*') resHdrNew.set('access-control-allow-origin', '*') resHdrNew.set('Cache-Control', 'max-age=1500') resHdrNew.delete('content-security-policy') resHdrNew.delete('content-security-policy-report-only') resHdrNew.delete('clear-site-data') return new Response(res.body, { status, headers: resHdrNew })}
三、使用服务器自建(reigistry)
由于Cloudflare在中国大陆的互联性并不是非常理想,所以在有中国优化线路的服务器上搭建一个加速服务可能对大多数人来说才是最优解。
本文介绍reigistry方式
利用reigistry搭建
首先创建一个docker-compose文件
vi registry/docker-compose.yml
然后粘贴如下内容
#version: '3' #最新版本docker 不在需要此字段services: registry: image: registry:2 ports: - "15000:5000" environment: REGISTRY_PROXY_REMOTEURL: https://registry-1.docker.io # 上游源 REGISTRY_STORAGE_CACHE_BLOBDESCRIPTOR: inmemory # 内存缓存 volumes: - ./data:/var/lib/registry
需要注意的是如果仅仅作为镜像源,需要把push功能ban掉,推荐使用nginx反代的时候禁止其他http method
# 端口, 域名 都改为自己的server { listen 80; server_name my-registry-domain.com; location / { # 仅允许 GET 请求 limit_except GET { deny all; } proxy_pass http://localhost:5000; # 假设 Docker Registry 运行在本地的 5000 端口 proxy_set_header Host $host; proxy_set_header X-Real-IP $remote_addr; proxy_set_header X-Forwarded-For $proxy_add_x_forwarded_for; proxy_set_header X-Forwarded-Proto $scheme; }}
done!
四、使用服务器自建(优化版,推荐)
可以参考这个Github项目
1.首先安装Docker,下载本项目
git clone https://github.com/brighill/registry-mirror.gitcd registry-mirror./get-docker.sh --mirror Aliyun
2.在服务器上生成证书
./gencert.sh
3.启动服务端
# 如果在无法访问gcr.io的机器上启动服务则需要增加代理# export PROXY=ip:portdocker compose up -d
1.修改/etc/hosts将域名解析劫持到自己的IP(如果有自建DNS服务也可以改DNS配置)
vim /etc/hosts xxx.xxx.xxx.xxx gcr.io quay.io docker.io registry-1.docker.io nvcr.io registry.k8s.io custom.local
2.信任证书
首先把你服务端生成的证书文件夹/cert复制到客户端
不同客户端信任证书流程如下:
# macOSsudo security add-trusted-cert -d -r trustRoot -k /Library/Keychains/System.keychain cert/ca.crt
# Debian/Ubuntusudo apt install ca-certificatessudo cp cert/ca.crt /usr/local/share/ca-certificates/ca.crtsudo update-ca-certificates
# CentOS/Fedora/RHELsudo yum install ca-certificatessudo update-ca-trust force-enablesudo cp cert/ca.crt /etc/pki/ca-trust/source/anchors/sudo update-ca-trust
3.重启docker
sudo systemctl daemon-reloadsudo systemctl restart docker
4.测试是否正常运行
docker pull registry.k8s.io/pause:3.9
五、直接配置Docker代理
假设SOCKS 代理地址为 127.0.0.1:1000 ,HTTP 代理地址为 127.0.0.1:2000
首先要确认的是本机是否可以连接到socks和http代理。用以下指令测试节点有效性
# SOCKS 代理curl -x socks5://127.0.0.1:1000 ip.sb
# HTTP 代理curl -x 127.0.0.1:2000 ip.sb
#代用户认证的SOCKS代理curl -x socks5://Username:Password@127.0.0.1:1000 ip.sb
如果返回的是代理的出口IP而不是本机IP,则代表连接成功
1.配置Docker镜像代理
因为镜像的拉取和管理都是 docker daemon 负责的,而 docker daemon 是由 systemd 管理的,所以要从 systemd 配置入手,给 docker daemon 配置代理。
官方文档: Configure the daemon with systemd | Docker Docs
(a)首先创建 dockerd 相关的 systemd 目录,这种 .d 目录下的配置将覆盖默认配置
sudo mkdir -p /etc/systemd/system/docker.service.d
(b)新建配置文件 http-proxy.conf
sudo vim /etc/systemd/system/docker.service.d/proxy.conf
添加配置
[Service]Environment="HTTP_PROXY=http://127.0.0.1:2000/"Environment="HTTPS_PROXY=http://127.0.0.1:2000/"Environment="NO_PROXY=127.0.0.1,localhost,192.168.*,*.example.com"# 如果 `NO_PROXY=*`,那么所有请求都将不通过代理服务器
(c)最后重新加载配置文件,重启 Dockerd 才能生效
sudo systemctl daemon-reloadsudo systemctl restart docker
检查确认环境变量是否正常配置
sudo systemctl show --property=Environment docker
2.配置Docker容器代理
在容器运行阶段,如果需要代理上网,只需要加上环境变量,比如使用 docker-compose 的话,其配置文件里的环境变量,增加下面三部分即可。
environment: - http_proxy="192.168.1.11:2000" - https_proxy="192.168.1.11:2000" - no_proxy="localhost,127.0.0.1,.example.com"
这个能不能生效,还得看里面运行的服务,会不会主动撷取环境变量了。
如果容器默认就使用代理,也可以配置 ~/.docker/config.json
{ "proxies": { "default": { "httpProxy": "http://proxy.example.com:2000", "httpsProxy": "http://proxy.example.com:2000", "noProxy": "localhost,127.0.0.1,.example.com" } }}
这个是用户级的配置,除了 proxies,docker login 等相关信息也会在其中。而且还可以配置信息展示的格式、插件参数等。
注意:无论是 docker run 还是 docker build,默认是网络隔绝的。如果代理使用的是 localhost:3128 这类,则会无效。这类仅限本地的代理,必须加上 --network host 才能正常使用。
3.Docker Build 代理
虽然 docker build 的本质,也是启动一个容器,但是环境会略有不同,用户级配置无效。在构建时,需要注入 http_proxy 等参数。
docker build . \ --build-arg "HTTP_PROXY=http://proxy.example.com:2000/" \ --build-arg "HTTPS_PROXY=http://proxy.example.com:2000/" \ --build-arg "NO_PROXY=localhost,127.0.0.1,.example.com" \ -t your/image:tag
五、利用 Github Action 将 DockerHub 镜像转存到阿里云私有仓库
Docker Images Pusher
使用 Github Action 将 DockerHub 镜像转存到阿里云私有仓库,供国内服务器使用,免费易用
项目地址: https://github.com/tech-shrimp/docker_image_pusher
配置阿里云
登录阿里云容器镜像服务 https://cr.console.aliyun.com/ 启用个人实例,创建一个命名空间(ALIYUN_NAME_SPACE)
访问凭证–>获取环境变量 用户名(ALIYUN_REGISTRY_USER) 密码(ALIYUN_REGISTRY_PASSWORD) 仓库地址(ALIYUN_REGISTRY)
Fork 本项目
Fork 项目 https://github.com/tech-shrimp/docker_image_pusher
进入您自己的项目,点击 Action ,启用 Github Action 功能 配置环境变量,进入 Settings->Secret and variables->Actions->New Repository secret > (原文配图已失效:v2ex 文档图「配置环境变量」) 将上一步的 ALIYUN_NAME_SPACE ,ALIYUN_REGISTRY_USER ,ALIYUN_REGISTRY_PASSWORD ,ALIYUN_REGISTRY 的值配置成环境变量
添加镜像
打开 images.txt 文件,添加你想要的镜像,可以带 tag ,也可以不用(默认 latest ) 文件提交后自动进入 Github Action 构建
使用镜像
回到阿里云,镜像仓库,点击任意镜像,可查看镜像状态。(可以改成公开,拉取镜像免登录) > (原文配图已失效:v2ex 文档图「开始使用」)
在国内服务器 pull 镜像:
docker pull registry.cn-hangzhou.aliyuncs.com/shrimp-images/alpine
registry.cn-hangzhou.aliyuncs.com 即 ALIYUN_REGISTRY shrimp-images 即 ALIYUN_NAME_SPACE alpine 即 images.txt 里面填的镜像
声明:本站原创文章文字版权归本站所有,转载务必注明作者和出处;本站转载文章仅仅代表原作者观点,不代表本站立场,图文版权归原作者所有。如有侵权,请联系我们删除。