实现一个简单的 CRT(issue24 系列合集)
四月 20, 2024 更新: 五月 23, 2024 [C/C++] #obsidian #合集 #操作系统原理 #编译链接Issue 2 gcc的fvisibility选项
fvisibility选项决定共享库中的符号是否是可见的。
-fvisibility=[default|internal|hidden|protected]
default意味着符号可见,hidden意味者不可见,internal和protected一般很少用
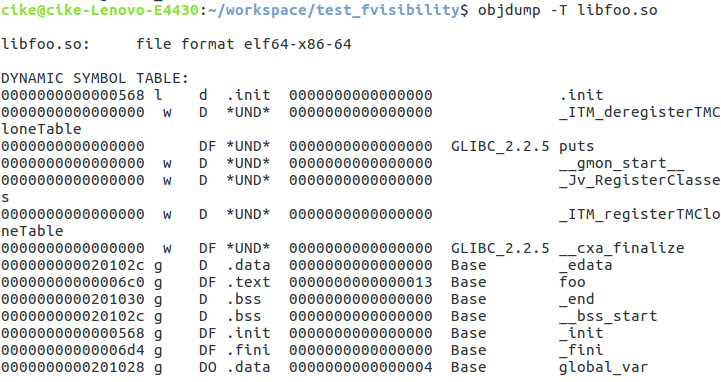
$ gcc -fPIC -shared foo.c -o libfoo.so
$ objdump -T libfoo.so
可以看到符号表中存在foo和global_var
加上编译选项-fvisibility=hidden
$ gcc -fPIC -shared -fvisibility=hidden foo.c -o libfoo.so
$ objdump -T libfoo.so
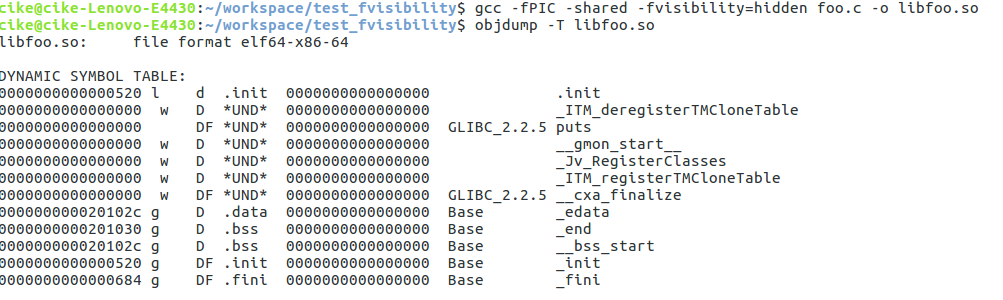
可以看到符号表中不再存在foo和global_var,因此外部也就无法调用foo函数和使用全局变量global_var
PS:可以使用__attribute__ ((visibility("default"))) 指定符号可见性
设置不可见有什么好处
- 提升动态共享对象(DSO(Dynamic Shared Object))的加载效率
- 使得优化器生成更好的代码 (具体原理待研究)
- 减少DSO的大小
- 避免符号冲突
fvisibility=hidden和static有什么区别
static修饰的符号在符号表中也是不可见的,那么和fvisibility=hidden有什么区别呢
假如有一个函数用__attribute__((visibility("hidden")))修饰,那么在编译成动态共享库之后该函数是不可见的,但是如果该库由foo.o和bar.o链接而成的,那么该函数可以定义在foo.c,在bar.c中被调用,即隐藏的可见度适用于整个共享库,而不适用于组成它的单个编译单元。
而static修饰的函数只能在当前文件内被调用
Issue 4 libc库的版本兼容问题
记一次解决glibc库版本兼容问题
问题背景:
本地编译的动态共享库(.so)在另外一台服务器上编译链接报错
报错信息如下:
/lib64/libc.so.6: version 'GLIBC_2.14' not found(require ./libsmscrypt.so)
symbol memcpy, version GLIBC_2.14 not defined in file libc.so.6 with link time reference
原因分析:
根据报错信息可以看出so库中memcpy函数使用了高版本的实现,而运行机器上的glibc库中没有相应版本实现,因此需要提供链接低版本glibc库的so库。
分析及解决:
从报错信息可以看出找不到GLIBC_2.14版本的memcpy函数
1、查看libsmscrypt.so中memcpy用的是哪个版本实现
$ objdump -T libsmscrypt.so | grep memcpy

可以看出libsmscrypt.so中调用了GLIBC_2.14中的memcpy实现
2、查看系统glibc支持的版本
$ strings libc.so.6 | grep GLIBC
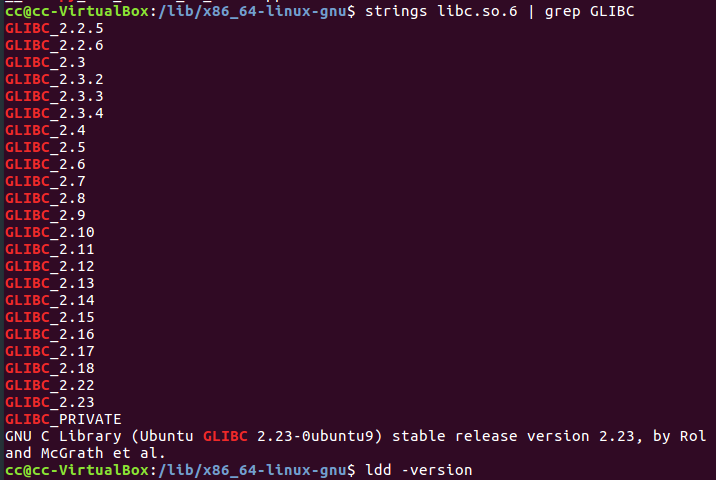
3、查看glibc库包含了memcpy的哪些版本
$ objdump -T libc.so.6 | grep memcpy

可以看到本机glibc库提供了2.2.5和2.14版本的memcpy
4、指定libsmscrypt.so中memcpy函数使用2.2.5版本实现
在使用了memcpy的源文件中添加
__asm__(".symver memcpy, memcpy@GLIBC_2.2.5");
5、重新编译生成libsmscrypt.so,查看memcpy使用的版本是否改变
$ objdump -T libsmscrypt.so | grep memcpy

可以看到,memcpy函数使用了2.2.5版本的实现。
完成。
局限性:
__asm__(".symver memcpy, memcpy@GLIBC_2.2.5");只对一个源文件有效,当多个源文件使用了memcpy,需要在每个文件添加。
示例代码:
//test.c
#include "test1.h"
#include "test2.h"

int main()
{
    foo1();
    foo2();
    return 0;
}

//test1.c
#include "stdlib.h"
#include "string.h"

__asm__(".symver memcpy, memcpy@GLIBC_2.2.5");
void foo1()
{
    char *str = "hello world!";
    char *t = (char *)malloc(5);
    memcpy(t, str, 5);
    free(t);
}

//test2.c
#include "stdlib.h"
#include "string.h"
void foo2()
{
    char *str = "hello world!";
    char *t = (char *)malloc(5);
    memcpy(t, str, 5);
    free(t);
}
编译:$ gcc test.c test1.c test2.c -o test
查看memcpy依赖的版本:$ objdump -T test
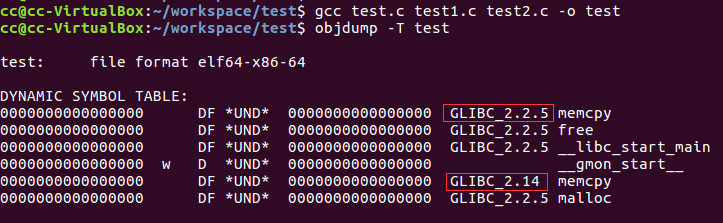
从截图可以看到同时用到了2.2.5和2.14版本的memcpy,说明确实只对一个文件起效。
更通用的实现:
编写一个单独的memcpy.c文件:
#include <string.h>

void *__memcpy_old(void *, const void *, size_t);

asm(".symver __memcpy_old, memcpy@GLIBC_2.2.5");
void *__wrap_memcpy(void *dest, const void *src, size_t n)
{
    return __memcpy_old(dest, src, n);
}
将test1.c中的__asm__(".symver memcpy, memcpy@GLIBC_2.2.5");去掉
编译:$ gcc test.c test1.c test2.c memcpy.c -Wl,--wrap=memcpy -o test
gcc编译时使用 -Wl,--wrap=memcpy选项,使得链接器将memcpy解析为__wrap_memcpy。
查看:$ objdump -T test
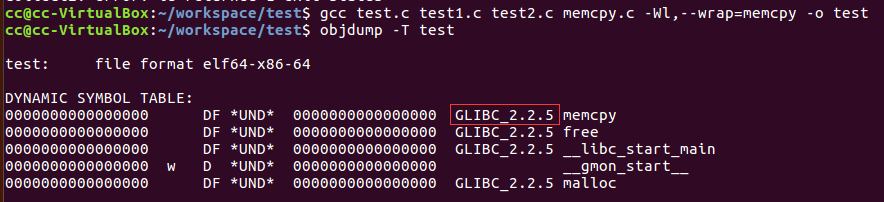
可以看到memcpy现在只依赖2.2.5版本的实现
参考: http://b.liuctic.com/2013/11/glibc_2-14-%E5%85%BC%E5%AE%B9%E9%97%AE%E9%A2%98-lib64libc-so-6-version-glibc_2-14-not-found/ https://blog.blahgeek.com/glibc-and-symbol-versioning/ http://blog.csdn.net/force_eagle/article/details/8684669
Issue 5 深入理解errno
我们知道当执行系统调用或库函数调用出现错误时,errno的值将被根据错误类型被置为相应的值(非0),且errno是线程安全的,现在我们来探究errno的本质。
首先,写个demo
#include "errno.h"
int main()
{
    errno = 1;
    return 0;
}
对文件进行预处理
$ gcc -E test2.c -o test2.i
预编译后的文件内容
## 1 "test2.c"
## 1 "<built-in>"
## 1 "<command-line>"
## 1 "/usr/include/stdc-predef.h" 1 3 4
## 1 "<command-line>" 2
## 1 "test2.c"
## 1 "/usr/include/errno.h" 1 3 4
## 28 "/usr/include/errno.h" 3 4
## 1 "/usr/include/features.h" 1 3 4
## 367 "/usr/include/features.h" 3 4
## 1 "/usr/include/x86_64-linux-gnu/sys/cdefs.h" 1 3 4
## 410 "/usr/include/x86_64-linux-gnu/sys/cdefs.h" 3 4
## 1 "/usr/include/x86_64-linux-gnu/bits/wordsize.h" 1 3 4
## 411 "/usr/include/x86_64-linux-gnu/sys/cdefs.h" 2 3 4
## 368 "/usr/include/features.h" 2 3 4
## 391 "/usr/include/features.h" 3 4
## 1 "/usr/include/x86_64-linux-gnu/gnu/stubs.h" 1 3 4
## 10 "/usr/include/x86_64-linux-gnu/gnu/stubs.h" 3 4
## 1 "/usr/include/x86_64-linux-gnu/gnu/stubs-64.h" 1 3 4
## 11 "/usr/include/x86_64-linux-gnu/gnu/stubs.h" 2 3 4
## 392 "/usr/include/features.h" 2 3 4
## 29 "/usr/include/errno.h" 2 3 4

## 1 "/usr/include/x86_64-linux-gnu/bits/errno.h" 1 3 4
## 24 "/usr/include/x86_64-linux-gnu/bits/errno.h" 3 4
## 1 "/usr/include/linux/errno.h" 1 3 4
## 1 "/usr/include/x86_64-linux-gnu/asm/errno.h" 1 3 4
## 1 "/usr/include/asm-generic/errno.h" 1 3 4

## 1 "/usr/include/asm-generic/errno-base.h" 1 3 4
## 5 "/usr/include/asm-generic/errno.h" 2 3 4
## 1 "/usr/include/x86_64-linux-gnu/asm/errno.h" 2 3 4
## 1 "/usr/include/linux/errno.h" 2 3 4
## 25 "/usr/include/x86_64-linux-gnu/bits/errno.h" 2 3 4
## 50 "/usr/include/x86_64-linux-gnu/bits/errno.h" 3 4

## 50 "/usr/include/x86_64-linux-gnu/bits/errno.h" 3 4
extern int *__errno_location (void) __attribute__ ((__nothrow__ , __leaf__)) __attribute__ ((__const__));
## 36 "/usr/include/errno.h" 2 3 4
## 58 "/usr/include/errno.h" 3 4

## 2 "test2.c" 2

## 2 "test2.c"
int main()
{

## 4 "test2.c" 3 4
(*__errno_location ())
## 4 "test2.c"
      = 1;
return 0;
}
可以看到errno经过预处理变成了*__errno_location(),表示对__errno_location()函数返回值取地址内容。
那么__errno_location()函数内部是怎么实现的呢? 首先我们需要找到__errno_location函数在哪里定义
这里有个小技巧,利用gdb调试查看进入哪个文件
(gdb) s
__GI___errno_location () at errno-loc.c:26
26    errno-loc.c: No such file or directory
可以看到__errno_location定义在errno-loc.c文件,且本机没有该文件,这里我们可以到github上查看glibc源码
可以看到errno-loc.c文件内容如下
#include <errno.h>
#include <tls.h>

int *
__errno_location (void)
{
  return &errno;
}
libc_hidden_def (__errno_location)
__errno_location函数返回errno变量的地址,那么此处的errno又是什么,查看该文件包含的头文件<errno.h>(在glibc/include目录下)
可以看到如下一行
extern __thread int errno attribute_tls_model_ie;
定义了一个整型变量errno
所以__errno_location最终就是返回了一个整型变量的地址
值得注意的是该变量使用了__thread关键字
查阅维基百科,看到C已经在与语言层面实现了thread local storage (TLS),其中GNU C使用的就是__thread关键字
*Tip:*除了语言层面支持,pthreads的API也支持使用线程本地存储,详见维基百科
参考: http://blog.csdn.net/js072110/article/details/44855565 https://en.wikipedia.org/wiki/Thread-local_storage
Issue 6 深入理解系统调用
网上大多数文章都是基于linux2.x版本的i386架构代码进行分析,而目前linux已经更新到4.x了,所以该文章基于linux4.14.3 stable version源码进行分析,源码下载地址
这里我关注的是X86架构,其他处理器架构的代码原理大同小异
从系统调用表开始进行分析,系统调用表在/arch/x86/entry/syscalls/syscall_32.tbl文件
截取该文件部分内容如下
## 32-bit system call numbers and entry vectors
## ## The format is:
## <number> <abi> <name> <entry point> <compat entry point>
## ## The abi is always "i386" for this file.
## 0    i386    restart_syscall        sys_restart_syscall
1    i386    exit            sys_exit
2    i386    fork            sys_fork            sys_fork
3    i386    read            sys_read
4    i386    write            sys_write
5    i386    open            sys_open            compat_sys_open
该表定义了系统调用号,系统调用名称和入口名称
那么该表什么时候用到了,在/arch/x86目录下中搜索syscall_32.tbl,发现在/arch/x86/entry/syscalls/Makefile中使用到该文件
文件内容如下
## SPDX-License-Identifier: GPL-2.0
out := $(obj)/../../include/generated/asm
uapi := $(obj)/../../include/generated/uapi/asm

## Create output directory if not already present
_dummy := $(shell [ -d '$(out)' ] || mkdir -p '$(out)') \
      $(shell [ -d '$(uapi)' ] || mkdir -p '$(uapi)')

syscall32 := $(srctree)/$(src)/syscall_32.tbl
syscall64 := $(srctree)/$(src)/syscall_64.tbl

syshdr := $(srctree)/$(src)/syscallhdr.sh
systbl := $(srctree)/$(src)/syscalltbl.sh

quiet_cmd_syshdr = SYSHDR  $@
      cmd_syshdr = $(CONFIG_SHELL) '$(syshdr)' '$<' '$@' \
          '$(syshdr_abi_$(basetarget))' \
          '$(syshdr_pfx_$(basetarget))' \
          '$(syshdr_offset_$(basetarget))'
quiet_cmd_systbl = SYSTBL  $@
      cmd_systbl = $(CONFIG_SHELL) '$(systbl)' $< $@

quiet_cmd_hypercalls = HYPERCALLS $@
      cmd_hypercalls = $(CONFIG_SHELL) '$<' $@ $(filter-out $<,$^)

syshdr_abi_unistd_32 := i386
$(uapi)/unistd_32.h: $(syscall32) $(syshdr)
    $(call if_changed,syshdr)

syshdr_abi_unistd_32_ia32 := i386
syshdr_pfx_unistd_32_ia32 := ia32_
$(out)/unistd_32_ia32.h: $(syscall32) $(syshdr)
    $(call if_changed,syshdr)

syshdr_abi_unistd_x32 := common,x32
syshdr_offset_unistd_x32 := __X32_SYSCALL_BIT
$(uapi)/unistd_x32.h: $(syscall64) $(syshdr)
    $(call if_changed,syshdr)

syshdr_abi_unistd_64 := common,64
$(uapi)/unistd_64.h: $(syscall64) $(syshdr)
    $(call if_changed,syshdr)

syshdr_abi_unistd_64_x32 := x32
syshdr_pfx_unistd_64_x32 := x32_
$(out)/unistd_64_x32.h: $(syscall64) $(syshdr)
    $(call if_changed,syshdr)

$(out)/syscalls_32.h: $(syscall32) $(systbl)
    $(call if_changed,systbl)
$(out)/syscalls_64.h: $(syscall64) $(systbl)
    $(call if_changed,systbl)

$(out)/xen-hypercalls.h: $(srctree)/scripts/xen-hypercalls.sh
    $(call if_changed,hypercalls)

$(out)/xen-hypercalls.h: $(srctree)/include/xen/interface/xen*.h

uapisyshdr-y            += unistd_32.h unistd_64.h unistd_x32.h
syshdr-y            += syscalls_32.h
syshdr-$(CONFIG_X86_64)        += unistd_32_ia32.h unistd_64_x32.h
syshdr-$(CONFIG_X86_64)        += syscalls_64.h
syshdr-$(CONFIG_XEN)        += xen-hypercalls.h

targets    += $(uapisyshdr-y) $(syshdr-y)

PHONY += all
all: $(addprefix $(uapi)/,$(uapisyshdr-y))
all: $(addprefix $(out)/,$(syshdr-y))
    @:
根据Makefile内容可以看出make会根据syscall_32.tbl文件生成相应的头文件syscalls_32.h等
那么具体会生成哪些文件呢?生成的文件内容又是什么呢?
动手来试一下,我在自己的虚拟机下(Ubuntu17.10 64bit)编译这份源码
在源码根目录下Make,结果如下
  HOSTCC  scripts/basic/fixdep
  HOSTCC  scripts/kconfig/conf.o
  SHIPPED scripts/kconfig/zconf.tab.c
  SHIPPED scripts/kconfig/zconf.lex.c
  HOSTCC  scripts/kconfig/zconf.tab.o
  HOSTLD  scripts/kconfig/conf
scripts/kconfig/conf  --silentoldconfig Kconfig
***
*** Configuration file ".config" not found!
***
*** Please run some configurator (e.g. "make oldconfig" or
*** "make menuconfig" or "make xconfig").
***
scripts/kconfig/Makefile:38: recipe for target 'silentoldconfig' failed
make[2]: *** [silentoldconfig] Error 1
Makefile:548: recipe for target 'silentoldconfig' failed
make[1]: *** [silentoldconfig] Error 2
  SYSTBL  arch/x86/entry/syscalls/../../include/generated/asm/syscalls_32.h
  SYSHDR  arch/x86/entry/syscalls/../../include/generated/uapi/asm/unistd_32.h
  SYSHDR  arch/x86/entry/syscalls/../../include/generated/uapi/asm/unistd_64.h
  SYSHDR  arch/x86/entry/syscalls/../../include/generated/uapi/asm/unistd_x32.h
  HOSTCC  arch/x86/tools/relocs_32.o
  HOSTCC  arch/x86/tools/relocs_64.o
  HOSTCC  arch/x86/tools/relocs_common.o
  HOSTLD  arch/x86/tools/relocs
make: *** No rule to make target 'include/config/auto.conf', needed by 'include/config/kernel.release'.  Stop.
这里报错的原因编译内核源码需要先配置选项,但这不是我们关注的重点,可以看到虽然报错中断了,但是相应的头文件已经生成了,目的已经达到了
其实这里可能由于没有编译成功少生成了某些文件,因为我在虚拟机/usr/src/linux-headers-4.13.0-16-generic/这个路径下发现还多了syscalls_64.h,unistd_64_x32.h等文件,linux-headers-4.13.0-16-generic是系统本身自带的,但其实不影响接下来的分析,因为syscalls_64.h和syscalls_32.h差别只在于命名时候将64改为I386
最终生成了以下几个文件
- /arch/x86/include/generated/asm/syscalls_32.h
- /arch/x86/include/generated/uapi/asm/unistd_32.h
- /arch/x86/include/generated/uapi/asm/unistd_64.h
- /arch/x86/include/generated/uapi/asm/unistd_x32.h
unistd_64.h部分内容如下
#define __NR_read 0
#define __NR_write 1
#define __NR_open 2
#define __NR_close 3
#define __NR_stat 4
#define __NR_fstat 5
unistd_32.h部分内容如下
#define __NR_restart_syscall 0
#define __NR_exit 1
#define __NR_fork 2
#define __NR_read 3
#define __NR_write 4
#define __NR_open 5
syscalls_32.h部分内容如下
__SYSCALL_I386(0, sys_restart_syscall, )
__SYSCALL_I386(1, sys_exit, )
#ifdef CONFIG_X86_32
__SYSCALL_I386(2, sys_fork, )
#else
__SYSCALL_I386(2, sys_fork, )
#endif
__SYSCALL_I386(3, sys_read, )
__SYSCALL_I386(4, sys_write, )
unistd_64.h和unistd_32.h文件定义了系统调用号,用来关联相应的系统调用,而且从unistd_64.h和unistd_32.h文件可以看出64bit和32bit系统的相同系统调用号对应的系统调用却是不同的
这里syscalls_32.h文件的内容看起来像是一些宏,具体表示什么呢?
在x86目录下全局搜索__SYSCALL_I386,发现被以下文件引用
- /arch/x86/entry/syscall_32.c
- /arch/x86/um/sys_call_table_32.c
- /arch/x86/kernel/asm-offsets_32.c
- /arch/x86/kernel/asm-offsets_64.c
- /arch/x86/um/user-offsets.c
个人感觉user-offsets.c和asm-offsets_64.c可能不是那么重要,不影响分析,先记下,有空再研究
而syscall_32.c和sys_call_table_32.c文件内容是类似的
且sys_call_table_32.c文件开头的注释引起了我的注意
/*
* System call table for UML/i386, copied from arch/x86/kernel/syscall_*.c
* with some changes for UML.
*/
大概意思就是该文件内容是从syscall_32.c复制过来并专门为UML/i386做了一些修改
那么UML是什么意思,经查资料,UML全称用户态Linux(User-mode Linux),将Linux编译为user mode使得该内核可以跑在另外一个操作系统上,详见维基
既然是针对UM的,那我们分析syscall_32.c即可
syscall_32.c内容
// SPDX-License-Identifier: GPL-2.0
/* System call table for i386. */

#include <linux/linkage.h>
#include <linux/sys.h>
#include <linux/cache.h>
#include <asm/asm-offsets.h>
#include <asm/syscall.h>

#define __SYSCALL_I386(nr, sym, qual) extern asmlinkage long sym(unsigned long, unsigned long, unsigned long, unsigned long, unsigned long, unsigned long) ;
#include <asm/syscalls_32.h>
#undef __SYSCALL_I386

#define __SYSCALL_I386(nr, sym, qual) [nr] = sym,

extern asmlinkage long sys_ni_syscall(unsigned long, unsigned long, unsigned long, unsigned long, unsigned long, unsigned long);

__visible const sys_call_ptr_t ia32_sys_call_table[__NR_syscall_compat_max+1] = {
    /*
    * Smells like a compiler bug -- it doesn't work
    * when the & below is removed.
    */
    [0 ... __NR_syscall_compat_max] = &sys_ni_syscall,
#include <asm/syscalls_32.h>
};
可以看到__SYSCALL_I386(nr, sym, qual)是个宏,且被定义了2次,用来分别解释unistd_32.h文件中的内容
一开始宏__SYSCALL_I386(nr, sym, qual)展开后是个函数声明,以unistd_32.h文件中的__SYSCALL_I386(1, sys_exit, )为例,将被展开为
extern asmlinkage long sys_exit(unsigned long, unsigned long, unsigned long, unsigned long, unsigned long, unsigned long) ;
接下来宏__SYSCALL_I386(nr, sym, qual)被展开为[nr] = sym,,以unistd_32.h文件中的__SYSCALL_I386(1, sys_exit, )为例,将被展开为
[1] = sys_exit,
然后定义了一个名为ia32_sys_call_table的数组,下标为系统调用号,元素为相应系统调用函数指针
这里ia32_sys_call_table其实是一个宏,指向一个定义在/arch/x86/include/asm/syscall.h中的数组,类型sys_call_ptr_t是一个函数指针,也定义在/arch/x86/include/asm/syscall.h
接下来查看ia32_sys_call_table在哪被调用,经查找,在/arch/x86/entry/common.c中被do_syscall_32_irqs_on调用
static __always_inline void do_syscall_32_irqs_on(struct pt_regs *regs)
{
    struct thread_info *ti = current_thread_info();
    unsigned int nr = (unsigned int)regs->orig_ax;

#ifdef CONFIG_IA32_EMULATION
    current->thread.status |= TS_COMPAT;
#endif

    if (READ_ONCE(ti->flags) & _TIF_WORK_SYSCALL_ENTRY) {
        /*
        * Subtlety here: if ptrace pokes something larger than
        * 2^32-1 into orig_ax, this truncates it.  This may or
        * may not be necessary, but it matches the old asm
        * behavior.
        */
        nr = syscall_trace_enter(regs);
    }

    if (likely(nr < IA32_NR_syscalls)) {
        /*
        * It's possible that a 32-bit syscall implementation
        * takes a 64-bit parameter but nonetheless assumes that
        * the high bits are zero.  Make sure we zero-extend all
        * of the args.
        */
    regs->ax = ia32_sys_call_table[nr](
            (unsigned int)regs->bx, (unsigned int)regs->cx,
            (unsigned int)regs->dx, (unsigned int)regs->si,
            (unsigned int)regs->di, (unsigned int)regs->bp);
    }

    syscall_return_slowpath(regs);
}
而do_syscall_32_irqs_on被同文件的定义的do_int80_syscall_32函数调用
/* Handles int $0x80 */
__visible void do_int80_syscall_32(struct pt_regs *regs)
{
    enter_from_user_mode();
    local_irq_enable();
    do_syscall_32_irqs_on(regs);
}
do_int80_syscall_32再被/arch/x86/entry/entry_32.S文件调用
ENTRY(entry_INT80_32)
    ASM_CLAC
    pushl    %eax            /* pt_regs->orig_ax */
    SAVE_ALL pt_regs_ax=$-ENOSYS    /* save rest */

    /*
    * User mode is traced as though IRQs are on, and the interrupt gate
    * turned them off.
    */
    TRACE_IRQS_OFF

    movl    %esp, %eax
    call    do_int80_syscall_32
.Lsyscall_32_done:
而ENTRY(entry_INT80_32)就是触发0x80 号中断后的入口
到这里linux内核的系统调用流程就差不多了
那么平时我们使用的glibc库是如何调用系统调用的呢?
从github上拉取glibc源码进行分析
首先,我们需要看系统调用在glibc的具体实现,具体实现源码是由 /sysdeps/unix/make-syscalls.sh脚本生成的,make-syscalls.sh脚本会读取syscalls.list文件为每个系统调用生成如下的一些宏
SYSCALL_NAME        syscall name
SYSCALL_NARGS        number of arguments this call takes
SYSCALL_SYMBOL        primary symbol name
SYSCALL_CANCELLABLE    1 if the call is a cancelation point
SYSCALL_NOERRNO        1 to define a no-errno version (see below)
SYSCALL_ERRVAL        1 to define an error-value version (see below)
然后将syscall-template.S文件内容#include进来生成相应系统调用代码文件。
看syscall-template.S文件中执行系统调用代码片段
/* This is a "normal" system call stub: if there is an error,
  it returns -1 and sets errno.  */

T_PSEUDO (SYSCALL_SYMBOL, SYSCALL_NAME, SYSCALL_NARGS)
    ret
T_PSEUDO_END (SYSCALL_SYMBOL)
宏T_PSEUDO 被定义展开为另一个宏PSEUDO
宏PSEUDO定义在/sysdeps/i386/sysdep.h
#define    PSEUDO(name, syscall_name, args)                      \
  .globl syscall_error;                                  \
lose: SYSCALL_PIC_SETUP                                  \
  jmp JUMPTARGET(syscall_error);                          \
  ENTRY (name)                                      \
  DO_CALL (syscall_name, args);                              \
  jb lose
宏ENTRY定义在/sysdeps/i386/sysdep.h
/* Define an entry point visible from C.

  There is currently a bug in gdb which prevents us from specifying
  incomplete stabs information.  Fake some entries here which specify
  the current source file.  */
#define    ENTRY(name)                                  \
  STABS_CURRENT_FILE1("")                              \
  STABS_CURRENT_FILE(name)                              \
  ASM_GLOBAL_DIRECTIVE C_SYMBOL_NAME(name);                      \
  ASM_TYPE_DIRECTIVE (C_SYMBOL_NAME(name),@function)                  \
  .align ALIGNARG(4);                                  \
  STABS_FUN(name)                                  \
  C_LABEL(name)                                      \
  cfi_startproc;                                  \
  CALL_MCOUNT
宏DO_CALL定义在/sysdeps/unix/sysv/linux/i386/sysdep.h
## define ENTER_KERNEL int $0x80

#define DO_CALL(syscall_name, args)                                \
    PUSHARGS_##args                                  \
    DOARGS_##args                                  \
    movl $SYS_ify (syscall_name), %eax;                          \
    ENTER_KERNEL                                  \
    POPARGS_##args
可以看到DO_CALL触发0x80 号中断
宏SYS_ify定义在/sysdeps/unix/sysv/linux/i386/sysdep.h
/* For Linux we can use the system call table in the header file
    /usr/include/asm/unistd.h
  of the kernel.  But these symbols do not follow the SYS_* syntax
  so we have to redefine the `SYS_ify' macro here.  */
#undef SYS_ify
#define SYS_ify(syscall_name)    __NR_##syscall_name
可以看到__NR_##syscall_name其实就是分析linux源码时候unistd_32.h文件所定义的系统调用号
根据代码理解如下: ENTRY(name)宏使得系统调用名称在C层是可见的,然后该系统调用具体实现就是DO_CALL (syscall_name, args);
参考: http://docs.huihoo.com/joyfire.net/6-1.html http://blog.csdn.net/gatieme/article/details/50779184 https://zhuanlan.zhihu.com/p/28984642 https://bbs.pku.edu.cn/v2/post-read.php?bid=13&threadid=16042150&page=a&postid=16206732
Issue 7 静态链接库的顺序问题
原文链接:https://github.com/chenpengcong/blog/issues/7
首先看如下示例代码
//main.c
void foo();
int main()
{
    foo();
}

//foo.c
void bar();
void foo()
{
    bar();
}

//bar.c
void bar()
{

}
可以看到有三个文件main.c, foo.c, bar.c,main.c中的调用的foo函数定义在foo.c,而foo函数调用的bar函数定义在bar.c
接下来将foo.c和bar.c编译成静态库
$ gcc -c foo.c -o foo.o
$ ar cr libfoo.a foo.o
$ gcc -c bar.c -o bar.o
$ ar cr libbar.a bar.o
编译main.c,链接相应静态库生成可执行文件
$ gcc main.c -L. -lfoo -lbar
成功
$gcc main.c -L. -lbar -lfoo
./libfoo.a(foo.o): In function `foo':
foo.c:(.text+0xa): undefined reference to `bar'
collect2: error: ld returned 1 exit status
失败,提示foo.o找不到符号bar的定义
为什么改变静态库的顺序会导致链接失败?我们需要了解链接器时怎么工作的
以链接成功的顺序为例,首先,链接器从左到右开始检索,记录下main.o中未解析的符号foo,然后从libfoo.a中的foo.o文件找到符号foo的解析,同时foo.o引入了未解析符号bar,继续往右检索,从libbar.a中的bar.o找到符号bar。
而如果将静态库顺序调整为libbar.a,libfoo.a,当链接器在向右检索符号foo的解析时,由于libbar.a不包含符号foo解析,因此被忽略跳过,而最后在libfoo.a中的foo.o中找到foo符号的解析时又引入了未解析符号bar,此时链接器不会重新往前进行检索,因此提示符号未定义错误。
了解了静态链接库的顺序问题,我们来介绍下静态链接库的另一个问题:循环依赖
看如下代码
//main.c
void foo();
int main()
{
    foo();
    return 0;
}

//foo.c
void bar();
void foo()
{
    bar();
}

//bar.c
void zar();
void bar()
{
    zar();
}

//zar.c
void zar()
{
}
将foo.o和zar.o一起打包成一个静态链接库,bar.o单独一个静态链接库
ar cr libfoo_zar.a foo.o zar.o
ar cr libbar.a bar.o
此时这两个库的依赖关系如下
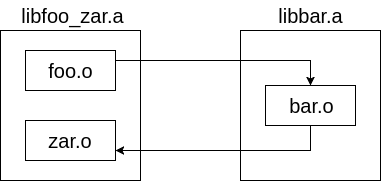
成功链接指令如下
gcc main.c -L. -lfoo_zar -lbar -lfoo_zar
失败链接指令如下
$ gcc main.c -L. -lbar -lfoo_zar -lbar
./libbar.a(bar.o): In function `bar':
bar.c:(.text+0xa): undefined reference to `zar'
collect2: error: ld returned 1 exit status
可以看到成功链接的指令使用了2次lfoo_zar,原因是foo.o依赖于bar.o,而bar.o又依赖于zar.o,这里容易误解的是当链接器检索到libfoo_zar.a时会解析符号zar,事实上并不会,链接器只会链接libfoo_zar.a中的foo.o文件用以解析符号foo,因此当链接libbar.a时引入了未解析符号zar,需要在-lbar后再次添加-lfoo_zar
关于链接的更细致描述推荐阅读这篇文章
为了避免由于静态链接库顺序造成的错误,可以使用--start-group … --end-group参数,该参数告诉linker在中间的...重复找寻smbol,直到没有新的未定义的symbol创建
执行命令如下:
$ gcc main.c -L. -Wl, --start-group -lfoo_zar -lbar -Wl, --end-group
参考: https://stackoverflow.com/questions/45135/why-does-the-order-in-which-libraries-are-linked-sometimes-cause-errors-in-gcc/409470#409470 http://novus.pixnet.net/blog/post/32736521-%E9%97%9C%E6%96%BC-ld-%E7%9A%84%E9%80%A3%E7%B5%90%E9%A0%86%E5%BA%8F http://wen00072.github.io/blog/2013/12/24/c-archive-reference-link/ https://eli.thegreenplace.net/2013/07/09/library-order-in-static-linking
Issue 9 使用objcopy将二进制文件的的内容作为目标文件中的一个段
objcopy命令可以将目标文件的内容复制到另一个目标文件,使用GNU BFD库来读取和写入对象文件。它可以用与源目标文件不同的格式写目标文件。
文本文件data内容如下:
cike
使用objcopy处理该文本文件生成目标文件
$ objcopy -I binary -O elf64-x86-64 -B i386:x86-64 data data.o
选项-I指定源文件的格式,-O指定输出的目标文件的格式,-B指定输出目标文件的架构
目标文件格式和架构的选择可以使用objdump命令对本机中的随意一个ELF文件进行查看获取
$ objdump -x a.out
a.out:    file format elf64-x86-64
a.out
architecture: i386:x86-64, flags 0x00000150:
HAS_SYMS, DYNAMIC, D_PAGED
start address 0x0000000000000540
可以看到在本机编译出来的ELF文件文件格式为elf64-x86-64,架构为i386:x86-64
查看生成的data.o的段内容和符号表
$ objdump -st data.o
输出如下
ata.o:    file format elf64-x86-64

SYMBOL TABLE:
0000000000000000 l    d  .data    0000000000000000 .data
0000000000000000 g      .data    0000000000000000 _binary_data_start
0000000000000005 g      .data    0000000000000000 _binary_data_end
0000000000000005 g      *ABS*    0000000000000000 _binary_data_size

Contents of section .data:
0000 63696b65 0a                          cike.
可以看到.data段的内容即文本文件data里的内容
而符号_binary_data_start, _binary_data_end和_binary_data_size分别表示data文件内容在内存中的起始地址,结束地址和大小,我们可以直接在程序里面直接声明并使用它们
写了个测试程序来使用这3个符号,加深理解
#include "stdio.h"
extern char _binary_data_size;
extern char _binary_data_start;
extern char _binary_data_end;
int main()
{
    char *start;
    char *end;
    int index = 0;
    int size = 0;
    start = &_binary_data_start;
    end = &_binary_data_end;
    size = end - start + 1 - 2;//substrct 0x0a and 0x00
    while (start <= end) {
        printf("index %d :%d\n", index, *start);
        start++;
        index++;
    }
    printf("size: %d\n", size);
    return 0;
}
编译: $ gcc test_objcopy.c data.o
运行结果如下
index 0 :99
index 1 :105
index 2 :107
index 3 :101
index 4 :10
index 5 :0
size: 4
其中对于变量_binary_data_size的使用有点疑惑,不知道它究竟是个什么类型,但其实根据其余两个变量也可以计算出size
参考: 《程序员的自我修养》 http://wen00072.github.io/blog/2014/04/16/load-linux-using-c-language-data-object-archives-data-continued/ http://blog.csdn.net/astrotycoon/article/details/9901679
Issue10 弱符号的使用
对于弱符号的定义参见维基,这里不详细介绍,主要介绍weak和weakref的使用方法和使用场景
weak和weakref的使用场景可能有下面两种:
- 我们需要编写一个库,库中定义的弱符号可以被用户定义的强符号所覆盖,从而使得程序可以使用自定义版本的库函数
- 程序在未正常链接某个库时也可以正常运行,不报错。
第一个场景可以使用weak实现,只需要使用__attribute__((weak))将库中的符号设置为弱符号即可。
第二个场景可以使用weak,也可以使用weakref实现,做法就是在主程序中将引用的符号定义为弱符号,如下代码
static __attribute__((weakref("foo"))) void bar();
int main()
{
	if (bar) {
		bar();
		//...
	}
}
__attribute__((weak)) void foo();
int main()
{
	if (foo) {
		foo();
	}
}
接下来重点介绍弱符号使用过程的一些问题,看如下代码示例
//main.c
void foo();
int main()
{
    foo();
}
//test1.c
#include "stdio.h"
void foo()
{
    printf("strong foo defined in test1.c");
}
//test2.c
#include "stdio.h"
__attribute__((weak))void foo()
{
    printf("weak foo defined in test2.c");
}
编译,运行
$ gcc -c main.c -o main.o
$ gcc -c test1.c -o test1.o
$ gcc -c test2.c -o test2.o
$ gcc main.o test1.o test2.o -o main1
$ gcc main.o test2.o test1.o -o main2
$ ./main1
strong foo defined in test1.c
$ ./main2
strong foo defined in test1.c
编译,运行
$ gcc  -c main.c -o main.o
$ gcc  -c test1.c -o test1.o
$ gcc  -c test2.c -o test2.o
$ gcc  test1.o -fPIC -shared -o libtest1.so
$ gcc  test2.o -fPIC -shared -o libtest2.so
$ gcc  main.o -o main1 -L. -ltest1 -ltest2
$ gcc  main.o -o main2 -L. -ltest2 -ltest1
$ ./main1
strong foo defined in test1.c
$ ./main2
weak foo defined in test2.c
可以看到两次编译运行的结果不一致,为什么编译命令中动态共享库的顺序会影响结果的输出?
经过一番分析,发现两个可执行程序都只依赖了libtest1.so和libtest2.so中的一个
ldd命令查看:ldd main1 main2
输出结果如下
main1:
	linux-vdso.so.1 =>  (0x00007fffcebf7000)
	libtest1.so (0x00007f76e3c6b000)
	libc.so.6 => /lib/x86_64-linux-gnu/libc.so.6 (0x00007f76e388b000)
	/lib64/ld-linux-x86-64.so.2 (0x00007f76e406f000)
main2:
	linux-vdso.so.1 =>  (0x00007ffe9c5f2000)
	libtest2.so (0x00007ff45701d000)
	libc.so.6 => /lib/x86_64-linux-gnu/libc.so.6 (0x00007ff456c3d000)
	/lib64/ld-linux-x86-64.so.2 (0x00007ff457421000)
可以看到main1只依赖了libtest1.so,而main2只依赖了libtest2.so
根据这个结果可以猜测:当我们指定链接库顺序为-ltest2 -ltes1时,链接器在解析main.c中的符号foo时先从libtest2.so中找到了foo的定义,即使libtest2.so中的foo是弱符号,此时程序已不存在未解析符号,那么就不再依赖libtest1.so,那么自然不会使用libtest1.so中的强符号。
那如果让主程序同时依赖于libtest1.so和libtest2.so呢,会不会使用后找到的强符号来替换之前找到的弱符号,我们修改代码如下
//test1.c
#include "stdio.h"
void foo()
{
    printf("strong foo defined in test1.c\n");
}
void fun1()
{
}
//test2.c
#include "stdio.h"
__attribute__((weak))void foo()
{
    printf("weak foo defined in test2.c\n");
}
void fun2()
{
}
//main.c
void foo();
void fun1();
void fun2();
int main()
{
    foo();
    fun1();
    fun2();
}
编译运行
gcc  -c main.c -o main.o
gcc  -c test1.c -o test1.o
gcc  -c test2.c -o test2.o
gcc  test1.o -fPIC -shared -O2 -o libtest1.so
gcc  test2.o -fPIC -shared -O2 -o libtest2.so
gcc  main.o -o main1 -L. -ltest1 -ltest2
gcc  main.o -o main2 -L. -ltest2 -ltest1
./main1
strong foo defined in test1.c
./main2
weak foo defined in test2.c
结果还是使用了弱符号。
使用$ ldd main1 main2确认下是否同时依赖了两个so
$ ldd main1 main2
main1:
	linux-vdso.so.1 =>  (0x00007ffd6e5f0000)
	libtest1.so (0x00007f1ad20ec000)
	libtest2.so (0x00007f1ad1eea000)
	libc.so.6 => /lib/x86_64-linux-gnu/libc.so.6 (0x00007f1ad1b0a000)
	/lib64/ld-linux-x86-64.so.2 (0x00007f1ad24f0000)
main2:
	linux-vdso.so.1 =>  (0x00007ffc4be82000)
	libtest2.so (0x00007f3852601000)
	libtest1.so (0x00007f38523ff000)
	libc.so.6 => /lib/x86_64-linux-gnu/libc.so.6 (0x00007f385201f000)
	/lib64/ld-linux-x86-64.so.2 (0x00007f3852a05000)
明显已经依赖了,难道gcc解析符号时默认使用最先找到的foo,即使该符号是弱符号?
经查阅资料,发现是glibc的动态链接器问题,在旧版本的glibc下,链接器如果找到一个弱符号,它会记住那个符号,并继续搜索剩下的共享库,如果它随后发现同样符号的强定义,那么它会替换之前的弱定义(如果没有找到更多的符号,那么动态链接器会使用最初找到的弱符号)。
而新版本glibc的动态链接器将解析符号为第一个它找到的定义(即使它为弱符号),不会继续往下找。
该问题可以通过定义环境变量LD_DYNAMIC_WEAK 来使用旧版本glibc的行为,环境变量的说明见这里或使用$ man ld.so查看
定义该环境变量并重新运行
$ export LD_DYNAMIC_WEAK=any_value
$ ./main2
strong foo defined in test1.c
可以看到现在使用的是强符号了。
通过上面分析,我认为最重要的两个注意点如下
第一个注意点:确保链接器链接了库
比如上述的示例代码,由于主程序只用到库中的一个符号,且两个库都提供了该符号的定义,导致编译出来的可执行程序只依赖了其中的某个库,导致结果与我们的预期不符合。
除了上述情况容易导致链接器没有链接到库以外,还有一种情况值得注意,比如下述代码
//main.c
__attribute__((weak)) void foo();
/*void fun1();*/
int main()
{
	if (foo) {
		foo();
		/*fun1();*/
	}
}
//test1.c
#include "stdio.h"
void foo()
{
    printf("strong foo defined in test1.c\n");
}
void fun1()
{
}
编译运行
$ gcc test1.c -fpic -shared -o libtest1.so
$ gcc main.c -o main -L. -ltest1
$ ldd main
	linux-vdso.so.1 =>  (0x00007ffd18dd2000)
	libc.so.6 => /lib/x86_64-linux-gnu/libc.so.6 (0x00007f727abd1000)
	/lib64/ld-linux-x86-64.so.2 (0x00007f727b1b3000)
可以看到生成的可执行程序并没有依赖libtest1.so,主程序的foo也就不使用被libtest1.so中的强定义,符号foo此时默认为0
从该结果可以看出如果主程序如果只用到库中某个符号,且将该符号定义为弱符号,那么并不会去链接该库,但是这里有点奇怪的是如果我程序中没用到pthread,但我指定链接它,用ldd命令查看确实链接了libpthread.so(待后续研究下)
那么如何修改呢,只要打开main.c中的注释,让主程序使用库中的其他符号即可。
第二个注意点:针对高版本glibc,使用动态链接时要注意使用环境变量**LD_DYNAMIC_WEAK**
参考&阅读拓展: https://gcc.gnu.org/ml/gcc-help/2011-03/msg00206.html https://gcc.gnu.org/ml/gcc/2005-10/msg00235.html https://gcc.gnu.org/ml/gcc-help/2013-04/msg00068.html https://stackoverflow.com/questions/13089166/how-to-make-gcc-link-strong-symbol-in-static-library-to-overwrite-weak-symbol https://stackoverflow.com/questions/43136845/weak-linking-in-shared-object-not-working-as-expected https://stackoverflow.com/questions/23079997/override-weak-symbols-in-static-library
Issue11 符号地址的确定
用以下示例代码作为示例,理解链接器在链接目标文件时是如何确定符号地址
//a.c
extern int shared;
extern int shared2;

int main()
{
    int a = 100;
    swap(&a, &shared);
    swap(&a, &shared2);
}

//b.c
int shared = 1;

void swap(int *a, int *b)
{
    *a ^= *b ^= *a ^= *b;
}

//c.c
int shared2 = 1;

void swap2(int *a, int *b)
{
    *a ^= *b ^= *a ^= *b;
}
下面分析如何确定各个符号的虚拟地址
首先编译.c文件,分析生成的目标文件的段位置和段长度$ readelf -S a.o b.o c.o
File: a.o
There are 12 section headers, starting at offset 0x330:

Section Headers:
  [Nr] Name              Type            Address          Offset
      Size              EntSize          Flags  Link  Info  Align
  [ 0]                  NULL            0000000000000000  00000000
      0000000000000000  0000000000000000          0    0    0
  [ 1] .text            PROGBITS        0000000000000000  00000040
      0000000000000046  0000000000000000  AX      0    0    1
  [ 2] .rela.text        RELA            0000000000000000  00000258
      0000000000000060  0000000000000018  I      9    1    8
  [ 3] .data            PROGBITS        0000000000000000  00000086
      0000000000000000  0000000000000000  WA      0    0    1
  [ 4] .bss              NOBITS          0000000000000000  00000086
      0000000000000000  0000000000000000  WA      0    0    1
  [ 5] .comment          PROGBITS        0000000000000000  00000086
      0000000000000026  0000000000000001  MS      0    0    1
  [ 6] .note.GNU-stack  PROGBITS        0000000000000000  000000ac
      0000000000000000  0000000000000000          0    0    1
  [ 7] .eh_frame        PROGBITS        0000000000000000  000000b0
      0000000000000038  0000000000000000  A      0    0    8
  [ 8] .rela.eh_frame    RELA            0000000000000000  000002b8
      0000000000000018  0000000000000018  I      9    7    8
  [ 9] .symtab          SYMTAB          0000000000000000  000000e8
      0000000000000138  0000000000000018          10    8    8
  [10] .strtab          STRTAB          0000000000000000  00000220
      0000000000000034  0000000000000000          0    0    1
  [11] .shstrtab        STRTAB          0000000000000000  000002d0
      0000000000000059  0000000000000000          0    0    1

File: b.o
There are 11 section headers, starting at offset 0x268:

Section Headers:
  [Nr] Name              Type            Address          Offset
      Size              EntSize          Flags  Link  Info  Align
  [ 0]                  NULL            0000000000000000  00000000
      0000000000000000  0000000000000000          0    0    0
  [ 1] .text            PROGBITS        0000000000000000  00000040
      000000000000004b  0000000000000000  AX      0    0    1
  [ 2] .data            PROGBITS        0000000000000000  0000008c
      0000000000000004  0000000000000000  WA      0    0    4
  [ 3] .bss              NOBITS          0000000000000000  00000090
      0000000000000000  0000000000000000  WA      0    0    1
  [ 4] .comment          PROGBITS        0000000000000000  00000090
      0000000000000026  0000000000000001  MS      0    0    1
  [ 5] .note.GNU-stack  PROGBITS        0000000000000000  000000b6
      0000000000000000  0000000000000000          0    0    1
  [ 6] .eh_frame        PROGBITS        0000000000000000  000000b8
      0000000000000038  0000000000000000  A      0    0    8
  [ 7] .rela.eh_frame    RELA            0000000000000000  000001f8
      0000000000000018  0000000000000018  I      8    6    8
  [ 8] .symtab          SYMTAB          0000000000000000  000000f0
      00000000000000f0  0000000000000018          9    8    8
  [ 9] .strtab          STRTAB          0000000000000000  000001e0
      0000000000000011  0000000000000000          0    0    1
  [10] .shstrtab        STRTAB          0000000000000000  00000210
      0000000000000054  0000000000000000          0    0    1

File: c.o
There are 11 section headers, starting at offset 0x250:

Section Headers:
  [Nr] Name              Type            Address          Offset
      Size              EntSize          Flags  Link  Info  Align
  [ 0]                  NULL            0000000000000000  00000000
      0000000000000000  0000000000000000          0    0    0
  [ 1] .text            PROGBITS        0000000000000000  00000040
      000000000000002d  0000000000000000  AX      0    0    1
  [ 2] .data            PROGBITS        0000000000000000  00000070
      0000000000000004  0000000000000000  WA      0    0    4
  [ 3] .bss              NOBITS          0000000000000000  00000074
      0000000000000000  0000000000000000  WA      0    0    1
  [ 4] .comment          PROGBITS        0000000000000000  00000074
      0000000000000026  0000000000000001  MS      0    0    1
  [ 5] .note.GNU-stack  PROGBITS        0000000000000000  0000009a
      0000000000000000  0000000000000000          0    0    1
  [ 6] .eh_frame        PROGBITS        0000000000000000  000000a0
      0000000000000038  0000000000000000  A      0    0    8
  [ 7] .rela.eh_frame    RELA            0000000000000000  000001e0
      0000000000000018  0000000000000018  I      8    6    8
  [ 8] .symtab          SYMTAB          0000000000000000  000000d8
      00000000000000f0  0000000000000018          9    8    8
  [ 9] .strtab          STRTAB          0000000000000000  000001c8
      0000000000000013  0000000000000000          0    0    1
  [10] .shstrtab        STRTAB          0000000000000000  000001f8
      0000000000000054  0000000000000000          0    0    1
从输出中我们可以获得以下信息
| 文件 | 段 | 大小 | 虚拟地址 |
|---|---|---|---|
| a.o | .text | 0x46 | 0x00 |
| a.o | .data | 0x00 | 0x00 |
| b.o | .text | 0x4b | 0x00 |
| b.o | .data | 0x04 | 0x00 |
| c.o | .text | 0x2d | 0x00 |
| c.o | .data | 0x04 | 0x00 |
接下来查看符号表信息$ readelf -s a.o b.o c.o
File: a.o

Symbol table '.symtab' contains 13 entries:
  Num:    Value          Size Type    Bind  Vis      Ndx Name
    0: 0000000000000000    0 NOTYPE  LOCAL  DEFAULT  UND
    1: 0000000000000000    0 FILE    LOCAL  DEFAULT  ABS a.c
    2: 0000000000000000    0 SECTION LOCAL  DEFAULT    1
    3: 0000000000000000    0 SECTION LOCAL  DEFAULT    3
    4: 0000000000000000    0 SECTION LOCAL  DEFAULT    4
    5: 0000000000000000    0 SECTION LOCAL  DEFAULT    6
    6: 0000000000000000    0 SECTION LOCAL  DEFAULT    7
    7: 0000000000000000    0 SECTION LOCAL  DEFAULT    5
    8: 0000000000000000    70 FUNC    GLOBAL DEFAULT    1 main
    9: 0000000000000000    0 NOTYPE  GLOBAL DEFAULT  UND shared
    10: 0000000000000000    0 NOTYPE  GLOBAL DEFAULT  UND _GLOBAL_OFFSET_TABLE_
    11: 0000000000000000    0 NOTYPE  GLOBAL DEFAULT  UND swap
    12: 0000000000000000    0 NOTYPE  GLOBAL DEFAULT  UND shared2

File: b.o

Symbol table '.symtab' contains 10 entries:
  Num:    Value          Size Type    Bind  Vis      Ndx Name
    0: 0000000000000000    0 NOTYPE  LOCAL  DEFAULT  UND
    1: 0000000000000000    0 FILE    LOCAL  DEFAULT  ABS b.c
    2: 0000000000000000    0 SECTION LOCAL  DEFAULT    1
    3: 0000000000000000    0 SECTION LOCAL  DEFAULT    2
    4: 0000000000000000    0 SECTION LOCAL  DEFAULT    3
    5: 0000000000000000    0 SECTION LOCAL  DEFAULT    5
    6: 0000000000000000    0 SECTION LOCAL  DEFAULT    6
    7: 0000000000000000    0 SECTION LOCAL  DEFAULT    4
    8: 0000000000000000    4 OBJECT  GLOBAL DEFAULT    2 shared
    9: 0000000000000000    75 FUNC    GLOBAL DEFAULT    1 swap

File: c.o

Symbol table '.symtab' contains 10 entries:
  Num:    Value          Size Type    Bind  Vis      Ndx Name
    0: 0000000000000000    0 NOTYPE  LOCAL  DEFAULT  UND
    1: 0000000000000000    0 FILE    LOCAL  DEFAULT  ABS c.c
    2: 0000000000000000    0 SECTION LOCAL  DEFAULT    1
    3: 0000000000000000    0 SECTION LOCAL  DEFAULT    2
    4: 0000000000000000    0 SECTION LOCAL  DEFAULT    3
    5: 0000000000000000    0 SECTION LOCAL  DEFAULT    5
    6: 0000000000000000    0 SECTION LOCAL  DEFAULT    6
    7: 0000000000000000    0 SECTION LOCAL  DEFAULT    4
    8: 0000000000000000    4 OBJECT  GLOBAL DEFAULT    2 shared2
    9: 0000000000000000    45 FUNC    GLOBAL DEFAULT    1 swap2
从输出中我们可以获得如下信息
| 文件 | 符号 | 符号值 | 大小 |
|---|---|---|---|
| a.o | main | 0x00 | 70 |
| b.o | shared | 0x00 | 4 |
| b.o | swap | 0x00 | 75 |
| c.o | shared2 | 0x00 | 4 |
| c.o | swap2 | 0x00 | 45 |
链接a.o, b.o, c.o
$ ld a.o b.o c.o -e main -o abc
查看abc的段表
$ readelf -S abc
There are 9 section headers, starting at offset 0x12b0:

Section Headers:
  [Nr] Name              Type            Address          Offset
      Size              EntSize          Flags  Link  Info  Align
  [ 0]                  NULL            0000000000000000  00000000
      0000000000000000  0000000000000000          0    0    0
  [ 1] .text            PROGBITS        00000000004000e8  000000e8
      00000000000000be  0000000000000000  AX      0    0    1
  [ 2] .eh_frame        PROGBITS        00000000004001a8  000001a8
      0000000000000078  0000000000000000  A      0    0    8
  [ 3] .got.plt          PROGBITS        0000000000601000  00001000
      0000000000000018  0000000000000008  WA      0    0    8
  [ 4] .data            PROGBITS        0000000000601018  00001018
      0000000000000008  0000000000000000  WA      0    0    4
  [ 5] .comment          PROGBITS        0000000000000000  00001020
      0000000000000025  0000000000000001  MS      0    0    1
  [ 6] .symtab          SYMTAB          0000000000000000  00001048
      00000000000001c8  0000000000000018          7    11    8
  [ 7] .strtab          STRTAB          0000000000000000  00001210
      000000000000005a  0000000000000000          0    0    1
  [ 8] .shstrtab        STRTAB          0000000000000000  0000126a
      0000000000000043  0000000000000000          0    0    1
从输出中我们可以获得如下信息
| 段名 | 虚拟地址 |
|---|---|
| .text | 0x4000e8 |
| .data | 0x601018 |
获得以上信息后,可以计算出各个符号的地址了,这里我们先手动计算各个符号的地址,再使用readelf查看符号表验证下结果,计算过程如下:
因为链接器是使用相似段合并的策略来合并生成可执行程序abc的,因此生成文件的.text段就是a.o,b.o和c.o的.text段的拼接,那么我们可以计算出a.o的.text段的内容最终的起始虚拟地址为0x4000e8(abc中.text段的虚拟地址) + 0x00(a.o中.text段的偏移) = 0x4000e8,结束地址为0x4000e8 + 0x46(a.o的.text段的大小) = 0x40012e,b.o的.text段的起始地址为0x40012e(a.o中.text段的内容在文件abc中的结束地址) + 0x00(b.o的.text段的偏移) = 0x40012e, 结束地址为0x40012e + 0x4b(b.o的.text段的大小) = 0x400179,c.o的.text段起始地址为0x400179(c.o中.text段的内容在文件abc中的结束地址) + 0x00(c.o中.text段的偏移) = 0x400179,结束地址为0x400179+ 0x2d(c.o的.text段的大小) = 0x4001a6
.data段计算原理一样,,计算结果如下:
- a.o的.data起始地址:
0x601018 + 0x00,结束地址:0x601018 + 0x00 = 0x601018 - b.o的.data起始地址:
0x601018 + 0x00,结束地址:0x601018 + 0x04 = 0x60101c - c.o的.data起始地址:
0x60101c + 0x00,结束地址:0x60101c + 0x04 = 0x601020
而根据符号表的输出结果我们拿到了符号在对应段中的偏移量(符号值),下面以两个符号的计算过程为例
- b.o中的shared符号,它是在b.o中的.data段,偏移量为0,大小为4,那么该符号在文件abc中的虚拟地址为
0x601018(b.o的.data段在abc中的虚拟地址) + 0x00 = 0x601018 - c.o中的swap2符号,它在c.o中的.text段,偏移量为0x00, 大小为45,那么该符号在文件abc中的虚拟地址为
0x400179(c.o的.text段在abc中的虚拟地址)+ 0x00 = 0x400179
其他符号同理,最终计算结果如下
- main: 0x4000e8 + 0x00 = 0x4000e8
- shared: 0x601018 + 0x00 = 0x601018
- swap: 0x40012e + 0x00 = 0x40012e
- shared2: 0x60101c + 0x00 = 0x60101c
- swap2: 0x400179+ 0x00 = 0x400179
使用readelf命令验证下结果
$ readelf -s abc
输出如下
Symbol table '.symtab' contains 19 entries:
  Num:    Value          Size Type    Bind  Vis      Ndx Name
    0: 0000000000000000    0 NOTYPE  LOCAL  DEFAULT  UND
    1: 00000000004000e8    0 SECTION LOCAL  DEFAULT    1
    2: 00000000004001a8    0 SECTION LOCAL  DEFAULT    2
    3: 0000000000601000    0 SECTION LOCAL  DEFAULT    3
    4: 0000000000601018    0 SECTION LOCAL  DEFAULT    4
    5: 0000000000000000    0 SECTION LOCAL  DEFAULT    5
    6: 0000000000000000    0 FILE    LOCAL  DEFAULT  ABS a.c
    7: 0000000000000000    0 FILE    LOCAL  DEFAULT  ABS b.c
    8: 0000000000000000    0 FILE    LOCAL  DEFAULT  ABS c.c
    9: 0000000000000000    0 FILE    LOCAL  DEFAULT  ABS
    10: 0000000000601000    0 OBJECT  LOCAL  DEFAULT    3 _GLOBAL_OFFSET_TABLE_
    11: 000000000040012e    75 FUNC    GLOBAL DEFAULT    1 swap
    12: 0000000000601018    4 OBJECT  GLOBAL DEFAULT    4 shared
    13: 000000000060101c    4 OBJECT  GLOBAL DEFAULT    4 shared2
    14: 0000000000601020    0 NOTYPE  GLOBAL DEFAULT    4 __bss_start
    15: 00000000004000e8    70 FUNC    GLOBAL DEFAULT    1 main
    16: 0000000000400179    45 FUNC    GLOBAL DEFAULT    1 swap2
    17: 0000000000601020    0 NOTYPE  GLOBAL DEFAULT    4 _edata
    18: 0000000000601020    0 NOTYPE  GLOBAL DEFAULT    4 _end
可以看到与计算出来的一致。
参考:《程序员自我修养》4.1
Issue12 重定位
当链接器确定了每个section,以及每个符号的运行时地址后(符号地址的确定可以参考上篇文章),需要修改代码段和数据段中对每个符号的引用,使得它们指向正确的运行时地址。
比如有以下代码
//a.c
extern int global_var;

void foo();
int main()
{
    int a = global_var;
    foo();
    return 0;
}

//b.c
int global_var = 1;

void foo()
{
}
进行编译,链接: $ gcc -c a.c b.c && ld a.o b.o -e main -o ab
接下来开始分析:
首先反汇编a.o: $ $ objdump -d a.o
a.o: file format elf64-x86-64
Disassembly of section .text:
0000000000000000 <main>:
   0:    55     push %rbp
   1:    48 89 e5     mov %rsp,%rbp
   4:    48 83 ec 10     sub $0x10,%rsp
   8:    8b 05 00 00 00 00     mov 0x0(%rip),%eax # e <main+0xe>
   e:    89 45 fc     mov %eax,-0x4(%rbp)
  11:    b8 00 00 00 00     mov $0x0,%eax
  16:    e8 00 00 00 00     callq 1b <main+0x1b>
  1b:    b8 00 00 00 00     mov $0x0,%eax
  20:    c9     leaveq
  21:    c3     retq
地址0x08处的指令:
8: 8b 05 00 00 00 00 mov 0x0(%rip),%eax # e
表示将0x00 + R[rip]即(0x00 + 0x0e)复制到寄存器%eax,寄存器%eax用来存放变量a的值,由于全局变量定义在其他目标文件中,此时编译器并不知道global_var的地址,所以编译器把寄存器rip的值(下一条命令的地址)看作是全局变量global_var的地址。
继续看地址0x16处的指令:
16: e8 00 00 00 00 callq 1b
表示一个过程调用,过程调用的起始地址为0x01b,该命令就是调用函数foo,与上述global_var的地址类似,编译器将函数foo的起始地址设置为该指令的下一条指令地址
编译器将这两条指令的地址暂时用0x0e和0x1b代替着,把真正的地址计算工作留给了链接器。
而链接器通过重定位表找到需要被修改的指令并进行调整
查看a.o的重定位表: readelf -r a.o
Relocation section '.rela.text' at offset 0x210 contains 2 entries:
  Offset Info Type Sym. Value Sym. Name + Addend
00000000000a 000900000002 R_X86_64_PC32 0000000000000000 global_var - 4
000000000017 000b00000004 R_X86_64_PLT32 0000000000000000 foo - 4
可以看到有两个重定位入口(每个要被重定位地方称为一个重定位入口)
offset是重定位入口偏移:这个值是该重定位入口所要修正的位置的第一个字节相对于段起始的偏移。
在a.o中0x0a和0x17分别是代码段中mov指令和call指令的地址部分
type是指重定位类型,用来告知链接器如何修改重定位入口
重定位类型及其重定位修正方法如下图
A Represents the addend used to compute the value of the relocatable field. B Represents the base address at which a shared object has been loaded into memory during execution. Generally, a shared object is built with a 0 base virtual address, but the execution address will be different. G Represents the offset into the global offset table at which the relocation entry’s symbol will reside during execution. GOT Represents the address of the global offset table. L Represents the place (section offset or address) of the Procedure Linkage Table entry for a symbol. P Represents the place (section offset or address) of the storage unit being relocated (computed using r_offset). S Represents the value of the symbol whose index resides in the relocation entry. Z Represents the size of the symbol whose index resides in the relocation entry.
| Name | Value | Field | Calculation |
|---|---|---|---|
| R_X86_64_NONE | 0 | none | none |
| R_X86_64_64 | 1 | word64 | S+A |
| R_X86_64_PC32 | 2 | word32 | S+A-P |
| R_X86_64_GOT32 | 3 | word32 | G+A |
| R_X86_64_PLT32 | 4 | word32 | L+A-P |
| R_X86_64_COPY | 5 | none | none |
| R_X86_64_GLOB_DAT | 6 | word64 | S |
| R_X86_64_JUMP_SLOT | 7 | word64 | S |
| R_X86_64_RELATIVE | 8 | word64 | B+A |
| R_X86_64_GOTPCREL | 9 | word32 | G+GOT+A-P |
| R_X86_64_32 | 10 | word32 | S+A |
| R_X86_64_32S | 11 | word32 | S+A |
| R_X86_64_16 | 12 | word16 | S+A |
| R_X86_64_PC16 | 13 | word16 | S+A-P |
| R_X86_64_8 | 14 | word8 | S+A |
| R_X86_64_PC8 | 15 | word8 | S+A-P |
| R_X86_64_DTPMOD64 | 16 | word64 | |
| R_X86_64_DTPOFF64 | 17 | word64 | |
| R_X86_64_TPOFF64 | 18 | word64 | |
| R_X86_64_TLSGD | 19 | word32 | |
| R_X86_64_TLSLD | 20 | word32 | |
| R_X86_64_DTPOFF32 | 21 | word32 | |
| R_X86_64_GOTTPOFF | 22 | word32 | |
| R_X86_64_TPOFF32 | 23 | word32 | |
| R_X86_64_PC64 | 24 | word64 | S+A-P |
| R_X86_64_GOTOFF64 | 25 | word64 | S+A-GOT |
| R_X86_64_GOTPC32 | 26 | word32 | GOT+A-P |
| R_X86_64_GOT64 | 27 | word64 | G + A |
| R_X86_64_GOTPCREL64 | 28 | word64 | G + GOT - P + A |
| R_X86_64_GOTPC64 | 29 | word64 | GOT - P + A |
| R_X86_64_GOTPLT64 | 30 | word64 | G + A |
| R_X86_64_PLTOFF64 | 31 | word64 | L - GOT + A |
| R_X86_64_SIZE32 | 32 | word32 | Z+A |
| R_X86_64_SIZE64 | 33 | word64 | Z+A |
| R_X86_64_GOTPC32_TLSDESC | 34 | word32 | |
| R_X86_64_TLSDESC_CALL | 35 | none | |
| R_X86_64_TLSDESC | 36 | word64x2 |
以重定位global_var为例
从上面查看重定位表可知global_var的重定位类型为R_X86_64_PC32,那么修正后的地址值计算公式为S - P + A
S = 符号的实际地址
P = 被修正的位置(即重定位入口所要修正的位置)
A = 重定位表中的addend字段
查看链接后的可执行程序ab中global_var的虚拟地址:readelf -s ab
Symbol table '.symtab' contains 16 entries:
   Num:    Value          Size Type    Bind   Vis      Ndx Name
    ...
    10: 0000000000601018     4 OBJECT  GLOBAL DEFAULT    4 global_var
    ...
S = 0x601018
接下来查看global_var对应重定位入口的偏移量和addend常量,从上面查看的重定位表可以得到
- offset(global_var) = 0x0a
- A = addend = -4
要得到被修正的位置P,我们需要查看段表获取ab中.text段的地址:readelf -S ab
readelf -S ab
There are 9 section headers, starting at offset 0x1258:

Section Headers:
  [Nr] Name              Type             Address           Offset
       Size              EntSize          Flags  Link  Info  Align
  [ 0]                   NULL             0000000000000000  00000000
       0000000000000000  0000000000000000           0     0     0
  [ 1] .text             PROGBITS         00000000004000e8  000000e8
       0000000000000029  0000000000000000  AX       0     0     1
    ...
此时我们可以求出P = addr(.text) + offset(global_var) = 0x4000e8 + 0x0a = 0x4000f2
最后求出S - P + A = 0x601018 - 0x4000f2 - 0x04 = 0x200f22
所以修正后的地址值为0x200f22
反编译程序ab:objdump -d ab
objdump -d ab
ab: file format elf64-x86-64
Disassembly of section .text:
00000000004000e8 <main>:
  4000e8:    55     push %rbp
  4000e9:    48 89 e5     mov %rsp,%rbp
  4000ec:    48 83 ec 10     sub $0x10,%rsp
  4000f0:    8b 05 22 0f 20 00     mov 0x200f22(%rip),%eax # 601018 <global_var>
  4000f6:    89 45 fc     mov %eax,-0x4(%rbp)
  4000f9:    b8 00 00 00 00     mov $0x0,%eax
  4000fe:    e8 07 00 00 00     callq 40010a <foo>
  400103:    b8 00 00 00 00     mov $0x0,%eax
  400108:    c9     leaveq
  400109:    c3     retq
本机环境为小端
可以看到最终修正后的值确实是0x200f22
TODO:关于符号foo的重定位计算有些疑惑,虽然符号类型是R_X86_64_PLT32,但是重定位后的地址值却符合S + A - P计算规则
参考: 《程序员自我修养》4.2章节-符号解析与重定位 《深入理解计算机系统第3版》7.7章节-重定位 http://www.mindfruit.co.uk/2012/06/relocations-relocations.html#reloc_types_table
Issue13 不依赖glibc的HelloWorld程序
本文使用gcc扩展汇编写实现一个不依赖C标准库glibc的HelloWorld程序,并简单介绍链接控制脚本的使用。
我们知道glibc库的printf函数最终是使用write系统调用向终端输出字符,既然我们想编写一个不依赖运行时库的最"小"的HelloWorld程序,那么我们就得自己来进行系统调用
在x86架构可以使用0x80号中断(int 0x80)来进行系统调用
在x86_64架构除了使用0x80号中断以外,还有一个专用的指令syscall可以进行系统调用(更加高效),
两种方式实现如下,需要用到gcc扩展汇编知识,可以参考这里
int 0x80
char *str = "Hello world!\n";
void print()
{
    asm("movl $13, %%edx \n\t"
        "movl %0, %%ecx \n\t"
        "movl $1, %%ebx \n\t"
        "movl $4, %%eax \n\t"
        "int $0x80 \n\t"
        ::"r"(str):"edx", "ecx", "ebx", "esi");
}
void exit()
{
    asm("movl $42, %ebx \n\t"
        "movl $1, %eax \n\t"
        "int $0x80 \n\t");
}
void nomain()
{
    print();
    exit();
}
int 0x80系统调用的参数传递和返回值规则如下
| 系统调用号 | 参数1 | 参数2 | 参数3 | 参数4 | 参数5 | 参数6 | 返回值 |
|---|---|---|---|---|---|---|---|
| eax | ebx | ecx | edx | esi | edi | ebp | eax |
write系统调用的C语言描述如下
int write(int filedesc, char *buffer, int size)
进行write系统调用的汇编代码意义如下
movl $13, %%edx 将字符串长度传递给第3个参数size
movl %0, %%ecx 将指针str传递给第二个参数buff(%0指代str变量)
movl $1, %%ebx 将立即数1传递给第一个参数filedesc(标准输出的文件描述符为1)
movl $4, %%eax 寄存器eax用来存放系统调用号,write调用号为4,见unistd_32.h
"r"(str)表示由编译器决定使用哪个通用寄存器来存放str变量
"edx", "ecx", "ebx", "esi" 告知编译器汇编代码会修改这几个寄存器的值
详细语法规则见gcc扩展汇编知识
exit系统调用原理一致,就不赘述了
接下来进行编译链接,由于该代码是参考《链接,装载与库》书中的示例代码,且书中系统环境为32位,而本机环境为64位,所以编译和链接时需要指定使用32位(-m32选项和-m elf_i386)
$ gcc -m32 -c -fno-builtin tinyhelloworld.c
$ ld -static -e nomain -m elf_i386 -o tinyhelloworld. tinyhelloworld.o
$ ./tinyhelloworld.
hello world!
-fno-builtin选项关闭gcc的内置函数功能,避免程序中某些函数被替换
-m32选项指定编译出32位的目标文件
-m elf_i386选项指定链接的的是32位程序
-e nomain设置程序的入口函数为nomain
如果编译时不使用-m32选项,那么会报错如下
$ gcc -c -fno-builtin tinyhelloworld.c
tinyhelloworld.c: Assembler messages:
tinyhelloworld.c:6: Error: unsupported instruction `mov'
报错行是movl %0, %%ecx
错误原因可能如下:由于代码使用r来约束变量str,表示由编译器来决定使用任意通用寄存器,由于本机环境为64位,所以编译器使用了一个64位的寄存器来存放str,因此该指令将一个64位寄存器赋值给32位寄存器ecx是错误的。参考What does the GCC error message, “Error: unsupported for `mov'”, mean?
那如果还是想编译成64位程序而不是32位程序可以如何做呢?
既然编译器使用64位寄存器来存放str会报错,那我们只要不让str存储在寄存器即可,这里我尝试使用内存来存放变量str,发现结果可行,具体修改为"r"(str) to "m"(str)
重新编译链接,运行,成功!
$ gcc -c -fno-builtin tinyhelloworld.c
$ ld -static -e nomain -o tinyhelloworld tinyhelloworld.o
$ ./tinyhelloworld
hello world!
syscall
char *str = "Hello World!\n";
void print()
{
    asm("movq $1, %%rax \n\t"
        "movq $1, %%rdi \n\t"
        "movq %0, %%rsi \n\t"
        "movq $13, %%rdx \n\t"
        "syscall"
        :
        :"r"(str)
        :"rax", "rdi", "rsi", "rdx");
}

void exit()
{
    asm("movq $60, %rax \n\t"
        "movq $42, %rdi \n\t"
        "syscall");
}

void nomain()
{
    print();
    exit();
}
编译,链接,运行
$ gcc -c -fno-builtin tinyhelloworld.c
$ ld -static -e nomain -o tinyhelloworld tinyhelloworld.o
$ ./tinyhelloworld
hello world!
syscall系统调用的参数传递和返回值规则如下
| 系统调用号 | 参数1 | 参数2 | 参数3 | 参数4 | 参数5 | 参数6 | 返回值 |
|---|---|---|---|---|---|---|---|
| rax | rdi | rsi | rdx | r10 | r8 | r9 | rax |
调用规则与int 0x80类似,值得注意的是syscall和int 0x80使用的系统调用号不一致,syscall的系统调用号定义在linux/arch/x86/entry/syscalls/syscall_64.tbl,int x80的系统调用号定义在linux/arch/x86/entry/syscalls/syscall_32.tbl
接下来介绍如何使用链接控制脚本来控制链接器ld的链接过程
链接控制脚本就是描述输入文件的section如何变成输出文件中的section,并且控制输出文件的内存布局
当我们在链接程序时如果没有指定链接脚本,ld会使用一个默认的链接脚本,可以使用$ld -verbose查看,默认链接脚本都存放在/usr/lib/ldscripts下,不同机器平台,输出文件格式都有相应的链接脚本。
下面使编写个最简单的链接控制脚本
ENTRY(nomain)
SECTIONS
{
     . = 0x400000 + SIZEOF_HEADERS;
    tinytext : {*(.text) *(.data) *(.rodata)}
    /DISCARD/ : {*(.comment)}
}
该链接脚本指定了如下规则
ENTRY(nomain)指定程序的入口为nomain函数. = 0x400000 + SIZEOF_HEADERS将当前虚拟地址设置成0x400000 + SIZEOF_HEADERS,SIZEOF_HEADERS为输出文件的文件头大小tinytext : {*(.text) *(.data) *(.rodata)}将所有输入文件的.text, .data和.rodata段合并到输出文件的.tinytext/DISCARD/ : {*(.comment)}将所有输入文件中的.comment段丢弃,不保存到输入文件中
链接时使用-T指定使用的链接脚本
$ ld -static -T tinyhelloworld.lds -o tinyhelloworld tinyhelloworld.o
链接脚本如何编写的细节这里不再细究,这里介绍下学习过程中遇到的一个比较疑惑的问题
在32位机器上设置程序起始虚拟地址为0x400000 + SIZEOF_HEADERS,而在64位机器上设置为0x08048000 + SIZEOF_HEADERS
为什么选择0x400000和0x08048000这两个值呢?
通过阅读Why is address 0x400000 chosen as a start of text segment in x86_64 ABI?, Why do virtual memory addresses for linux binaries start at 0x8048000?, Why is the ELF execution entry point virtual address of the form 0x80xxxxx and not zero 0x0?和On Linux, why does the text segment start at 0x08048000? What is stored below that address?这几个回答了解一二,总结如下:
- System V i386的设计就是代码段位于0x8048000,然后低地址作为堆栈空间,之所以选择0x8048000是为了提供一个"恰当大小"的堆栈空间
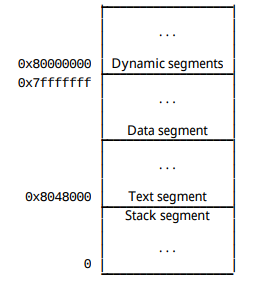
- 其他x86/32系统沿用了System V i386的设计,默认将代码段的地址设置为0x8048000,该地址往下128M空间是否有用到影响不大,因为128M"足够小"
- 而64位系统使用更低的地址0x40000也暂时没有定论,只能说它"足够使用"
对该问题理解总结得比较粗浅,有时间可以仔细研究下上面的那几个回答,理解更多细节
Issue14 ELF可执行文件在虚拟地址空间的分布
本文将根据一个实际可执行文件,画出其ELF文件结构图及其与虚拟地址空间和物理内存的映射关系。
本机环境: deepin15.5 64bit
可执行程序源代码如下:
#include "unistd.h"
int main()
{
    while (1) {
        sleep(1000);
    }
    return 0;
}
编译出可执行文件:$ gcc -static -o SectionMapping SectionMapping.c
要画出其ELF文件结构图,我们需要查看该可执行文件各个section的大小和偏移等信息,这些信息通过查看ELF header和段表得知
查看ELF header:$ readelf -h SectionMapping
$ readelf -h SectionMapping
ELF Header:
  Magic: 7f 45 4c 46 02 01 01 03 00 00 00 00 00 00 00 00
  Class: ELF64
  Data: 2's complement, little endian
  Version: 1 (current)
  OS/ABI: UNIX - GNU
  ABI Version: 0
  Type: EXEC (Executable file)
  Machine: Advanced Micro Devices X86-64
  Version: 0x1
  Entry point address: 0x400930
  Start of program headers: 64 (bytes into file)
  Start of section headers: 804624 (bytes into file)
  Flags: 0x0
  Size of this header: 64 (bytes)
  Size of program headers: 56 (bytes)
  Number of program headers: 6
  Size of section headers: 64 (bytes)
  Number of section headers: 32
  Section header string table index: 31
从输出结果获取到的信息为
- ELF header大小为64bytes
- Section table(段表)偏移为0xc4710(804624),大小为0x800ytes(64 * 32)
- Program header table(程序头表)偏移为0x40(64),大小为0x150bytes(56 * 6)
查看Section table(段表):$ readelf -S SectionMapping
$ readelf -S SectionMapping
There are 32 section headers, starting at offset 0xc4710:

Section Headers:
  [Nr] Name              Type             Address           Offset
       Size              EntSize          Flags  Link  Info  Align
  [ 0]                   NULL             0000000000000000  00000000
       0000000000000000  0000000000000000           0     0     0
  [ 1] .note.ABI-tag     NOTE             0000000000400190  00000190
       0000000000000020  0000000000000000   A       0     0     4
  [ 2] .note.gnu.build-i NOTE             00000000004001b0  000001b0
       0000000000000024  0000000000000000   A       0     0     4
readelf: Warning: [ 3]: Link field (0) should index a symtab section.
  [ 3] .rela.plt         RELA             00000000004001d8  000001d8
       0000000000000108  0000000000000018  AI       0    24     8
  [ 4] .init             PROGBITS         00000000004002e0  000002e0
       0000000000000017  0000000000000000  AX       0     0     4
  [ 5] .plt              PROGBITS         00000000004002f8  000002f8
       0000000000000058  0000000000000000  AX       0     0     8
  [ 6] .text             PROGBITS         0000000000400350  00000350
       00000000000888b7  0000000000000000  AX       0     0     16
  [ 7] __libc_freeres_fn PROGBITS         0000000000488c10  00088c10
       0000000000000ab7  0000000000000000  AX       0     0     16
  [ 8] __libc_thread_fre PROGBITS         00000000004896d0  000896d0
       00000000000000e1  0000000000000000  AX       0     0     16
  [ 9] .fini             PROGBITS         00000000004897b4  000897b4
       0000000000000009  0000000000000000  AX       0     0     4
  [10] .rodata           PROGBITS         00000000004897c0  000897c0
       000000000001c724  0000000000000000   A       0     0     32
  [11] __libc_subfreeres PROGBITS         00000000004a5ee8  000a5ee8
       0000000000000050  0000000000000000   A       0     0     8
  [12] __libc_IO_vtables PROGBITS         00000000004a5f40  000a5f40
       00000000000006a8  0000000000000000   A       0     0     32
  [13] __libc_atexit     PROGBITS         00000000004a65e8  000a65e8
       0000000000000008  0000000000000000   A       0     0     8
  [14] __libc_thread_sub PROGBITS         00000000004a65f0  000a65f0
       0000000000000008  0000000000000000   A       0     0     8
  [15] .eh_frame         PROGBITS         00000000004a65f8  000a65f8
       000000000000a64c  0000000000000000   A       0     0     8
  [16] .gcc_except_table PROGBITS         00000000004b0c44  000b0c44
       00000000000000af  0000000000000000   A       0     0     1
  [17] .tdata            PROGBITS         00000000006b0eb8  000b0eb8
       0000000000000020  0000000000000000 WAT       0     0     8
  [18] .tbss             NOBITS           00000000006b0ed8  000b0ed8
       0000000000000030  0000000000000000 WAT       0     0     8
  [19] .init_array       INIT_ARRAY       00000000006b0ed8  000b0ed8
       0000000000000010  0000000000000008  WA       0     0     8
  [20] .fini_array       FINI_ARRAY       00000000006b0ee8  000b0ee8
       0000000000000010  0000000000000008  WA       0     0     8
  [21] .jcr              PROGBITS         00000000006b0ef8  000b0ef8
       0000000000000008  0000000000000000  WA       0     0     8
  [22] .data.rel.ro      PROGBITS         00000000006b0f00  000b0f00
       00000000000000e4  0000000000000000  WA       0     0     32
  [23] .got              PROGBITS         00000000006b0fe8  000b0fe8
       0000000000000008  0000000000000008  WA       0     0     8
  [24] .got.plt          PROGBITS         00000000006b1000  000b1000
       0000000000000070  0000000000000008  WA       0     0     8
  [25] .data             PROGBITS         00000000006b1080  000b1080
       0000000000001ad0  0000000000000000  WA       0     0     32
  [26] .bss              NOBITS           00000000006b2b60  000b2b50
       0000000000001898  0000000000000000  WA       0     0     32
  [27] __libc_freeres_pt NOBITS           00000000006b43f8  000b2b50
       0000000000000030  0000000000000000  WA       0     0     8
  [28] .comment          PROGBITS         0000000000000000  000b2b50
       0000000000000025  0000000000000001  MS       0     0     1
  [29] .symtab           SYMTAB           0000000000000000  000b2b78
       000000000000b1d8  0000000000000018          30   753     8
  [30] .strtab           STRTAB           0000000000000000  000bdd50
       000000000000685b  0000000000000000           0     0     1
  [31] .shstrtab         STRTAB           0000000000000000  000c45ab
       000000000000015f  0000000000000000           0     0     1
Key to Flags:
  W (write), A (alloc), X (execute), M (merge), S (strings), I (info),
  L (link order), O (extra OS processing required), G (group), T (TLS),
  C (compressed), x (unknown), o (OS specific), E (exclude),
  l (large), p (processor specific)
从输出我们可以看到每个section的大小及其偏移
通过查看段表和ELF header,此时我们已经可以画出可执行文件的整个ELF文件结构图
接下来我们查看可执行程序的程序头(Program header),该程序头描述了ELF该如何加载被操作系统映射到进程的虚拟空间
$ readelf -l SectionMapping
Elf file type is EXEC (Executable file)
Entry point 0x400930
There are 6 program headers, starting at offset 64
Program Headers:
  Type Offset VirtAddr PhysAddr
                 FileSiz MemSiz Flags Align
  LOAD 0x0000000000000000 0x0000000000400000 0x0000000000400000
                 0x00000000000b0cf3 0x00000000000b0cf3 R E 0x200000
  LOAD 0x00000000000b0eb8 0x00000000006b0eb8 0x00000000006b0eb8
                 0x0000000000001c98 0x0000000000003570 RW 0x200000
  NOTE 0x0000000000000190 0x0000000000400190 0x0000000000400190
                 0x0000000000000044 0x0000000000000044 R 0x4
  TLS 0x00000000000b0eb8 0x00000000006b0eb8 0x00000000006b0eb8
                 0x0000000000000020 0x0000000000000050 R 0x8
  GNU_STACK 0x0000000000000000 0x0000000000000000 0x0000000000000000
                 0x0000000000000000 0x0000000000000000 RW 0x10
  GNU_RELRO 0x00000000000b0eb8 0x00000000006b0eb8 0x00000000006b0eb8
                 0x0000000000000148 0x0000000000000148 R 0x1
 Section to Segment mapping:
  Segment Sections...
   00 .note.ABI-tag .note.gnu.build-id .rela.plt .init .plt .text __libc_freeres_fn __libc_thread_freeres_fn .fini .rodata __libc_subfreeres __libc_IO_vtables __libc_atexit __libc_thread_subfreeres .eh_frame .gcc_except_table
   01 .tdata .init_array .fini_array .jcr .data.rel.ro .got .got.plt .data .bss __libc_freeres_ptrs
   02 .note.ABI-tag .note.gnu.build-id
   03 .tdata .tbss
   04
   05 .tdata .init_array .fini_array .jcr .data.rel.ro .got
可以看到该可执行文件有两个需要被映射到虚拟地址空间的Segment,分别为Segment0和Segment1,且它们由多个属性类似的Section组成。
Segment:对于属性类似(相同权限)的section,把它们合并到一起当作一个Segment进行映射,这样做的好处是可以明显减少页面内部碎片,从而节省了内存空间。
| 段 | 起始虚拟地址 | segment在文件中所占空间的长度 | segment在虚拟地址空间所占用的长度 | segment在文件中的偏移 | 权限 | 对齐 |
|---|---|---|---|---|---|---|
| Segment0 | 0x400000 | 0xb0cf3 | 0xb0cf3 | 0x00 | 可读可执行(RE) | 0x200000 |
| Segment1 | 0x6b0eb8 | 0x1c98 | 0x3570 | 0xb0eb8 | 可读可写(RW) | 0x200000 |
注意:为什么Segment1在ELF文件中所占用空间长度为0x1c98,而在进程虚拟地址空间占用的大小memsize为0x3570
原因为Segment1包含了.bss和__libc_freeres_ptrs这两个Section,从查看段表的输出结果中可以看到这两个Section的Type为NOBITS,意味着它们在ELF文件中没有实际内容,不占文件空间。
只要把.bss和__libc_freeres_ptrs在内存中实际占据空间加上0x1c98就可以得到0x3570这个值,计算过程如下: .bss在.data之后,.data的结束地址为0xb1080+0x1ad0 = 0xb2b50,由于.bss是32对齐,所以.bss的起始地址为0xb2b60,结束地址为0xb2b60+0x1898 = 0xb43f8,由于__libc_freeres_ptrs为8对齐,所以起始地址为0xb43f8,终止地址为0xb43f8 + 0x30 = 0xb4428,然后使用__libc_freeres_ptrs的结束地址减去.data的结束地址就可以得到这两个段在内存中占据的空间大小0xb4428-0xb2b50 = 0x18d8,加上0x1c98刚好等于0x3570
查询系统页大小:$ getconf PAGE_SIZE
$ getconf PAGE_SIZE
4096
根据上述得到的信息,我们可以画出可执行文件,虚拟地址空间和物理内存三者的映射关系
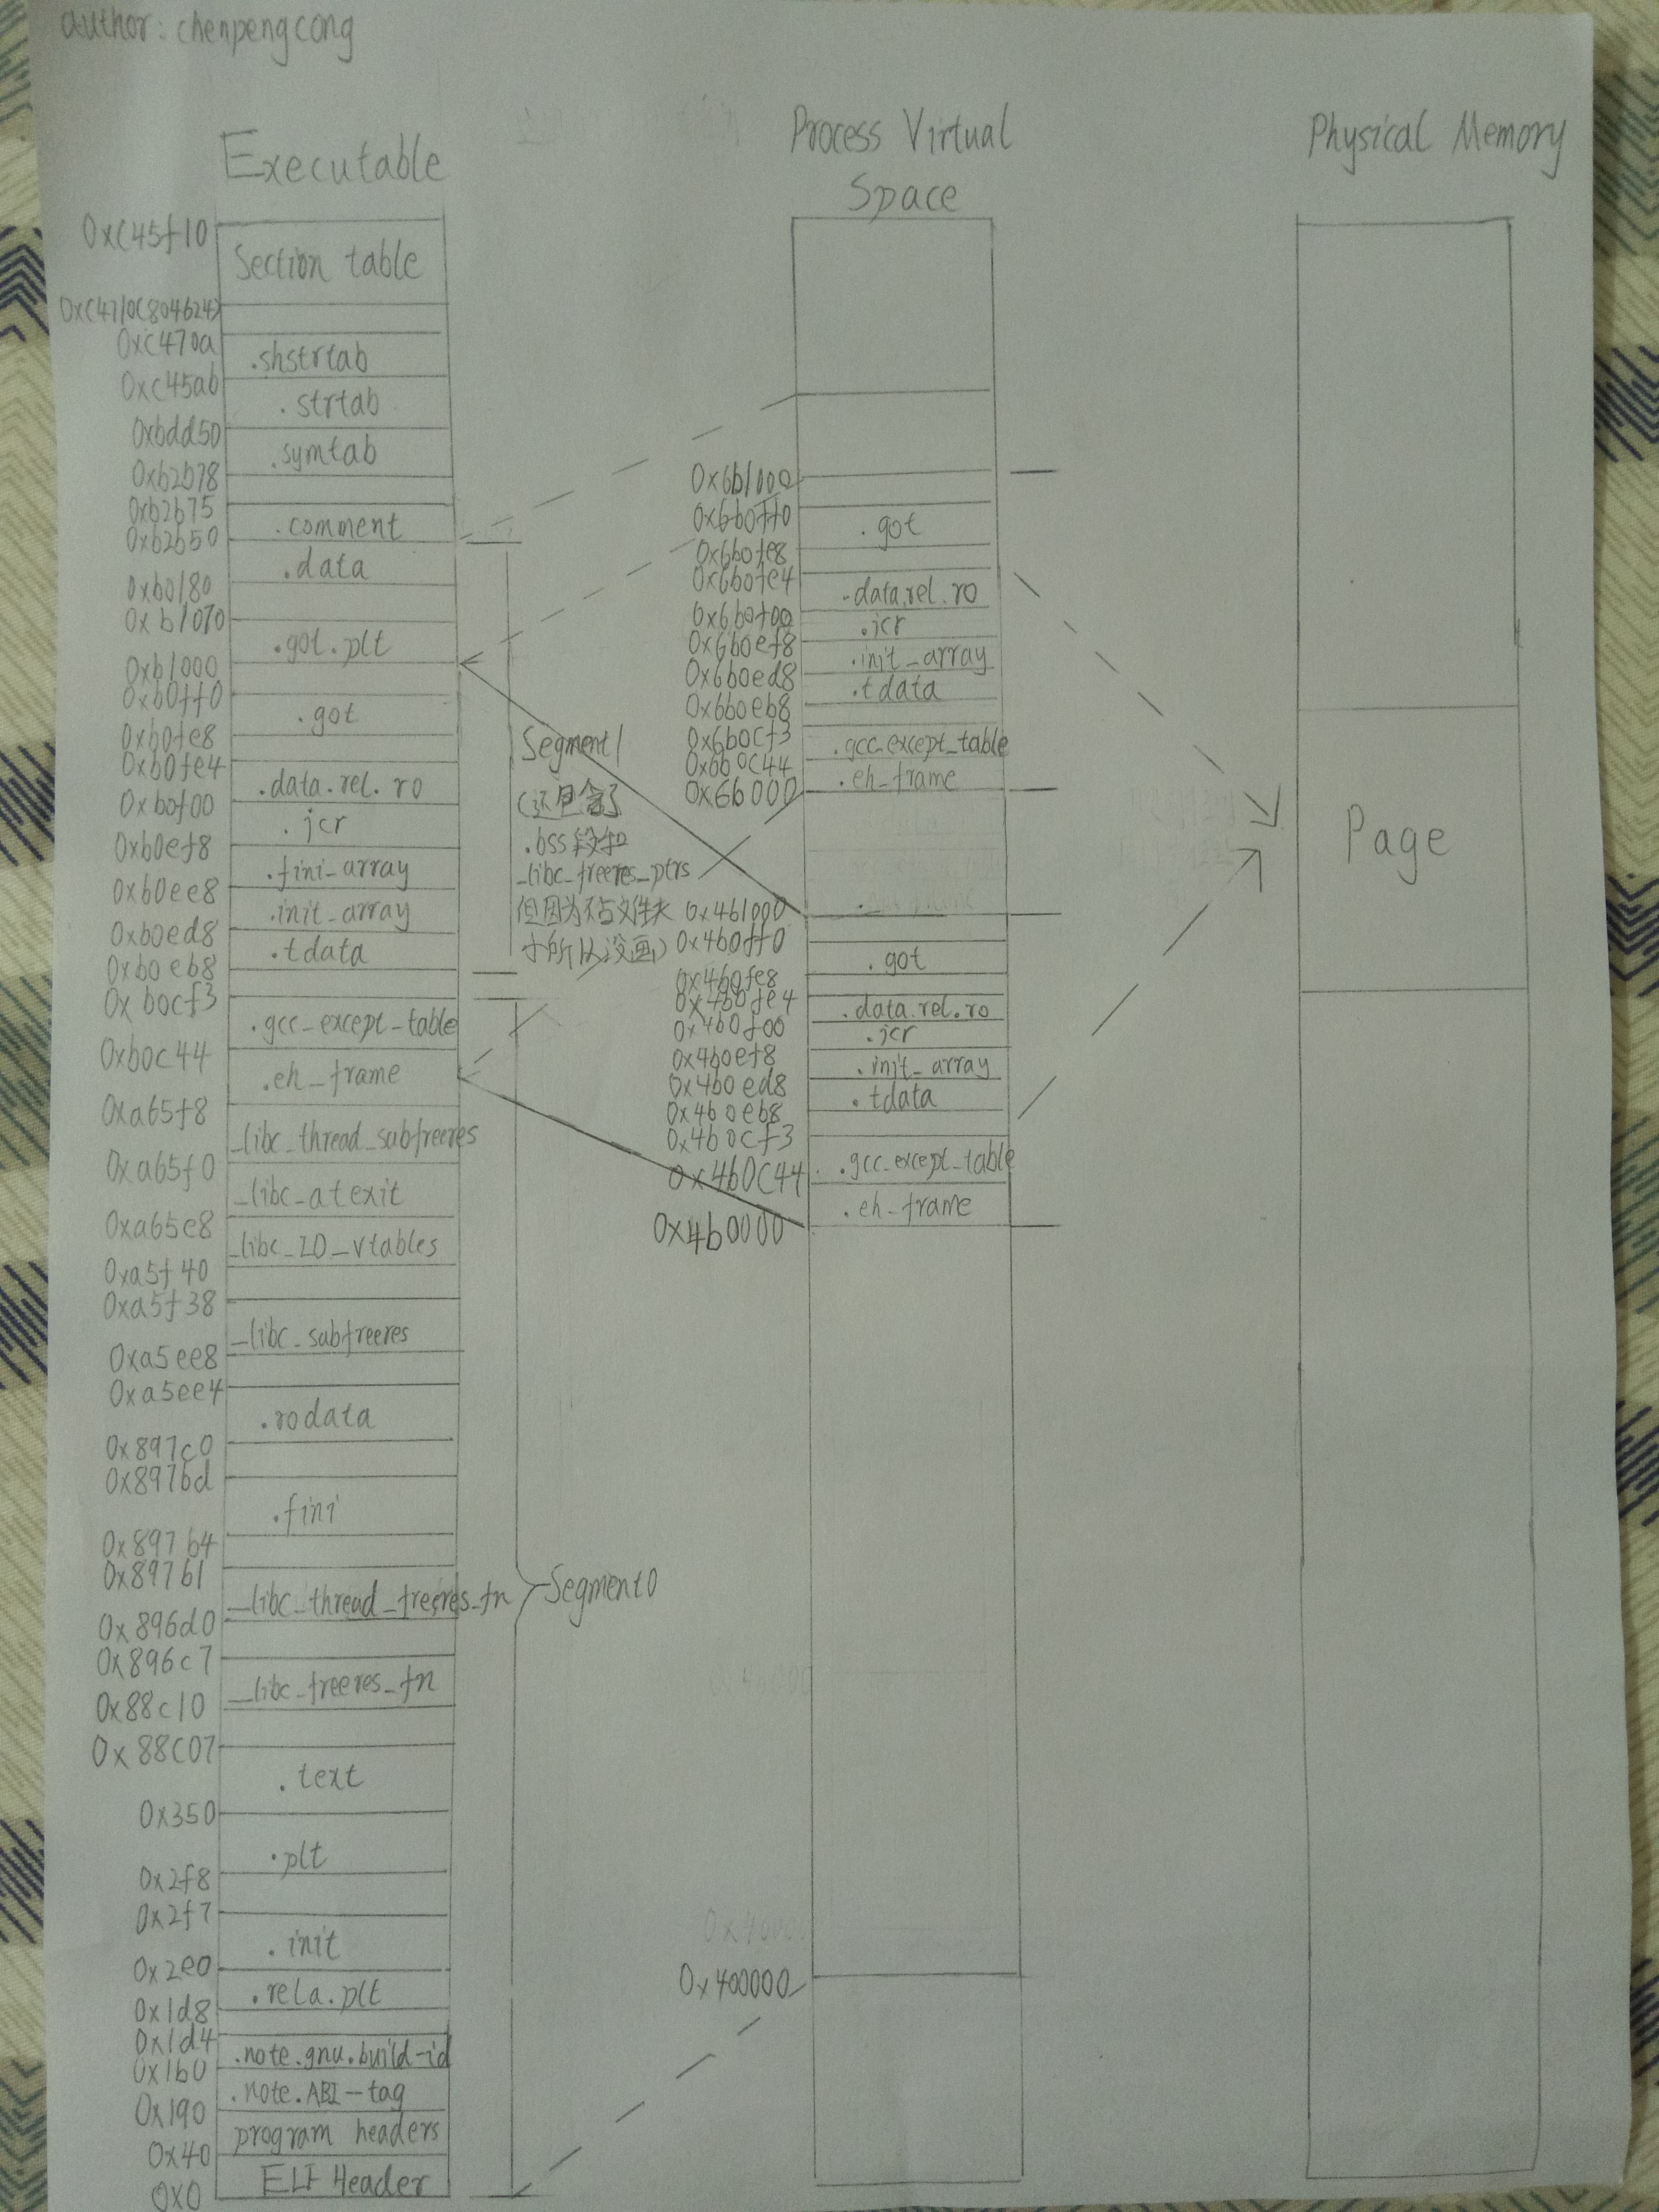
值得注意的是,可执行文件的0xb0000 ~ 0xb1000区域在虚拟地址空间被映射了2次,分别对应虚拟地址空间的0x4b0000 ~ 0x4b10000和0x6b0000 ~ 0x6b1000,然后这两部分虚拟地址空间最终映射到物理内存中的同一个页面。
这样做的好处是增加空间使用率。由于可执行程序0xb0000~0xb1000这一页数据同时包含了Segment0和Segment1中的section,如果将该页数据分成两部分,分别只包含一个Segment的数据,那么最终将被映射到两页物理内存,且这两页物理内存有效数据都少于页大小4096bytes,浪费内存。
参考: 《程序员的自我修养》
Issue15 位置无关代码(PIC)
本文主要研究动态共享库如何实现位置无关,基于如下代码进行研究
本机环境 Linux cike-pc 4.14.0-deepin2-amd64 #1 SMP PREEMPT Deepin 4.14.12-2 (2018-01-06) x86_64 GNU/Linux
extern int global_var;
static int static_var = 6;

void bar();
static void baz();

void foo()
{
    global_var = 66;
    static_var = 66;
    bar();
    baz();
}

static void baz()
{

}
使用fPIC指定编译成位置无关的动态共享库$ gcc -shared -fPIC mydlib.c -o libmydlib.so
该例子对包含了4种类型的地址访问,分别是模块内部函数调用,模块内部数据访问,模块外部数据访问和模块间函数调用
首先,我们反编译出汇编代码。
$ objdump -d libmydlib.so

00000000000006b0 <foo>:
 6b0:    55                       push   %rbp
 6b1:    48 89 e5                 mov    %rsp,%rbp
 6b4:    48 8b 05 1d 09 20 00     mov    0x20091d(%rip),%rax        # 200fd8 <global_var>
 6bb:    c7 00 42 00 00 00        movl   $0x42,(%rax)
 6c1:    c7 05 5d 09 20 00 42     movl   $0x42,0x20095d(%rip)        # 201028 <static_var>
 6c8:    00 00 00
 6cb:    b8 00 00 00 00           mov    $0x0,%eax
 6d0:    e8 bb fe ff ff           callq  590 <bar@plt>
 6d5:    b8 00 00 00 00           mov    $0x0,%eax
 6da:    e8 03 00 00 00           callq  6e2 <baz>
 6df:    90                       nop
 6e0:    5d                       pop    %rbp
 6e1:    c3                       retq

00000000000006e2 <baz>:
 6e2:    55                       push   %rbp
 6e3:    48 89 e5                 mov    %rsp,%rbp
 6e6:    90                       nop
 6e7:    5d                       pop    %rbp
 6e8:    c3                       retq
模块内部函数调用
baz函数调用指令如下
6da: e8 03 00 00 00 callq 6e2
E8是相对偏移调用指令call的指令码
03 00 00 00是目的地址相对于下一条指令的偏移,由于机器是小端的,所以偏移量为0x00000003
所以bar的地址为0x6df + 0x03 = 0x6e2
无论该模块装载到哪个位置,这条指令都是有效的,因为foo和bar的相对位置不变
模块内部数据访问
对定义在模块内部的静态变量static_var访问指令如下
6c1: c7 05 5d 09 20 00 42 movl $0x42,0x20095d(%rip) # 201028
由于对数据的寻址方式往往没有相对与当前指令地址的寻址方式,所以使用指令指针寄存器rip加上一个偏移量来达到目的
模块外部数据访问
定义在模块外部的变量global_var的地址要等到装载时才能确定。
假设global_var定义在模块B,相对.data的起始地址为0x00,当模块B的.data的装载地址为0x10000时,变量global_var的地址为0x10000,这时系统遍历模块libmydlib.so中的定位表,把所有对global_var的地址引用都定位至0x10000。
上述做法存在的问题是:其他进程无法共享使用模块libmydlib.so的指令部分,因为其他进程不一定将模块B装载到与上述装载过程一样的地址,对global_var的访问不再是使用0x10000地址。
解决该问题的基本想法就是把指令中那些需要被修改的部分分离出来,跟数据部分放在一起,这样指令部分就可以保持不变,而数据部分可以在每个进程中拥有一个副本。
ELF使用一个全局偏移表(GOT, Global Offset Table)来记录外部变量的地址,GOT就是一个指向外部变量的指针数组,当代码对外部变量进行访问的时候,先访问该变量在GOT中对应的项,再根据该项的值去访问变量。
由于GOT在编译时就可以确定相对于文件的偏移,因此对GOT的访问可以使用上面的模块内部数据访问的方法,使用rip寄存器加上一个偏移量来访问,然后GOT中记录的变量的实际地址等到装载时再修改,这样就完成了指令变化部分的分离。
这时我们可以来看libmydlib.so对外部变量global_var的访问
 6b4:    48 8b 05 1d 09 20 00     mov    0x20091d(%rip),%rax        # 200fd8 <global_var>
 6bb:    c7 00 42 00 00 00        movl   $0x42,(%rax)
可以看到变量global_var的访问地址保存在0x20091d + (%rip) = 0x200fd8
通过查看段表$ readelf -S libmydlib.so
  [20] .got PROGBITS 0000000000200fd0 00000fd0
       0000000000000030 0000000000000008 WA 0 0 8
可知.got段的地址范围为0x200fd0 ~ 0x2001000
因此对0x200fd8的访问实际就是访问GOT,且具体访问的是GOT的第二项
查看动态重定位表$ readelf -r libmdlib.so
readelf -r libmdlib.so

Relocation section '.rela.dyn' at offset 0x478 contains 9 entries:
  Offset          Info           Type           Sym. Value    Sym. Name + Addend
000000200df8  000000000008 R_X86_64_RELATIVE                    680
000000200e00  000000000008 R_X86_64_RELATIVE                    640
000000201020  000000000008 R_X86_64_RELATIVE                    201020
000000200fd0  000100000006 R_X86_64_GLOB_DAT 0000000000000000 _ITM_deregisterTMClone + 0
000000200fd8  000300000006 R_X86_64_GLOB_DAT 0000000000000000 global_var + 0
000000200fe0  000400000006 R_X86_64_GLOB_DAT 0000000000000000 __gmon_start__ + 0
000000200fe8  000500000006 R_X86_64_GLOB_DAT 0000000000000000 _Jv_RegisterClasses + 0
000000200ff0  000600000006 R_X86_64_GLOB_DAT 0000000000000000 _ITM_registerTMCloneTa + 0
000000200ff8  000700000006 R_X86_64_GLOB_DAT 0000000000000000 __cxa_finalize@GLIBC_2.2.5 + 0
可知偏移200fd8的重定位入口最终会被重定位,被修改为global_var的实际地址
模块间函数调用
模块间函数调用的原理与模块间数据访问类似,将指令中变化的部分(外部函数地址)分离出来,用一个.got.plt表来存放函数引用的地址。同时,为了实现延迟绑定,调用函数并不直接通过.got.plt跳转,而是通过一个叫作PLT项的结构来进行跳转,每个外部函数在PLT中都有一个相应的项,比如bar函数对应bar@plt
0000000000000580 <.plt>:
 580:    ff 35 82 0a 20 00     pushq 0x200a82(%rip) # 201008 <_GLOBAL_OFFSET_TABLE_+0x8>
 586:    ff 25 84 0a 20 00     jmpq *0x200a84(%rip) # 201010 <_GLOBAL_OFFSET_TABLE_+0x10>
 58c:    0f 1f 40 00     nopl 0x0(%rax)

0000000000000590 <bar@plt>:
 590:    ff 25 82 0a 20 00     jmpq *0x200a82(%rip) # 201018 <bar>
 596:    68 00 00 00 00     pushq $0x0
 59b:    e9 e0 ff ff ff     jmpq 580 <.plt>
bar@plt第一条指令进行跳转,跳转地址保存在0x201018
查看.got.plt段内容readelf -x .got.plt libmydlib.so
$ readelf -x .got.plt libmydlib.so

Hex dump of section '.got.plt':
  0x00201000 100e2000 00000000 00000000 00000000 .. .............
  0x00201010 00000000 00000000 96050000 00000000 ................
0x201018是.got.plt的第四项,该项的值为0x0596(小端),刚好是下一条指令的地址,所以bar@plt第一条指令就是跳转到下一条指令
pushq $0x0将0压栈,0是bar这个符号在重定位表.rel.plt中的下标
$ readelf -r libmydlib.so
...
Relocation section '.rela.plt' at offset 0x550 contains 1 entries:
  Offset Info Type Sym. Value Sym. Name + Addend
000000201018 000200000007 R_X86_64_JUMP_SLO 0000000000000000 bar + 0
接下来将地址0x201008的内容入栈,再进行跳转,跳转地址保存在0x201010,这两个地址分别对应.got.plt的第1项.got.plt[1]和第2项.got.plt[2]
 580:    ff 35 82 0a 20 00     pushq 0x200a82(%rip) # 201008 <_GLOBAL_OFFSET_TABLE_+0x8>
 586:    ff 25 84 0a 20 00     jmpq *0x200a84(%rip) # 201010 <_GLOBAL_OFFSET_TABLE_+0x10>
从上面.got.plt段的内容可以看到这两项的值都为0。
实际上当动态链接器(ld-linux-XXX)执行时才对这两项进行填充,.got.plt[1]存放的是该共享模块的ID,.got.plt[2]存放的是_dl_runtime_resolve函数的地址。
_dl_runtime_resolve函数通过上面两条圧栈指令拿到待决议符号bar在重定位表的下标和模块ID这两个参数就可以完成符号解析和重定位工作,与此同时,_dl_runtime_resolve函数会将bar符号的真正地址填入到.got.plt表中,下次执行bar@plt的第一条指令就直接跳转到bar函数,不再进行符号解析和重定位工作。
PLT的执行过程可以使用GDB进行调试查看,参考再议 PLT 与 GOT这篇文章
拓展阅读: 全局符号介入问题
参考: 《程序员的自我修养》 Linux动态链接中的PLT和GOT
Issue16 共享库及符号的版本控制实践: 动态链接库符号版本控制
首先了解下共享库的命名约定
共享库的命名规则:libname.so.x.y.z
- name: 库的名字
- x: 主版本号(Major Version Number)
- y: 次版本号(Minor Version Number)
- z: 发布版本号(Release Vresion Number)
主版本号表示库的重大升级,不同主版本号之间不兼容,旧的接口符号进行了改动 次版本号表示库的增量升级,即增加一些新的接口符号,且保持原来的符号不变 发布版本号表示库的一些错误的修正,性能的改进等,并不添加任何新的接口,也不对旧的接口进行修改
共享库的编译和运行过程涉及到3个名称: real name, soname和linker name
real name: 编译出来的库文件的真实名字。比如libfoo.so.1.0.0soname: 描述共享库功能的一个逻辑名称(logic name)。命名规则为libname.so.x,只保留了主版本号,常用于提供版本向后兼容性信息。比如程序a在编译时使用了共享库libx.1.0.0,而现在系统中只包含了libx.1.1.0,那么程序a会根据它所依赖的soname,即libx.1,去使用比编译时更高版本的库libx.1.2.0,因为该库是兼容1.1.0版本的linker name: 链接器使用该名称去寻找共享库,一般不包含版本号。比如使用链接选项-lfoo,那么链接器就会去寻找名称为libfoo.so的文件,libfoo.so就是linker name
通常情况下,linker name软链接到soname, soname软链接到real name
这三个名称会在下面实际例子中体现各自的作用
接下来以一个实际的例子来演示共享库的版本控制实践
say.c
#include "stdio.h"
#include "say.h"
void say_hello()
{
    printf("hello\n");
}
say.h
void say_hello();
main.c
#include "say.h"
int main()
{
    say_hello();
    return 0;
}
共享库的编译
$ gcc -c -fPIC say.c
$ ld -shared -soname libsay.so.1 -o libsay.so.1.0.0 -lc say.o
这里指定libsay.so.1.0.0的soname为libsay.so.1,soname可以通过查看.dynamic段确认
如果链接时不指定soname那么就没有查看不到SONAME
$ readelf -d libsay.so.1.0.0
Dynamic section at offset 0xec0 contains 15 entries:
  Tag Type Name/Value
 0x0000000000000001 (NEEDED) Shared library: [libc.so.6]
 0x000000000000000e (SONAME) Library soname: [libsay.so.1]
 0x0000000000000004 (HASH) 0x158
 0x0000000000000005 (STRTAB) 0x218
 0x0000000000000006 (SYMTAB) 0x188
 0x000000000000000a (STRSZ) 74 (bytes)
 0x000000000000000b (SYMENT) 24 (bytes)
 0x0000000000000003 (PLTGOT) 0x201000
 0x0000000000000002 (PLTRELSZ) 24 (bytes)
 0x0000000000000014 (PLTREL) RELA
 0x0000000000000017 (JMPREL) 0x290
 0x000000006ffffffe (VERNEED) 0x270
 0x000000006fffffff (VERNEEDNUM) 1
 0x000000006ffffff0 (VERSYM) 0x262
 0x0000000000000000 (NULL) 0x0
共享库的安装和使用
libsay.so.1.0.0库使用者拿到.so和.h文件后,执行以下命令生成可执行程序main
$ ldconfig -n .
$ ln -sf libsay.so.1 libsay.so
$ gcc main.c -L. -lsay -o main
ldconfig -n .会生成一个软链接libsay.so.1链接到libsay.so.1.0.0,如果有多个版本,那么该软链接会指向最libsay.so.1.x.y中的最新版本
第二条指令$ ln -sf libsay.so.1 libsay.so是创建一个名为libsay.so软链接,指向libsay.so.1。为什么需要创建libsay.so呢,因为链接时-lsay会去搜索libsay.so,也就是linker name,否则会报找不到库的错。
查看最终生成的可执行程序的依赖信息
$ ldd main
    linux-vdso.so.1 (0x00007fff71525000)
    libsay.so.1 => not found
    libc.so.6 => /lib/x86_64-linux-gnu/libc.so.6 (0x00007ff5c8729000)
    /lib64/ld-linux-x86-64.so.2 (0x00007ff5c8cca000)
可以看到执行程序main记录的是共享库的soname,而不是real name或linker name(也可以通过readelf -d查看依赖的共享库),所以装载时会去找名称为soname的库
由于动态链接器查找共享库默认是从/lib/,/usr/lib和/ld.so.conf文件指定的路径中寻找,而我们没有把libsay.so.1拷贝到其中某个路径下,所以输出结果中libsay.so.1显示not found,这里将so库所在路径添加到环境变量LD_LIBRARY_PATH后即可显示,这里我的so文件和可执行文件在同一级目录下,所以执行如下命令
$ export LD_LIBRARY_PATH=$LD_LIBRARY_PATH:.
$ ldd main
    linux-vdso.so.1 (0x00007fff4c7e2000)
    libsay.so.1 (0x00007fa52b270000)
    libc.so.6 => /lib/x86_64-linux-gnu/libc.so.6 (0x00007fa52aed1000)
    /lib64/ld-linux-x86-64.so.2 (0x00007fa52b674000)
共享库的版本升级
当共享库更新版本时,共享库提供者还是按照上面步骤进行编译生成so,而使用者只需要重新执行$ ldconfig -n .就可以让soname指向最新版本
soname机制存在的问题
如下面示例
假设现在代码如下
say.c
#include "stdio.h"
#include "say.h"
void say_hello_v1()
{
    printf("hello(v1)\n");
}
say.h
void say_hello_v1();
进行编译链接,生成libsay.so.1.0.0
然后我增加了了一个say_hello_v2接口,现在代码如下
say.c
#include "stdio.h"
#include "say.h"
void say_hello_v1()
{
    printf("hello(v1)\n");
}

void say_hello_v2()
{
    printf("hello(v2)\n");
}
say.h
void say_hello_v1();
void say_hello_v2();
进行编译链接,生成libsay.so.1.1.0
假设此时用户B在编译可执行程序main的时候,所在的编译环境使用的是libsay.so.1.1.0,且程序使用了say_hello_v2符号,但是main程序的运行环境的机器上却使用了libsay.so.1.0.0,由于程序在进行动态链接时soname只判断主版本号,因此可以正常装载1.0.0版本的库,但是可能造成的后果就是
- mian程序的执行流程没走到调用say_hello_v2的地方,程序没报错,正常运行
- main程序的执行流程走到了调用say_hello_v2的地方,程序报找不到符号的错symbol lookup error: ./main: undefined symbol: say_hello_v2,崩溃
很明显这种运行时出现未知行为我们是不允许的,解决这种问题可以通过使用**基于符号的版本控制机制(symbol versioning)**来解决。
基于符号的版本控制
基于符号的版本控制实际上就是让每个导入和导出的符号都有一个相关联的版本
我们为say.c中的接口符号指定版本 say.c
#include "stdio.h"
#include "say.h"

asm(".symver say_hello_v1, say_hello@@VERS_1.0.0");
void say_hello_v1()
{
    printf("hello(v1)\n");
}
say.h
void say_hello();
编写符号版本脚本say.ver
VERS_1.0.0 {
    global:
        say_hello;
    local:
        *;
};
编译链接,生成libsay.so.1.0.0
$ gcc -c -fPIC say.c
$ ld -shared say.o -soname libsay.so.1 --version-script say.ver -lc -o libsay.so.1.0.0
接下来修改say.c添加say_hello_v2接口,并修改符号版本脚本,最后生成libsay.so.1.1.0
#include "stdio.h"
#include "say.h"
asm(".symver say_hello_v1, say_hello@VERS_1.0.0");
void say_hello_v1()
{
    printf("hello(v1)\n");
}
asm(".symver say_hello_v2, say_hello@@VERS_1.1.0");
void say_hello_v2()
{
    printf("hello(v2)\n");
}
say.ver
VERS_1.0.0 {
    global:
        say_hello;
    local:
        *;
};

VERS_1.1.0 {
}VERS_1.0.0;
编译链接
$ gcc -c -fPIC say.c
$ ld -shared say.o -soname libsay.so.1 --version-script say.ver -lc -o libsay.so.1.1.0
接下来编写main.c main.c
#include "stdio.h"
#include "say.h"
int main()
{
    printf("running...\n");
    say_hello();
    return 0;
}
把main.c和libsay.so.1.1.0在放在同级目录,生成依赖libsay.so.1.1.0的可执行程序main
$ ldconfig -n .
$ ln -sf libsay.so.1 libsay.so
$ gcc main.c -L. -lsay -o main
把libsay.so.1.1.0和main拷贝到同一目录下,运行:
$ ldconfig -n .
$ ln -sf libsay.so.1 libsay.so
$ export LD_LIBRARY_PATH=$LD_LIBRARY_PATH:.
$ ./main
running...
hello(v2)
正常。
接下来把libsay.so.1.0.0和main拷贝到同一目录下,运行
$ ldconfig -n .
$ ln -sf libsay.so.1 libsay.so
$ ./main
./main: libsay.so.1: version `VERS_1.1.0' not found (required by ./main)
可以看到main程序直接被阻止运行,而不是等到运行时才崩溃,避免了上面提到的运行时出现symbol lookup error的错误。
参考: Shared objects for the object disoriented! 《程序员的自我修养》 soname
Issue17 函数返回值传递
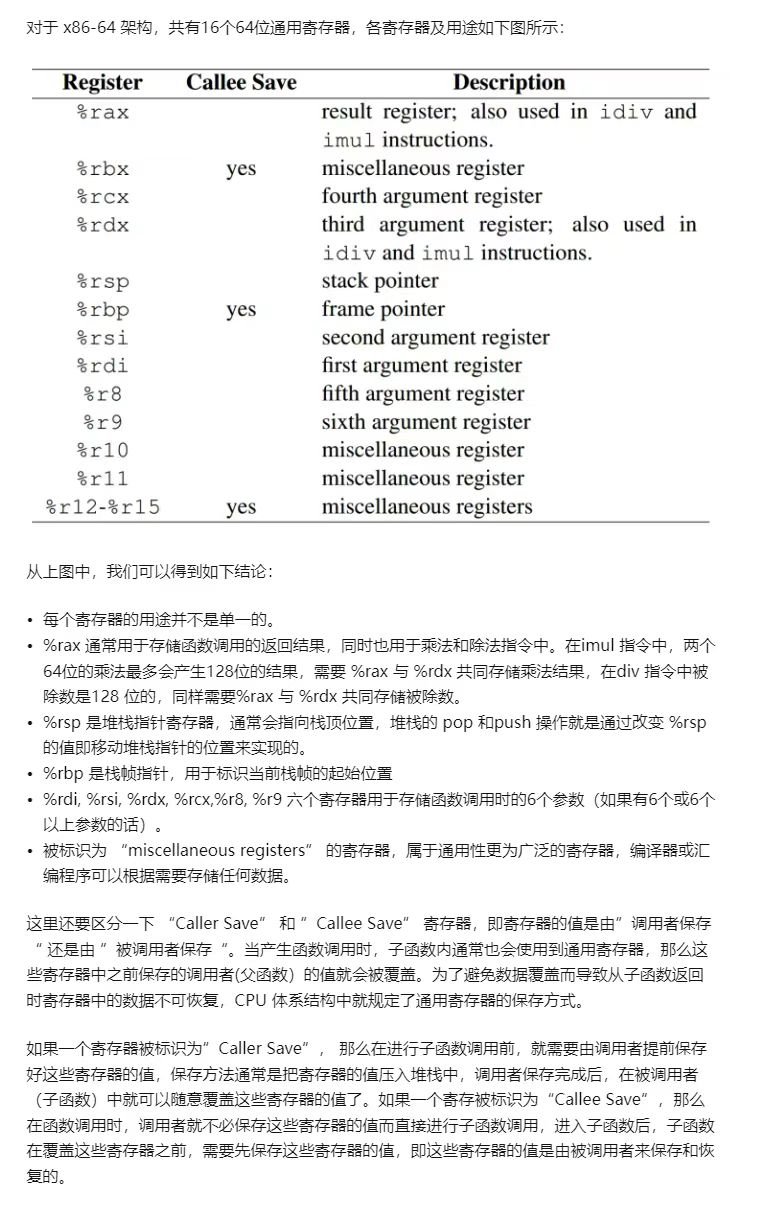
我们知道一般情况下函数的返回值是通过eax或rax寄存器来返回的,但是当我们返回值超过eax和rax所能存储的大小情况呢?
以下面代码为例,函数返回大小为32字节的结构体对象
本机环境:Linux cike-pc 4.14.0-deepin2-amd64 #1 SMP PREEMPT Deepin 4.14.12-2 (2018-01-06) x86_64 GNU/Linux
struct Test
{
    char buf[32];
};
struct Test foo()
{
    struct Test t2;
    return t2;
}
int main()
{
    struct Test t1 = foo();
    return 0;
}
查看该文件编译后的汇编代码
$ objdump -d test.o

test.o:     file format elf64-x86-64

Disassembly of section .text:

0000000000000000 <foo>:
   0:    55                       push   %rbp
   1:    48 89 e5                 mov    %rsp,%rbp
   4:    48 89 7d d8              mov    %rdi,-0x28(%rbp)
   8:    48 8b 45 d8              mov    -0x28(%rbp),%rax
   c:    48 8b 55 e0              mov    -0x20(%rbp),%rdx
  10:    48 89 10                 mov    %rdx,(%rax)
  13:    48 8b 55 e8              mov    -0x18(%rbp),%rdx
  17:    48 89 50 08              mov    %rdx,0x8(%rax)
  1b:    48 8b 55 f0              mov    -0x10(%rbp),%rdx
  1f:    48 89 50 10              mov    %rdx,0x10(%rax)
  23:    48 8b 55 f8              mov    -0x8(%rbp),%rdx
  27:    48 89 50 18              mov    %rdx,0x18(%rax)
  2b:    48 8b 45 d8              mov    -0x28(%rbp),%rax
  2f:    5d                       pop    %rbp
  30:    c3                       retq

0000000000000031 <main>:
  31:    55                       push   %rbp
  32:    48 89 e5                 mov    %rsp,%rbp
  35:    48 83 ec 20              sub    $0x20,%rsp
  39:    48 8d 45 e0              lea    -0x20(%rbp),%rax
  3d:    48 89 c7                 mov    %rax,%rdi
  40:    b8 00 00 00 00           mov    $0x0,%eax
  45:    e8 00 00 00 00           callq  4a <main+0x19>
  4a:    b8 00 00 00 00           mov    $0x0,%eax
  4f:    c9                       leaveq
  50:    c3                       retq
汇编代码的意义如下
首先看main函数,函数main在栈上开辟0x20大小的空间,并将栈顶的地址赋值给rdi寄存器(作为传递给foo的第一个参数)。
  35:    48 83 ec 20              sub    $0x20,%rsp
  39:    48 8d 45 e0              lea    -0x20(%rbp),%rax
  3d:    48 89 c7                 mov    %rax,%rdi
接下来看foo函数,函数foo在栈上开辟0x28大小的空间,并将栈顶(8个字节)的值赋值为%rdi(即main函数传递进来的地址)。然后将该栈上剩下的0x20大小的内存数据对应复制到main函数开辟的0x20大小的栈空间。
   4:    48 89 7d d8              mov    %rdi,-0x28(%rbp)
   8:    48 8b 45 d8              mov    -0x28(%rbp),%rax
   c:    48 8b 55 e0              mov    -0x20(%rbp),%rdx
  10:    48 89 10                 mov    %rdx,(%rax)
  13:    48 8b 55 e8              mov    -0x18(%rbp),%rdx
  17:    48 89 50 08              mov    %rdx,0x8(%rax)
  1b:    48 8b 55 f0              mov    -0x10(%rbp),%rdx
  1f:    48 89 50 10              mov    %rdx,0x10(%rax)
  23:    48 8b 55 f8              mov    -0x8(%rbp),%rdx
  27:    48 89 50 18              mov    %rdx,0x18(%rax)
可以这样理解上述的执行过程:
- main函数新建一个struct Test类型变量t1,并将t1的地址作为隐藏参数传递给foo函数
- foo函数新建一个struct Test类型变量t2,并将t2的内容拷贝给t1
由于t2的内容已经拷贝到t1了,所以t1就相当于foo函数返回的t2
从上面分析来看,其实foo函数的声明struct Test foo()更像是void foo(struct Test *ret)
Issue18 进程堆栈初始化
当加载器(ELF Loader)将ELF文件加载到内存后,会初始化进程堆栈,包括argc, argv, 环境变量和辅助向量,初始化后的进程堆栈结构如下(x86_64)
position            content                         size(bytes) + comment
-------------------------------------------------------------------------------------------------

stack pointer ->    [argc = number of args]         8
                    [argv[0](pointer)]              8
                    [argv[1](pointer)]              8
                    [argv[...](pointer)]            8 * x
                    [argv[n-1](pointer)]            8
                    [argv[n](pointer)]              8 (=NULL)

                    [envp[0](pointer)]              8
                    [envp[1](pointer)]              8
                    [envp[..](pointer)]             8 * x
                    [envp[term](pointer)]           8 (=NULL)

                    [auxv[0](Elf64_auxv_t)]         16
                    [auxv[1](Elf64_auxv_t)]         16
                    [auxv[..](Elf64_auxv_t)]        16 * x
                    [auxv[term](Elf64_auxv_t)]      16 (=NULL)

                    [padding]                       >= 0

                    [rand bytes]                    16

                    [String identifying platform]   >= 0

                    [padding for align]             >= 0 (sp - (get_random_int() % 8192)) & (~0xf)

                    [argument ASCIIZ strings]       >= 0
                    [environment ASCIIZ str]        >= 0
该图主要参考这里, 但进行了修改,因为在本地环境编写代码验证发现[auxv[term]]到[argument ASCIIZ strings]这部分区域的结构并不像参考文章里图示所展示的那样
通过翻阅ELF Loader源码linux/fs/binfmt_elf.c,找到与初始化堆栈相关的函数create_elf_tables
我把create_elf_tables函数里面操作堆栈的代码圈出如下图所示
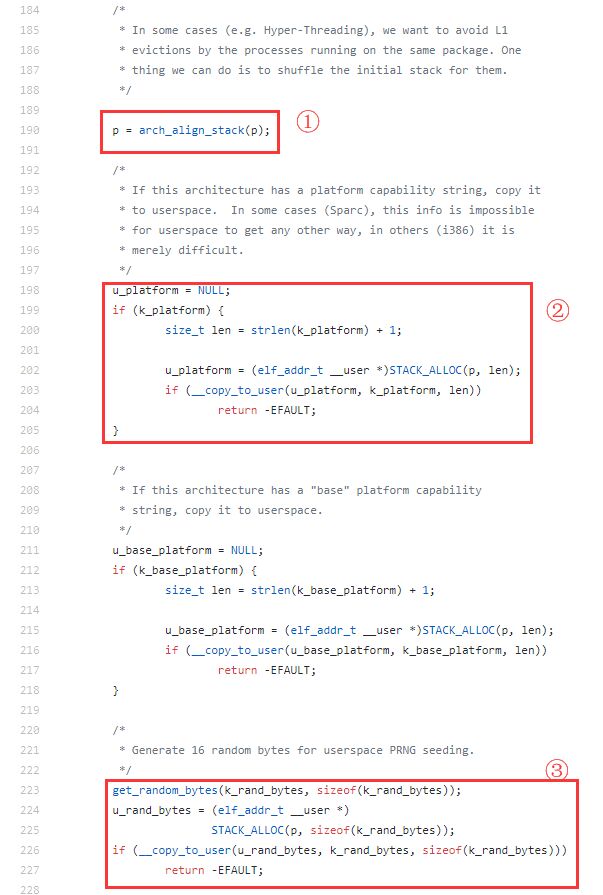
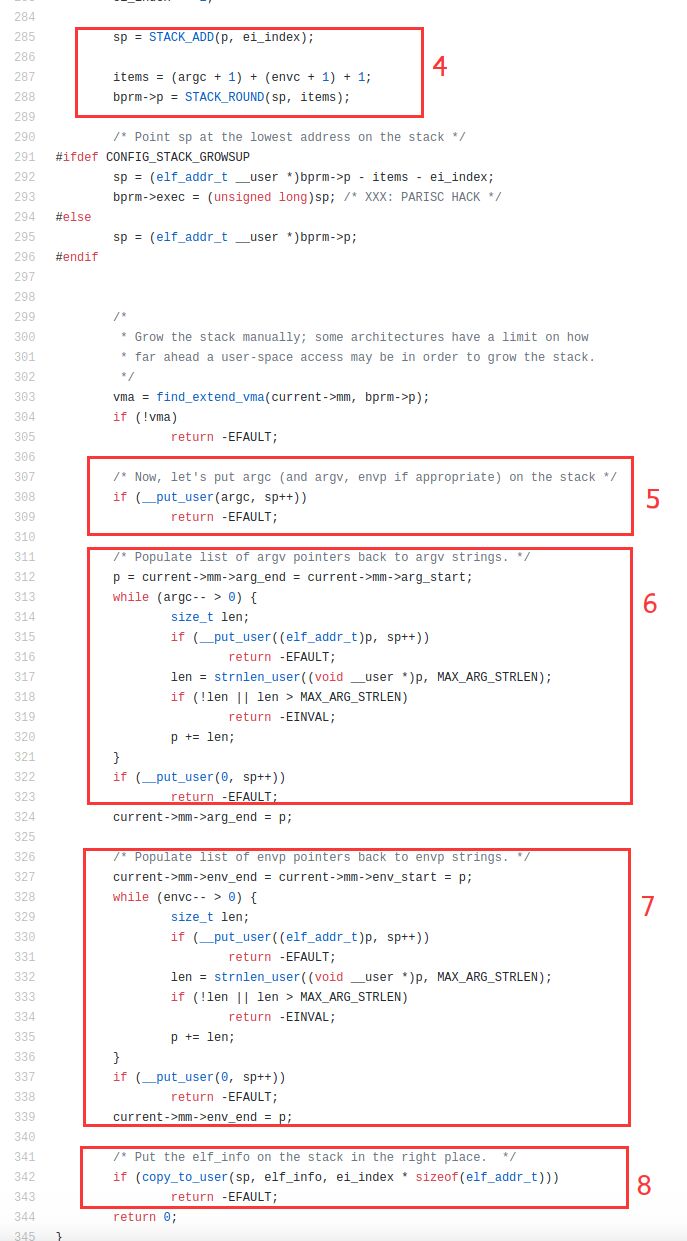
标号1处的arch_align_stack函数具体实现如下, 该函数定义在linux/arch/x86/kernel/process.c
unsigned long arch_align_stack(unsigned long sp)
{
	if (!(current->personality & ADDR_NO_RANDOMIZE) && randomize_va_space)
		sp -= get_random_int() % 8192;
	return sp & ~0xf;
}
该函数将堆栈指针向下移动了x(0 <= x <=8192), 分配出[padding for align]这部分空间
标号2的代码为[String identifying platform]在栈上分配空间并进行赋值操作
标号3的代码生成16bytes大小的随机数,然后为[rand bytes]在栈上分配空间并进行赋值操作
标号4的代码
sp = STACK_ADD(p, ei_index)
在栈上分配辅助向量(auxiliary vector)所需存储空间
items = (argc + 1) + (envc + 1) + 1;
bprm->p = STACK_ROUND(sp, items);
在栈上分配argc, argv, encironment vector所需存储空间, 值得注意的是这两步都只是移动堆栈指针分配空间,并没有进行赋值初始化数据操作
标号5, 6, 7, 8的代码做了如下操作 5. 初始化栈上argc的值 6. 初始化栈上argv的值 7. 初始化栈上envp的值 8. 初始化栈上auxv的值
通过阅读代码可以看出执行结果与上面的结构图是相匹配的, 可能会有疑惑的地方就是图示中[padding]这一区域, 这一块数据来源如下:
通过上面解释我们可以看到标号4的代码在栈上一次性分配了argc, argv, envp auxv所需要的空间,然后再通过堆栈指针按顺序向上初始化每一块数据, 重点在于分配的空间并不刚好等于所需空间, 因为标号4的分配空间时使用了宏STACK_ROUND, 该宏定义如下
#define STACK_ROUND(sp, items) \
	(((unsigned long) (sp - items)) &~ 15UL)
会向下16字节对齐,因此分配的空间可能会比所需空间多,而标号5, 6 ,7 ,8的初始化操作又是从栈顶初始化的,所以最后在[auxvterm]和[rand bytes]这两块区域之间会多出[padding]这块数据
最后编写的测试代码如下
本机环境
$ uname -a Linux debian 4.16.0-2-amd64 #1 SMP Debian 4.16.16-2 (2018-06-22) x86_64 GNU/Linux
#include <stdio.h>
#include <stdlib.h>
#include <elf.h>
#include <string.h>

int main(int argc, char** argv) {
    int i = 0;
    Elf64_auxv_t *auxv = NULL;
    long *auxv_start_addr = NULL;
    long *auxv_end_addr = NULL;
    long *env_start_addr = NULL;
    long *env_end_addr = NULL;
    long *argv_end_addr = NULL;
    char *platform;
    long *p = (long *)argv;
    char *env_str = NULL;
    unsigned char *rand_bytes = NULL;
    int arg_num = *(p - 1);
    printf("arg_num:%d\n", arg_num);
    for (i = 0;i < arg_num;i++) {
        printf("arg %d:%s\n", i, *p);
        p++;
    }
    argv_end_addr = p;
    p++;//skip null
    printf("\nenvironment vector:\n");
    env_str = (char *)*p;
    env_start_addr = p;
    while (*p) {
        printf("%s\n", *p);
        p++;
    }
    env_end_addr = p;
    p++;//skip null
    printf("\nauxiliary vectors:\n");
    auxv = (Elf64_auxv_t *)p;
    auxv_start_addr = (long *)auxv;
    while (auxv->a_type != AT_NULL) {
        printf("auxv type:%ld, val:0x%x\n", auxv->a_type, auxv->a_un.a_val);
        if (auxv->a_type == AT_PLATFORM) {
            platform = (char *)(auxv->a_un.a_val);
        }
        auxv++;
    }
    auxv_end_addr = (long *)auxv;
    auxv++;//skip AT_NULL vector
    printf("\naddress:%lx, env0_ascii_string:%s\n", env_str, env_str);
    printf("address:%lx ~ %lx, argument0_ascii_string:%s\n", *argv, argv[0] + strlen(argv[0]),*argv);
    printf("address:%lx ~ %lx, here contain %ld bytes data\n", platform + strlen(platform) + 1, (char *)*argv - 1, (long)*argv - (long)platform - strlen(platform) - 1);
    printf("address:%lx ~ %lx, String identifying platform:%s\n", platform, platform + strlen(platform), platform);
    rand_bytes = platform - 16;
    printf("address:%lx ~ %lx, rand_bytes[16]:", rand_bytes, rand_bytes + 15);
    for (i = 0;i < 16;i++) {
        printf(" %d", *(rand_bytes + i));
    }
    printf("\naddress:%lx ~ %lx, auxivilary vector\n", auxv_start_addr, auxv_end_addr);
    printf("address:%lx ~ %lx, environment vector\n", env_start_addr, env_end_addr);
    printf("address:%lx ~ %lx, argv\n", argv, argv_end_addr);
    printf("address:%lx, argc\n", argv - 1);
    return 0;
}
本机运行结果如下:
$ ./a.out
arg_num:1
arg 0:./a.out

environment vector:
LS_COLORS=rs=0:di=01;34:ln=01;36:mh=00:pi=40;33:so=01;35:do=01;35:bd=40;33;01:cd=40;33;01:or=40;31;01:mi=00:su=37;41:sg=30;43:ca=30;41:tw=30;42:ow=34;42:st=37;44:ex=01;32:*.tar=01;31:*.tgz=01;31:*.arc=01;31:*.arj=01;31:*.taz=01;31:*.lha=01;31:*.lz4=01;31:*.lzh=01;31:*.lzma=01;31:*.tlz=01;31:*.txz=01;31:*.tzo=01;31:*.t7z=01;31:*.zip=01;31:*.z=01;31:*.Z=01;31:*.dz=01;31:*.gz=01;31:*.lrz=01;31:*.lz=01;31:*.lzo=01;31:*.xz=01;31:*.zst=01;31:*.tzst=01;31:*.bz2=01;31:*.bz=01;31:*.tbz=01;31:*.tbz2=01;31:*.tz=01;31:*.deb=01;31:*.rpm=01;31:*.jar=01;31:*.war=01;31:*.ear=01;31:*.sar=01;31:*.rar=01;31:*.alz=01;31:*.ace=01;31:*.zoo=01;31:*.cpio=01;31:*.7z=01;31:*.rz=01;31:*.cab=01;31:*.wim=01;31:*.swm=01;31:*.dwm=01;31:*.esd=01;31:*.jpg=01;35:*.jpeg=01;35:*.mjpg=01;35:*.mjpeg=01;35:*.gif=01;35:*.bmp=01;35:*.pbm=01;35:*.pgm=01;35:*.ppm=01;35:*.tga=01;35:*.xbm=01;35:*.xpm=01;35:*.tif=01;35:*.tiff=01;35:*.png=01;35:*.svg=01;35:*.svgz=01;35:*.mng=01;35:*.pcx=01;35:*.mov=01;35:*.mpg=01;35:*.mpeg=01;35:*.m2v=01;35:*.mkv=01;35:*.webm=01;35:*.ogm=01;35:*.mp4=01;35:*.m4v=01;35:*.mp4v=01;35:*.vob=01;35:*.qt=01;35:*.nuv=01;35:*.wmv=01;35:*.asf=01;35:*.rm=01;35:*.rmvb=01;35:*.flc=01;35:*.avi=01;35:*.fli=01;35:*.flv=01;35:*.gl=01;35:*.dl=01;35:*.xcf=01;35:*.xwd=01;35:*.yuv=01;35:*.cgm=01;35:*.emf=01;35:*.ogv=01;35:*.ogx=01;35:*.aac=00;36:*.au=00;36:*.flac=00;36:*.m4a=00;36:*.mid=00;36:*.midi=00;36:*.mka=00;36:*.mp3=00;36:*.mpc=00;36:*.ogg=00;36:*.ra=00;36:*.wav=00;36:*.oga=00;36:*.opus=00;36:*.spx=00;36:*.xspf=00;36:
XDG_MENU_PREFIX=gnome-
LANG=en_US.UTF-8
GDM_LANG=en_US.UTF-8
DISPLAY=:0
COLORTERM=truecolor
DESKTOP_AUTOSTART_ID=1067f02f661904b013153191243121980500000010550007
USERNAME=cike
XDG_VTNR=2
SSH_AUTH_SOCK=/run/user/1000/keyring/ssh
XDG_SESSION_ID=2
USER=cike
DESKTOP_SESSION=gnome
WAYLAND_DISPLAY=wayland-0
GNOME_TERMINAL_SCREEN=/org/gnome/Terminal/screen/1209a8c3_5cad_4323_b8e8_171909ba8809
PWD=/home/cike/workspace/linker_loader
HOME=/home/cike
XDG_SESSION_TYPE=wayland
XDG_SESSION_DESKTOP=gnome
TERM=xterm-256color
SHELL=/bin/bash
VTE_VERSION=5202
QT_IM_MODULE=fcitx
XMODIFIERS=@im=fcitx
XDG_CURRENT_DESKTOP=GNOME
GNOME_TERMINAL_SERVICE=:1.107
XDG_SEAT=seat0
SHLVL=2
GDMSESSION=gnome
GNOME_DESKTOP_SESSION_ID=this-is-deprecated
LOGNAME=cike
DBUS_SESSION_BUS_ADDRESS=unix:path=/run/user/1000/bus
XDG_RUNTIME_DIR=/run/user/1000
PATH=/usr/local/bin:/usr/bin:/bin:/usr/local/games:/usr/games
SESSION_MANAGER=local/debian:@/tmp/.ICE-unix/1055,unix/debian:/tmp/.ICE-unix/1055
GTK_IM_MODULE=fcitx
OLDPWD=/home/cike/workspace/test
_=./a.out

auxiliary vectors:
auxv type:33, val:0x121d1000
auxv type:16, val:0xbfebfbff
auxv type:6, val:0x1000
auxv type:17, val:0x64
auxv type:3, val:0xdb1e4040
auxv type:4, val:0x38
auxv type:5, val:0x9
auxv type:7, val:0x30912000
auxv type:8, val:0x0
auxv type:9, val:0xdb1e45d0
auxv type:11, val:0x3e8
auxv type:12, val:0x3e8
auxv type:13, val:0x3e8
auxv type:14, val:0x3e8
auxv type:23, val:0x0
auxv type:25, val:0x1200c7c9
auxv type:26, val:0x0
auxv type:31, val:0x1200eff0
auxv type:15, val:0x1200c7d9

address:7ffd1200e5fb, env0_ascii_string:LS_COLORS=rs=0:di=01;34:ln=01;36:mh=00:pi=40;33:so=01;35:do=01;35:bd=40;33;01:cd=40;33;01:or=40;31;01:mi=00:su=37;41:sg=30;43:ca=30;41:tw=30;42:ow=34;42:st=37;44:ex=01;32:*.tar=01;31:*.tgz=01;31:*.arc=01;31:*.arj=01;31:*.taz=01;31:*.lha=01;31:*.lz4=01;31:*.lzh=01;31:*.lzma=01;31:*.tlz=01;31:*.txz=01;31:*.tzo=01;31:*.t7z=01;31:*.zip=01;31:*.z=01;31:*.Z=01;31:*.dz=01;31:*.gz=01;31:*.lrz=01;31:*.lz=01;31:*.lzo=01;31:*.xz=01;31:*.zst=01;31:*.tzst=01;31:*.bz2=01;31:*.bz=01;31:*.tbz=01;31:*.tbz2=01;31:*.tz=01;31:*.deb=01;31:*.rpm=01;31:*.jar=01;31:*.war=01;31:*.ear=01;31:*.sar=01;31:*.rar=01;31:*.alz=01;31:*.ace=01;31:*.zoo=01;31:*.cpio=01;31:*.7z=01;31:*.rz=01;31:*.cab=01;31:*.wim=01;31:*.swm=01;31:*.dwm=01;31:*.esd=01;31:*.jpg=01;35:*.jpeg=01;35:*.mjpg=01;35:*.mjpeg=01;35:*.gif=01;35:*.bmp=01;35:*.pbm=01;35:*.pgm=01;35:*.ppm=01;35:*.tga=01;35:*.xbm=01;35:*.xpm=01;35:*.tif=01;35:*.tiff=01;35:*.png=01;35:*.svg=01;35:*.svgz=01;35:*.mng=01;35:*.pcx=01;35:*.mov=01;35:*.mpg=01;35:*.mpeg=01;35:*.m2v=01;35:*.mkv=01;35:*.webm=01;35:*.ogm=01;35:*.mp4=01;35:*.m4v=01;35:*.mp4v=01;35:*.vob=01;35:*.qt=01;35:*.nuv=01;35:*.wmv=01;35:*.asf=01;35:*.rm=01;35:*.rmvb=01;35:*.flc=01;35:*.avi=01;35:*.fli=01;35:*.flv=01;35:*.gl=01;35:*.dl=01;35:*.xcf=01;35:*.xwd=01;35:*.yuv=01;35:*.cgm=01;35:*.emf=01;35:*.ogv=01;35:*.ogx=01;35:*.aac=00;36:*.au=00;36:*.flac=00;36:*.m4a=00;36:*.mid=00;36:*.midi=00;36:*.mka=00;36:*.mp3=00;36:*.mpc=00;36:*.ogg=00;36:*.ra=00;36:*.wav=00;36:*.oga=00;36:*.opus=00;36:*.spx=00;36:*.xspf=00;36:
address:7ffd1200e5f3 ~ 7ffd1200e5fa, argument0_ascii_string:./a.out
address:7ffd1200c7e0 ~ 7ffd1200e5f2, here contain 7699 bytes data
address:7ffd1200c7d9 ~ 7ffd1200c7df, String identifying platform:x86_64
address:7ffd1200c7c9 ~ 7ffd1200c7d8, rand_bytes[16]: 193 130 184 246 204 82 221 150 58 249 82 90 18 26 172 195
address:7ffd1200c680 ~ 7ffd1200c7b0, auxivilary vector
address:7ffd1200c548 ~ 7ffd1200c678, environment vector
address:7ffd1200c538 ~ 7ffd1200c540, argv
address:7ffd1200c530, argc
参考: About ELF Auxiliary Vectors 《程序员自我修养》7.5章节
Issue20 获取签名apk的证书
本文介绍获取签名.apk文件的证书的几种方式,重点介绍从.RSA文件中获取
1. 使用keytool工具从keystrore文件中获取
$ keytool -export -alias key0 -file my.cer -keystore my.jks
<context_instance>.getPackageManager().getPackageInfo(<context_instance>.getPackageName(),PackageManager.GET_SIGNATURES).signatures[0].toCharsString();//context_instance表示是一个Context实例
3. 从.RSA文件中获取
将被签名过的.apk文件解压即可得到/META-INF/CERT.RSA文件,接下来我们需要分析CERT.RSA是什么格式文件,里面包含什么信息。
通过阅读Android源码SignApk.java 中生成.RSA的代码段
/** Sign data and write the digital signature to 'out'. */
    private static void writeSignatureBlock(
        CMSTypedData data, X509Certificate publicKey, PrivateKey privateKey,
        OutputStream out)
        throws IOException,
               CertificateEncodingException,
               OperatorCreationException,
               CMSException {
        ArrayList<X509Certificate> certList = new ArrayList<X509Certificate>(1);
        certList.add(publicKey);
        JcaCertStore certs = new JcaCertStore(certList);
        CMSSignedDataGenerator gen = new CMSSignedDataGenerator();
        ContentSigner signer = new JcaContentSignerBuilder(getSignatureAlgorithm(publicKey))
            .setProvider(sBouncyCastleProvider)
            .build(privateKey);
        gen.addSignerInfoGenerator(
            new JcaSignerInfoGeneratorBuilder(
                new JcaDigestCalculatorProviderBuilder()
                .setProvider(sBouncyCastleProvider)
                .build())
            .setDirectSignature(true)
            .build(signer, publicKey));
        gen.addCertificates(certs);
        CMSSignedData sigData = gen.generate(data, false);
        ASN1InputStream asn1 = new ASN1InputStream(sigData.getEncoded());
        DEROutputStream dos = new DEROutputStream(out);
        dos.writeObject(asn1.readObject());
    }
可以看到代码使用了CMSSignedDataGenerator类去生成.RSA文件,根据CMSSignedDataGenerator的说明文档描述:"general class for generating a pkcs7-signature message",可知该类是用来生成PKCS7签名信息的,所以生成的CERT.RSA遵循PKCS#7标准,PKCS#7文件格式如下(使用ASN.1语法)
SignedData ::= SEQUENCE {
     version Version,
     digestAlgorithms DigestAlgorithmIdentifiers,
     contentInfo ContentInfo,
     certificates[0] IMPLICIT ExtendedCertificatesAndCertificates OPTIONAL,
     crls [1] IMPLICIT CertificateRevocationLists OPTIONAL,
     signerInfos SignerInfos
}
该ASN.1表示法来自RFC2315
可以看到PKCS7中包含了证书(certificates)
如何从PKCS#7文件中获取证书呢,这里介绍使用openssl command方式和openssl api方式
openssl command
$ openssl pkcs7 -inform DER -in CERT.RSA -print_certs | openssl x509 -outform DER -out CERT.cer
openssl api
$ cat get_cer_from_pkcs7.c
#include <stdio.h>
#include <openssl/pkcs7.h>
#include <openssl/x509.h>
#include <openssl/bio.h>
#include <openssl/pem.h>
#include <openssl/err.h>

int main(int argc, char **argv)
{
    PKCS7 *p7 = NULL;
    FILE *f;
    int i;
    BIO *in;
    BIO *out;
    STACK_OF(X509) *certs = NULL;
    f = fopen("my.cer", "wb");//将certificate保存在my.cer文件
    if (f == NULL) {
        perror("fopen");
        exit(1);
    }

    CRYPTO_malloc_init();                                               \
    ERR_load_crypto_strings();
    OpenSSL_add_all_algorithms();

    in = BIO_new(BIO_s_file());
    BIO_read_filename(in, argv[1]);

    p7 = d2i_PKCS7_bio(in, NULL);
    i = OBJ_obj2nid(p7->type);
    if(i == NID_pkcs7_signed) {
        certs = p7->d.sign->cert;
    } else if(i == NID_pkcs7_signedAndEnveloped) {
        certs = p7->d.signed_and_enveloped->cert;
    }

    for (i = 0; certs && i < sk_X509_num(certs); i++) {
        X509 *x = sk_X509_value(certs,i);
        if(i2d_X509_fp(f, x) == 0) {
            perror("i2d_X509_fp");
        }
    }
    fclose(f);
}
$ gcc get_cer_from_pkcs7.c -lcrypto
$ ldd a.out
	linux-vdso.so.1 (0x00007ffd77782000)
	libcrypto.so.1.0.2 => /usr/lib/x86_64-linux-gnu/libcrypto.so.1.0.2 (0x00007f5defb39000)
	libc.so.6 => /lib/x86_64-linux-gnu/libc.so.6 (0x00007f5def79a000)
	libdl.so.2 => /lib/x86_64-linux-gnu/libdl.so.2 (0x00007f5def596000)
	/lib64/ld-linux-x86-64.so.2 (0x00007f5df01a0000)
最终放几张输出截图证明这几种方式提取的证书内容是一样的
Android API
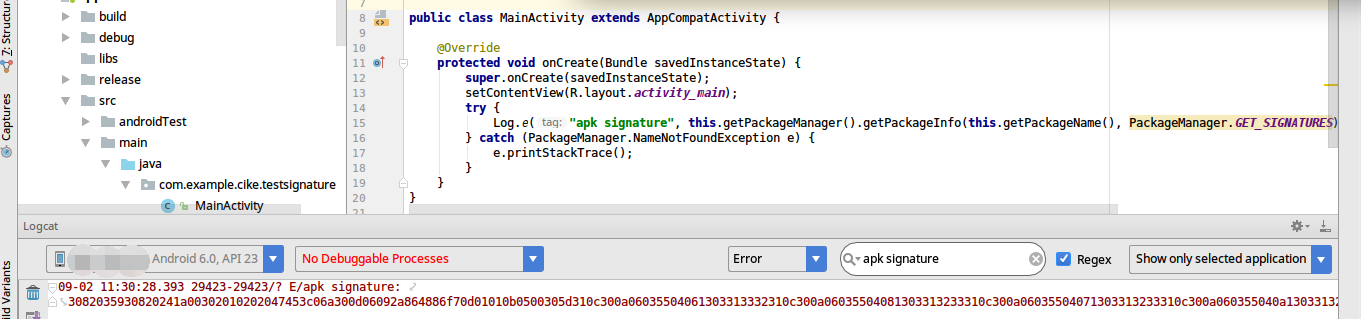
keytool
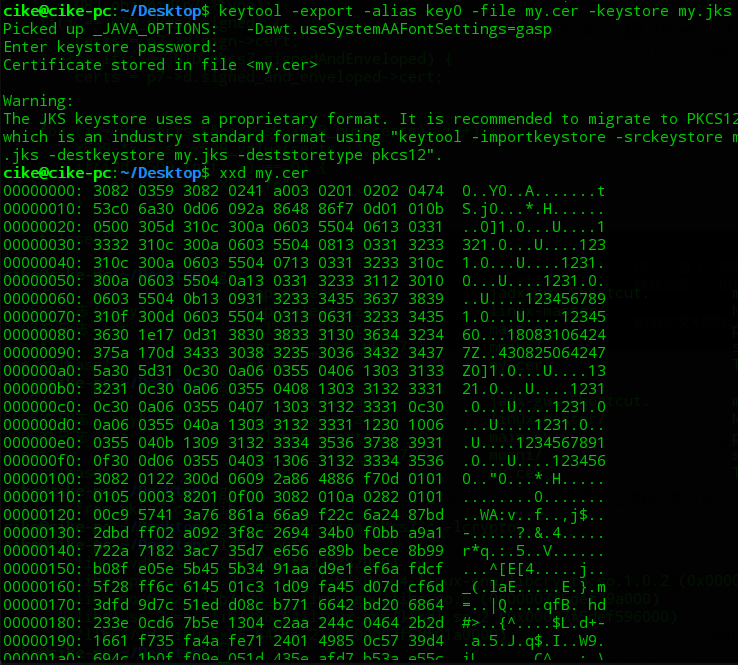
openssl command
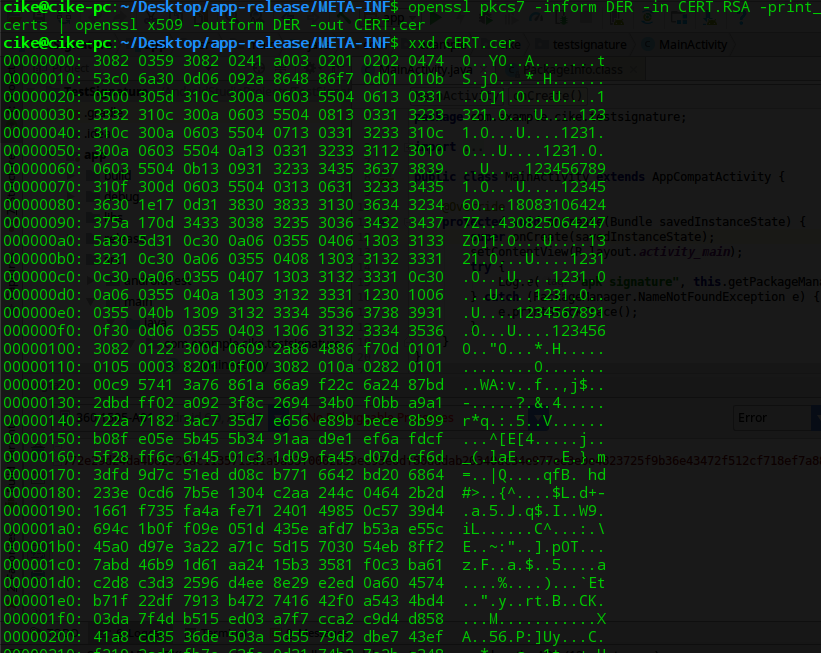
使用openssl api
📄 [图片文字版] 终端演示从 APK 签名块提取证书:在 app-release/META-INF 目录用 gcc get_cer_from_pkcs7.c -o get_cer_from_pkcs7 -lcrypto 编译,运行 ./get_cer_from_pkcs7 CERT.RSA 生成 my.cer,再用 xxd my.cer 十六进制查看:文件以 3082 0359、3082 0241 开头的 DER 编码证书,其后为版本、序列号、OID 等字段的十六进制与 ASCII 对照。https://user-images.githubusercontent.com/12814622/44951987-ce5f7780-aea5-11e8-8ddf-5ccd22ba949e.png
参考: Android中的签名和签名文件的生成过程 how to Read the certificates file from the PKCS7.p7b certificate file usind openssl? Regarding: PKCS7, X509 and DER
拓展阅读: getting apk signature outside of android
Issue33 TLS-PSK协议分析
本文通过一个演示例子讲解基于PSK( Pre-Shared Key,预共享密钥)的TLS(Transport Layer Security)协议是如何加密及计算MAC的,对于想要实现TLS-PSK Server及client的读者应该有所帮助。
在演示例子中,客户端与服务端使用TLS1.2及PSK-AES128-CBC-SHA256密码套件进行交互,客户端发送"hi server\n",服务端响应"hi client\n",然后正常终止连接
准备工作
- 运行tcpdump,将后续捕获到的TLS数据保存到文件
- 使用openssl client与openssl server建立TLS-PSK连接
- 使用Wireshark解析TLS数据
运行tcpdump,将后续捕获到的TLS数据保存到文件
抓取本地4433端口流量并保存到tls_psk.pcap文件
$ tcpdump port 4433 -i lo -w tls_psk.pcap
这里抓取的端口要与TLS server监听的端口一致
使用openssl client与openssl server建立TLS-PSK连接
使用openssl server启动一个TLS server
$ openssl s_server -cipher PSK-AES128-CBC-SHA256 -tls1_2 -nocert -no_ticket -psk_identity my_psk_id -psk 000102030405060708090A0B0C0D0E0F
-nocert表示不使用证书,这是PSK与PKI(Public Key Infrastructure)的一个区别
-no_ticket用于disable session ticket,session ticket可以优化握手效率,但会复杂化首次握手的流程,所以不启用
默认监听4433端口
使用openssl client与server建立TLS连接
$ openssl s_client -cipher PSK-AES128-CBC-SHA256 -tls1_2 -psk_identity my_psk_id -psk 000102030405060708090A0B0C0D0E0F
使用Wireshark解析TLS数据
运行Wireshark,打开tls_psk.cap文件,为了Wireshark能够解析密文,还需要配置Pre-Shared Key,点击编辑 -> 首选项 -> Protocols -> TLS,在Pre-Shared Key中输入密钥值000102030405060708090A0B0C0D0E0F
在TLS配置页面可以顺便选择TLS debug file,该功能会将Wireshark解析TLS的一些过程数据比如master secret,key block等保存到文件中,方便我们比对计算结果排查问题,非常有用
最终得到TLS数据如下
Client Hello
16 03 01 00 7d 01 00 00 79 03 03 36 9e 43 08 87 60 b8 b1 e0 61 cd d8 1f 4b ab 5e e1 38 08 c2 d9 d5 50 9d 92 61 3e af 62 55 f6 be 00 00 04 00 ae 00 ff 01 00 00 4c 00 00 00 0e 00 0c 00 00 09 6c 6f 63 61 6c 68 6f 73 74 00 23 00 00 00 16 00 00 00 17 00 00 00 0d 00 2a 00 28 04 03 05 03 06 03 08 07 08 08 08 09 08 0a 08 0b 08 04 08 05 08 06 04 01 05 01 06 01 03 03 03 01 03 02 04 02 05 02 06 02
Server Hello
16 03 03 00 59 02 00 00 55 03 03 c5 b4 a2 ca 4e fb 20 21 74 75 fc 9f 91 78 38 ee 47 30 74 8f 8e d9 e4 56 a9 bf 94 0d 55 eb cb 22 20 9e e6 cb c2 77 ad db 29 05 52 eb ce 60 81 fa 71 43 63 5b 9b c9 31 84 f0 88 09 dc d0 21 8a ff 48 00 ae 00 00 0d ff 01 00 01 00 00 16 00 00 00 17 00 00
Server Hello Done
16 03 03 00 04 0e 00 00 00
Client Key Exchange
16 03 03 00 0f 10 00 00 0b 00 09 6d 79 5f 70 73 6b 5f 69 64
Client Change Cipher Spec
14 03 03 00 01 01
Client Finished
16 03 03 00 50 98 9c 70 7f 7b b2 d1 9d 38 70 c1 b0 81 8d 60 97 07 cd 28 0b 61 64 bf ae 46 08 22 90 34 56 82 3a 5e b4 4a e0 51 bd df 9b 34 44 92 67 1b 6c 22 44 60 92 03 e8 d4 f7 09 12 37 56 30 b7 ae 1f 7b 67 58 d5 72 ce 4e 36 89 a6 5a 90 d3 15 2f 53 1a 6c
Server Change Cipher Spec
14 03 03 00 01 01
Server Finished
16 03 03 00 50 41 54 6e f1 7a 2a 3f 1d 0f 26 29 95 7f ba 0a f2 d8 4b 4a 9a c5 b3 b4 71 2e ef 70 fa 39 17 5e cc 90 9f 33 16 c2 e3 ad 4a 3c 95 f1 fe 90 cd cc a1 98 d8 7c 0a b4 d6 50 3a fa 6a 16 f5 6e ff 06 77 a7 f4 66 db d2 fb b4 be cf 8d 7b c8 7c 78 78 71
Client Application Data
17 03 03 00 40 19 77 d0 be 1f b4 83 f9 53 6d 8c f5 06 05 b3 10 e9 98 68 ed bf 30 93 e1 74 cc 22 3a 3b 31 a3 93 26 e2 0c 1c c3 c8 eb d9 f6 ec 11 5a b5 a1 bd 65 7c 28 e4 5b 0d c5 08 65 b7 f3 4a 93 91 83 8a 3a
Server Application Data
17 03 03 00 40 07 80 69 09 82 fd c3 7f 28 18 81 ad 78 4b 78 45 12 fb 47 ca 97 60 a2 50 65 32 97 d4 9e 2c 65 48 2a e3 f3 2b 3b d1 82 6c 30 e1 e8 45 46 32 e0 ca b0 40 96 26 98 fc 4f db d4 c2 33 23 10 a8 6c f3
Alert(Client Close Notify)
15 03 03 00 40 4f aa 08 0c ec c9 19 a0 87 e5 8d f8 69 49 70 54 ac bf 46 58 d5 76 18 1e 22 77 57 1b 86 9d 03 c5 b5 4d 7b 2b a1 e8 29 00 07 23 41 be e6 ad c0 23 61 ec b6 d3 83 dd 0f ed 06 43 c5 03 c9 89 4c ac
消息数据的每个字节含义在wireshark中已提示得很清晰,就不一一解释了,本文演示例子抓包的数据文件可以点击tls_psk.pcap下载,方便跟着文章一步一步计算
这里重点关注加解密这一块,接下来将还原Finished,Application Data及Alert消息的密文构造过程
从Client Hello及Server Hello消息可知
- 协商的TLS版本为1.2
- 协商的密码套件为PSK-AES128-CBC-SHA256
- client random = 369e43088760b8b1e061cdd81f4bab5ee13808c2d9d5509d92613eaf6255f6be
- server random = c5b4a2ca4efb20217475fc9f917838ee4730748f8ed9e456a9bf940d55ebcb22
并且协商使用了下面这两个扩展(extension)
这两个扩展要重点关注,他们改变了RFC5246中定义的TLS1.2协议的默认行为
首先计算master secret,要特别注意的是例子中使用了extended master secret extension,要参考rfc7627#section-4而非RFC5246,rfc7627定义如下
master_secret = PRF(pre_master_secret, "extended master secret",
				session_hash)[0..47];
session_hash定义在RFC7627#section-3
When a full TLS handshake takes place, we define
session_hash = Hash(handshake_messages)
where "handshake_messages" refers to all handshake messages sent or received, starting at the ClientHello up to and including the ClientKeyExchange message, including the type and length fields of the handshake messages. This is the concatenation of all the exchanged Handshake structures, as defined in Section 7.4 of [RFC5246].
For TLS 1.2, the "Hash" function is the one defined in Section 7.4.9 of [RFC5246] for the Finished message computation. For all previous versions of TLS, the "Hash" function computes the concatenation of MD5 and SHA1.
PSK的premaster secret定义在RFC4279#section-2
The premaster secret is formed as follows: if the PSK is N octets long, concatenate a uint16 with the value N, N zero octets, a second uint16 with the value N, and the PSK itself.
PRF(Pseudorandom Function)定义在RFC5246#section-5
PRF(secret, label, seed) = P_\<hash>(secret, label + seed)

P_hash(secret, seed) = HMAC_hash(secret, A(1) + seed) +
                       HMAC_hash(secret, A(2) + seed) +
                       HMAC_hash(secret, A(3) + seed) + ...
where + indicates concatenation.
A() is defined as:
  A(0) = seed
  A(i) = HMAC_hash(secret, A(i-1))
针对密码套件PSK-AES128-CBC-SHA256,PRF使用的hash算法为SHA256,在RFC5487#section-3.1中描述
CipherSuite TLS_PSK_WITH_AES_128_CBC_SHA256 = {0x00,0xAE}; CipherSuite TLS_PSK_WITH_AES_256_CBC_SHA384 = {0x00,0xAF}; CipherSuite TLS_PSK_WITH_NULL_SHA256 = {0x00,0xB0}; CipherSuite TLS_PSK_WITH_NULL_SHA384 = {0x00,0xB1};
The above four cipher suites are the same as the corresponding cipher suites in RFC 4279 and RFC 4785 (with names ending in "_SHA" in place of "_SHA256" or "_SHA384"), except for the hash and PRF algorithms, as explained below.
o For cipher suites with names ending in "_SHA256":
  \*  The MAC is HMAC [RFC2104] with SHA-256 as the hash function.

  \* When negotiated in a version of TLS prior to 1.2, the PRF from that version is used; otherwise, the PRF is the TLS PRF [RFC5246] with SHA-256 as the hash function.
有了规范依据后,接下来代入实际数据进行计算
###### 计算premaster secret ######
premaster secret  = 0010 + 00000000000000000000000000000000 + 0010 + 000102030405060708090A0B0C0D0E0F = 0010000000000000000000000000000000000010000102030405060708090A0B0C0D0E0F

###### 计算sessIon_hash(handshake_messages) ######
handshake_messages是client hello ~ ClientKeyExchange之间所有content type为handshake(0x16)的消息的拼接,在上述例子即client hello, server hello, server hello done, client key exchange 这4个消息,change cipher spec的content type不是handshake因此不包含,需要注意这里拼接的每个handshake message不包含record layer headers,即最开始的ContentType,ProtocolVersion及length这几个参数

handshake_messages = client hello + server hello + sever hello done + client key exchange = 010000790303369e43088760b8b1e061cdd81f4bab5ee13808c2d9d5509d92613eaf6255f6be00000400ae00ff0100004c0000000e000c0000096c6f63616c686f7374002300000016000000170000000d002a0028040305030603080708080809080a080b080408050806040105010601030303010302040205020602020000550303c5b4a2ca4efb20217475fc9f917838ee4730748f8ed9e456a9bf940d55ebcb22209ee6cbc277addb290552ebce6081fa7143635b9bc93184f08809dcd0218aff4800ae00000dff0100010000160000001700000e0000001000000b00096d795f70736b5f6964

session_hash = SHA256(handshake_messages) = d08e6ed25877545d37396ff946bc0c2c9a99b74732ec025bce300814a42e0ff7

###### 计算master secret ######
A(0) = seed = "extended master secret" + session_hash = 657874656E646564206D617374657220736563726574d08e6ed25877545d37396ff946bc0c2c9a99b74732ec025bce300814a42e0ff7
A(1) = HMAC_SHA256(pre_master_secret, A(0)) = ad934828a4ed92206f0c1697ec010458eac51f2fa632a534e35b210bc5804e20
A(2) = HMAC_SHA256(pre_master_secret, A(1)) = ee7461a8253437d4bce063e2aded9cc4d5b654025dbaf671d504fbf7814b7637

HMAC_SHA256(pre_master_secret, A(1) + seed) = 499404bc28ade1b35d0a7a4a946e7c0459b15531e1dd5aa208f2752361afb96b
HMAC_SHA256(pre_master_secret, A(2) + seed) = f5b8b08057b01bd1b9b8dc862490f9336e8ad8a69804ae05b35d340c611b6518

master secret = PRF(pre_master_secret, seed)[0..47] = P_hash(pre_master_secret, seed)[0..47] = HMAC_SHA256(pre_master_secret, A(1) + seed)[all 32 bytes] + HMAC_SHA256(pre_master_secret, A(2) + seed)[0..15]

至此可得到48字节的master secret = 499404bc28ade1b35d0a7a4a946e7c0459b15531e1dd5aa208f2752361afb96bf5b8b08057b01bd1b9b8dc862490f933
接下来计算client/server的write key及mac key,需要先生成key block,定义在RFC5246#section-6.3
key_block = PRF(SecurityParameters.master_secret,
                "key expansion",
                SecurityParameters.server_random +
                SecurityParameters.client_random);

until enough output has been generated.  Then, the key_block is partitioned as follows:

client_write_MAC_key[SecurityParameters.mac_key_length]
server_write_MAC_key[SecurityParameters.mac_key_length]
client_write_key[SecurityParameters.enc_key_length]
server_write_key[SecurityParameters.enc_key_length]
                      Key      IV   Block
Cipher        Type    Material  Size  Size
------------  ------  --------  ----  -----
NULL          Stream      0       0    N/A
RC4_128       Stream     16       0    N/A
3DES_EDE_CBC  Block      24       8      8
AES_128_CBC   Block      16      16     16
AES_256_CBC   Block      32      16     16

MAC       Algorithm    mac_length  mac_key_length
--------  -----------  ----------  --------------
NULL      N/A              0             0
MD5       HMAC-MD5        16            16
SHA       HMAC-SHA1       20            20
SHA256    HMAC-SHA256     32            32

Key Material
  The number of bytes from the key_block that are used for generating the write keys.
可知PSK-AES128-CBC-SHA256密码套件的enc_key_length为16字节,mac_key_length为32字节
因此key_block至少需要 2 * 32 + 2 * 16 = 96字节,P_hash需要迭代3次生成96字节数据
###### 计算key block ######

A(0) = seed = "key expansion", server_random + client_random = 6B657920657870616E73696F6Ec5b4a2ca4efb20217475fc9f917838ee4730748f8ed9e456a9bf940d55ebcb22369e43088760b8b1e061cdd81f4bab5ee13808c2d9d5509d92613eaf6255f6be
A(1) = HMAC_SHA256(master_secret, A(0)) = 2974a1366b2acfae12ae915c5e22cff27c68c19135a0e9d4c4c60c9530690861
A(2) = HMAC_SHA256(master_secret, A(1)) = 309cc823366446903ffd3e6147f1fd3f44a991685def09fc51feeee88ad468a3
A(3) = HMAC_SHA256(master_secret, A(2)) = 5783e391ea9f845fe698a4a48a9846700ffb64c60b72fd408d09c68f3929513a

HMAC_hash(master_secret, A(1) + seed) =
1ae8a34eaeee0c7a2023ebdc307427736ca15a69f76e933f10f7bdd6c7ea4ac1
HMAC_hash(master_secret, A(2) + seed) =
af14436461232f2786d91eaf9ea2465e20cb7f7ea796fd9a3cbeac872f3a5276
HMAC_hash(master_secret, A(3) + seed) =
2b492656fc20fc2b103fc49e707bd65826203fabe4fe7aa49f18e4d66a5189fc

key_block = PRF(master_secret, seed) = P_SHA256(master_secret, seed) = HMAC_SHA256(master_secret, A(1) + seed) + HMAC_SHA256(master_secret, A(2) + seed) + HMAC_SHA256(master_secret, A(3) + seed)

得到key_block = 1ae8a34eaeee0c7a2023ebdc307427736ca15a69f76e933f10f7bdd6c7ea4ac1af14436461232f2786d91eaf9ea2465e20cb7f7ea796fd9a3cbeac872f3a52762b492656fc20fc2b103fc49e707bd65826203fabe4fe7aa49f18e4d66a5189fc

client_write_MAC_key[32] = 1ae8a34eaeee0c7a2023ebdc307427736ca15a69f76e933f10f7bdd6c7ea4ac1
server_write_MAC_key[32] = af14436461232f2786d91eaf9ea2465e20cb7f7ea796fd9a3cbeac872f3a5276
client_write_key[16] = 2b492656fc20fc2b103fc49e707bd658
server_write_key[16] = 26203fabe4fe7aa49f18e4d66a5189fc
到这里,用于加密及计算MAC的密钥已经得到了
接下来解析finished message,还是先介绍理论依据,根据RFC5246#section-7.4.9,Finished message定义如下,包含了12字节的verify_data
struct {
  opaque verify_data[verify_data_length];
} Finished;

verify_data
  PRF(master_secret, finished_label, Hash(handshake_messages))
  [0..verify_data_length-1];

finished_label
  For Finished messages sent by the client, the string "client finished".  For Finished messages sent by the server, the string "server finished".

Any cipher suite which does not explicitly specify verify_data_length has a verify_data_length equal to 12

the Hash MUST be the Hash used as the basis for the PRF

All of the data from all messages in this handshake (not including any HelloRequest messages) up to, but not including, this message.  This is only data visible at the handshake layer and does not include record layer headers.
接下来介绍TLS-PSK是如何对消息进行MAC的计算及加密的,需要特别注意的是上述例子client与server协商使用了encrypt-then-mac extension,MAC的计算需要参考RFC7366#section-3
Once the use of encrypt-then-MAC has been negotiated, processing of TLS/DTLS packets switches from the standard:

encrypt( data || MAC || pad )

to the new:

encrypt( data || pad ) || MAC

with the MAC covering the entire packet up to the start of the MAC value.
for TLS 1.1 and greater with an explicit IV is:

MAC(MAC_write_key, seq_num +
    TLSCipherText.type +
    TLSCipherText.version +
    TLSCipherText.length +
    IV +
    ENC(content + padding + padding_length));

The overall TLS packet is then:
struct {
       ContentType type;
       ProtocolVersion version;
       uint16 length;
       GenericBlockCipher fragment;
       opaque MAC;
} TLSCiphertext;
sequence number见RFC5246#section-6.1
sequence number Each connection state contains a sequence number, which is maintained separately for read and write states. The sequence number MUST be set to zero whenever a connection state is made the active state. Sequence numbers are of type uint64 and may not exceed 2^64-1. Sequence numbers do not wrap. If a TLS implementation would need to wrap a sequence number, it must renegotiate instead. A sequence number is incremented after each record: specifically, the first record transmitted under a particular connection state MUST use sequence number 0.
个人理解简单来说就是一个8字节的值,初始值为0,client及server针对接收和发送消息都维护自己的两个sequence number,每次接收消息后read sequence number + 1,每次发送消息后write sequence number+1
而加密规则还是需要参考RFC5246#section-6.2.3,要注意GenericBlockCipher中的MAC计算以RFC7366规范为准
struct {
	ContentType type;
	ProtocolVersion version;
	uint16 length;
	select (SecurityParameters.cipher_type) {
		case stream: GenericStreamCipher;
		case block:  GenericBlockCipher;
		case aead:   GenericAEADCipher;
	} fragment;
} TLSCiphertext;

struct {
    opaque IV[SecurityParameters.record_iv_length];
    block-ciphered struct {
        opaque content[TLSCompressed.length];
        opaque MAC[SecurityParameters.mac_length];
        uint8 padding[GenericBlockCipher.padding_length];
        uint8 padding_length;
	};
} GenericBlockCipher;
接下来代入具体数值还原client finished message
###### 计算verify data ######

handshake_messages = client hello + client hello + server hello + server hello done + client key exchange =
010000790303369e43088760b8b1e061cdd81f4bab5ee13808c2d9d5509d92613eaf6255f6be00000400ae00ff0100004c0000000e000c0000096c6f63616c686f7374002300000016000000170000000d002a0028040305030603080708080809080a080b080408050806040105010601030303010302040205020602020000550303c5b4a2ca4efb20217475fc9f917838ee4730748f8ed9e456a9bf940d55ebcb22209ee6cbc277addb290552ebce6081fa7143635b9bc93184f08809dcd0218aff4800ae00000dff0100010000160000001700000e0000001000000b00096d795f70736b5f6964

SHA256(handshake_messages) = d08e6ed25877545d37396ff946bc0c2c9a99b74732ec025bce300814a42e0ff7

A(0) = seed = "client finished" + SHA256(handshake_messages) = 636C69656E742066696E6973686564d08e6ed25877545d37396ff946bc0c2c9a99b74732ec025bce300814a42e0ff7
A(1) = HMAC_SHA256(master_secret, A(0)) = 44486e65f5bec93fa356cb38d09e0186bf7e5d9176f2021a79239ac1762e2158

HMAC_SHA256(master_secret, A(1) + seed) = b776a81f5cb028809bf74714e1bda48063764d61b56b8ef6c9a1186958f18092

verify_data = PRF(master_secret, seed)[0..11] = P_SHA256(master_secret, seed)[0..11] = HMAC_SHA256(master_secret, A(1) + seed)[0..11] = b776a81f5cb028809bf74714

###### 校验MAC ######

client finisded message
16 03 03 00 50 98 9c 70 7f 7b b2 d1 9d 38 70 c1 b0 81 8d 60 97 07 cd 28 0b 61 64 bf ae 46 08 22 90 34 56 82 3a 5e b4 4a e0 51 bd df 9b 34 44 92 67 1b 6c 22 44 60 92 03 e8 d4 f7 09 12 37 56 30 b7 ae 1f 7b 67 58 d5 72 ce 4e 36 89 a6 5a 90 d3 15 2f 53 1a 6c

由引用的规范说明可知finished message的fragment由IV,block-ciphered text,MAC三部分组成,因此其中密文部分组成如下
iv: 989c707f7bb2d19d3870c1b0818d6097
block-ciphered text: 07cd280b6164bfae460822903456823a5eb44ae051bddf9b344492671b6c2244
mac: 609203e8d4f70912375630b7ae1f7b6758d572ce4e3689a65a90d3152f531a6c

MAC_write_key = client_write_MAC_key = 1ae8a34eaeee0c7a2023ebdc307427736ca15a69f76e933f10f7bdd6c7ea4ac1
TLSCipherText.seq_num = 0000000000000000
TLSCipherText.type = 16
TLSCipherText.version = 0303
TLSCipherText.length = 0050 - 0020 = 0030 # 这里要特别注意要先减掉MAC的长度
ENC(content + padding + padding_length) = 07cd280b6164bfae460822903456823a5eb44ae051bddf9b344492671b6c2244

MAC(MAC_write_key, seq_num +
 TLSCipherText.type +
 TLSCipherText.version +
 TLSCipherText.length +
 IV +
 ENC(content + padding + padding_length)) = 609203e8d4f70912375630b7ae1f7b6758d572ce4e3689a65a90d3152f531a6c

$ echo "00000000000000001603030030989c707f7bb2d19d3870c1b0818d609707cd280b6164bfae460822903456823a5eb44ae051bddf9b344492671b6c2244" | xxd -r -p | openssl dgst -sha256 -mac hmac -macopt hexkey:1ae8a34eaeee0c7a2023ebdc307427736ca15a69f76e933f10f7bdd6c7ea4ac1
结果:609203e8d4f70912375630b7ae1f7b6758d572ce4e3689a65a90d3152f531a6c

得到的MAC与实际抓包数据一致

###### 解密block-ciphered text ######

client_write_key = 2b492656fc20fc2b103fc49e707bd658
block-ciphered text = 07cd280b6164bfae460822903456823a5eb44ae051bddf9b344492671b6c2244
iv = 989c707f7bb2d19d3870c1b0818d6097

$ echo "07cd280b6164bfae460822903456823a5eb44ae051bddf9b344492671b6c2244" | xxd -r -p | openssl aes-128-cbc -d -K 2b492656fc20fc2b103fc49e707bd658 -iv 989c707f7bb2d19d3870c1b0818d6097 -nopad | xxd -p
结果:1400000cb776a81f5cb028809bf747140f0f0f0f0f0f0f0f0f0f0f0f0f0f0f0f

14 - handshake type:finished
00000c - length
b776a81f5cb028809bf74714 - verify data
0f0f0f0f0f0f0f0f0f0f0f0f0f0f0f0f - padding[padding_length] + padding_length

解密后得到的verify_data与前面计算结果一致
Server finished message的解析过程类似,理论层面不再赘述,直接代入具体数值计算
###### 计算verify data ######
handshake_messages = client hello + client hello + server hello + server hello done + client key exchange + client finished = 010000790303369e43088760b8b1e061cdd81f4bab5ee13808c2d9d5509d92613eaf6255f6be00000400ae00ff0100004c0000000e000c0000096c6f63616c686f7374002300000016000000170000000d002a0028040305030603080708080809080a080b080408050806040105010601030303010302040205020602020000550303c5b4a2ca4efb20217475fc9f917838ee4730748f8ed9e456a9bf940d55ebcb22209ee6cbc277addb290552ebce6081fa7143635b9bc93184f08809dcd0218aff4800ae00000dff0100010000160000001700000e0000001000000b00096d795f70736b5f69641400000cb776a81f5cb028809bf74714

要特别注意上面拼接的client finished是加密前的消息体:1400000cb776a81f5cb028809bf74714

A(0) = seed = "server finished" + SHA256(handshake_messages) = 7365727665722066696e6973686564f9387601c17d5a57310b1828cf9b4a7df5e0933e8e89b92ef50f89f7c992a61b
A(1) = HMAC_SHA256(master_secret, A(0)) = bb74f4bb302f4772c8c3392daa762cac19ec98646eff3af80c8cdbff062dc923

HMAC_SHA256(master_secret, A(1) + seed) = ae30c192dbcd56cbcc927f0576b392cfbfb2a25d0745be165cfb0610fc69bc2f

verify_data = PRF(master_secret, seed)[0..11] = P_SHA256(master_secret, seed)[0..11] = HMAC_SHA256(master_secret, A(1) + seed)[0..11] = ae30c192dbcd56cbcc927f05

###### 校验MAC ######
16 03 03 00 50 41 54 6e f1 7a 2a 3f 1d 0f 26 29 95 7f ba 0a f2 d8 4b 4a 9a c5 b3 b4 71 2e ef 70 fa 39 17 5e cc 90 9f 33 16 c2 e3 ad 4a 3c 95 f1 fe 90 cd cc a1 98 d8 7c 0a b4 d6 50 3a fa 6a 16 f5 6e ff 06 77 a7 f4 66 db d2 fb b4 be cf 8d 7b c8 7c 78 78 71

iv: 41546ef17a2a3f1d0f2629957fba0af2
block-ciphered text: d84b4a9ac5b3b4712eef70fa39175ecc909f3316c2e3ad4a3c95f1fe90cdcca1
mac: 98d87c0ab4d6503afa6a16f56eff0677a7f466dbd2fbb4becf8d7bc87c787871

MAC_write_key = server_write_MAC_key = af14436461232f2786d91eaf9ea2465e20cb7f7ea796fd9a3cbeac872f3a5276
TLSCipherText.seq_num = 0000000000000000
TLSCipherText.type = 16
TLSCipherText.version = 0303
TLSCipherText.length = 0050 - 0020 = 0030 # 减掉MAC的长度
ENC(content + padding + padding_length) = d84b4a9ac5b3b4712eef70fa39175ecc909f3316c2e3ad4a3c95f1fe90cdcca1

MAC(MAC_write_key, seq_num +
 TLSCipherText.type +
 TLSCipherText.version +
 TLSCipherText.length +
 IV +
 ENC(content + padding + padding_length)) = 98d87c0ab4d6503afa6a16f56eff0677a7f466dbd2fbb4becf8d7bc87c787871

$ echo "0000000000000000160303003041546ef17a2a3f1d0f2629957fba0af2d84b4a9ac5b3b4712eef70fa39175ecc909f3316c2e3ad4a3c95f1fe90cdcca1" | xxd -r -p | openssl dgst -sha256 -mac hmac -macopt hexkey:af14436461232f2786d91eaf9ea2465e20cb7f7ea796fd9a3cbeac872f3a5276
结果:98d87c0ab4d6503afa6a16f56eff0677a7f466dbd2fbb4becf8d7bc87c787871

得到的MAC与实际抓包数据一致

###### 解密block-ciphered text ######
server_write_key = 26203fabe4fe7aa49f18e4d66a5189fc
block-ciphered text = d84b4a9ac5b3b4712eef70fa39175ecc909f3316c2e3ad4a3c95f1fe90cdcca1
iv = 41546ef17a2a3f1d0f2629957fba0af2

$ echo "d84b4a9ac5b3b4712eef70fa39175ecc909f3316c2e3ad4a3c95f1fe90cdcca1" | xxd -r -p | openssl aes-128-cbc -d -nopad -K 26203fabe4fe7aa49f18e4d66a5189fc -iv 41546ef17a2a3f1d0f2629957fba0af2  | xxd -p
结果:1400000cae30c192dbcd56cbcc927f050f0f0f0f0f0f0f0f0f0f0f0f0f0f0f0f

14 - handshake type:finished
00000c - length
ae30c192dbcd56cbcc927f05 - verify data
0f0f0f0f0f0f0f0f0f0f0f0f0f0f0f0f - padding[padding_length] + padding_length

解密后得到的verify_data与前面计算结果一致
client application data及server application data的加密及MAC计算与Finished也是一样的,这里只演示client application data的计算
###### 校验MAC ######
Client Application Data

17 03 03 00 40 19 77 d0 be 1f b4 83 f9 53 6d 8c f5 06 05 b3 10 e9 98 68 ed bf 30 93 e1 74 cc 22 3a 3b 31 a3 93 26 e2 0c 1c c3 c8 eb d9 f6 ec 11 5a b5 a1 bd 65 7c 28 e4 5b 0d c5 08 65 b7 f3 4a 93 91 83 8a 3a

iv:1977d0be1fb483f9536d8cf50605b310
block-ciphered text:e99868edbf3093e174cc223a3b31a393
mac:26e20c1cc3c8ebd9f6ec115ab5a1bd657c28e45b0dc50865b7f34a9391838a3a

MAC_write_key = client_write_MAC_key = 1ae8a34eaeee0c7a2023ebdc307427736ca15a69f76e933f10f7bdd6c7ea4ac1
TLSCipherText.seq_num = 0000000000000001
TLSCipherText.type = 17
TLSCipherText.version = 0303
TLSCipherText.length = 0040 - 0020 = 0020 # 减掉MAC的长度
ENC(content + padding + padding_length) = e99868edbf3093e174cc223a3b31a393

MAC(MAC_write_key, seq_num +
 TLSCipherText.type +
 TLSCipherText.version +
 TLSCipherText.length +
 IV +
 ENC(content + padding + padding_length)) = 26e20c1cc3c8ebd9f6ec115ab5a1bd657c28e45b0dc50865b7f34a9391838a3a

$ echo "000000000000000117030300201977d0be1fb483f9536d8cf50605b310e99868edbf3093e174cc223a3b31a393" | xxd -r -p | openssl dgst -mac hmac -sha256 -macopt hexkey:1ae8a34eaeee0c7a2023ebdc307427736ca15a69f76e933f10f7bdd6c7ea4ac1
结果:26e20c1cc3c8ebd9f6ec115ab5a1bd657c28e45b0dc50865b7f34a9391838a3a

得到的MAC与实际抓包数据一致

###### 解密block-ciphered text ######
client_write_key = 2b492656fc20fc2b103fc49e707bd658
block-ciphered text = e99868edbf3093e174cc223a3b31a393
IV = 1977d0be1fb483f9536d8cf50605b310

$ echo "e99868edbf3093e174cc223a3b31a393" | xxd -r -p | openssl enc -aes-128-cbc -d -nopad -K 2b492656fc20fc2b103fc49e707bd658 -iv 1977d0be1fb483f9536d8cf50605b310 | xxd -p
结果:6869207365727665720a050505050505

6869207365727665720a - hi server\n
050505050505 - padding[padding_length] + padding_length

得到client发送的明文是"hi server\n"
解密Alert(Client Close Notify)
###### 校验MAC ######
15 03 03 00 40 4f aa 08 0c ec c9 19 a0 87 e5 8d f8 69 49 70 54 ac bf 46 58 d5 76 18 1e 22 77 57 1b 86 9d 03 c5 b5 4d 7b 2b a1 e8 29 00 07 23 41 be e6 ad c0 23 61 ec b6 d3 83 dd 0f ed 06 43 c5 03 c9 89 4c ac

iv:4faa080cecc919a087e58df869497054
block-ciphered text:acbf4658d576181e2277571b869d03c5
mac:b54d7b2ba1e82900072341bee6adc02361ecb6d383dd0fed0643c503c9894cac

MAC_write_key = client_write_MAC_key = 1ae8a34eaeee0c7a2023ebdc307427736ca15a69f76e933f10f7bdd6c7ea4ac1
TLSCipherText.seq_num = 0000000000000002
TLSCipherText.type = 15
TLSCipherText.version = 0303
TLSCipherText.length = 0040 - 0020 = 0020 # 减掉MAC的长度
ENC(content + padding + padding_length) = acbf4658d576181e2277571b869d03c5

MAC(MAC_write_key, seq_num +
 TLSCipherText.type +
 TLSCipherText.version +
 TLSCipherText.length +
 IV +
 ENC(content + padding + padding_length)) = b54d7b2ba1e82900072341bee6adc02361ecb6d383dd0fed0643c503c9894cac

$ echo "000000000000000215030300204faa080cecc919a087e58df869497054acbf4658d576181e2277571b869d03c5" | xxd -r -p | openssl dgst -mac hmac -sha256 -macopt hexkey:1ae8a34eaeee0c7a2023ebdc307427736ca15a69f76e933f10f7bdd6c7ea4ac1
结果:b54d7b2ba1e82900072341bee6adc02361ecb6d383dd0fed0643c503c9894cac

得到的MAC与实际抓包数据一致

###### 解密block-ciphered text ######
client_write_key = 2b492656fc20fc2b103fc49e707bd658
block-ciphered text = acbf4658d576181e2277571b869d03c5
IV = 4faa080cecc919a087e58df869497054

$ echo "acbf4658d576181e2277571b869d03c5" | xxd -r -p | openssl enc -aes-128-cbc -d -nopad -K 2b492656fc20fc2b103fc49e707bd658 -iv 4faa080cecc919a087e58df869497054 | xxd -p
结果:01000d0d0d0d0d0d0d0d0d0d0d0d0d0d

01 - level: Warning
00 - description: close notify
0d0d0d0d0d0d0d0d0d0d0d0d0d0d - padding[padding_length] + padding_length
issue19 glibc的构造函数和析构函数
ELF可执行程序默认入口是_start,定义在glibc/sysdeps/x86_64/start.S
_start在执行main函数前后会执行一些初始化和结尾工作,可以使用__attribute__((constructor))和__attribute__((section(".init")))让函数在main函数调用之前调用,使用__attribute__((destructor))和__attribute__((section(".fini")))让函数在main函数返回之后或调用exit()时调用
接下来对具体实现过程进行分析
使用__attribute__((constructor)) 声明普通函数foo
测试代码
#include <stdio.h>

void
__attribute__((constructor)) foo()
{
    printf("%s...\n", __FUNCTION__);
}

int main()
{
    printf("main...\n");
    return 0;
}
查看.text段汇编代码,可以看到foo函数存储在.text段
Disassembly of section .text:

. . .

0000000000000720 <foo>:

 720:    55                       push   %rbp

 721:    48 89 e5                 mov    %rsp,%rbp

 724:    48 8d 35 ec 00 00 00     lea    0xec(%rip),%rsi        # 817 <__FUNCTION__.2210>

 72b:    48 8d 3d d6 00 00 00     lea    0xd6(%rip),%rdi        # 808 <_IO_stdin_used+0x8>

 732:    b8 00 00 00 00           mov    $0x0,%eax

 737:    e8 94 fe ff ff           callq  5d0 <printf@plt>

 73c:    90                       nop

 73d:    5d                       pop    %rbp

 73e:    c3                       retq

. . .
那么foo是怎么被调用的呢,使用gdb看下调用堆栈
$ gdb a.out
(gdb) b foo
Breakpoint 1 at 0x724: file test.c, line 6.
(gdb) start
Temporary breakpoint 2 at 0x762: file test.c, line 30.
Starting program: /home/cike/a.out

Breakpoint 1, foo () at test.c:6
6        printf("%s...\n", __FUNCTION__);
(gdb) bt
#0  foo () at test.c:6
#1  0x00005555555547cd in __libc_csu_init ()
#2  0x00007ffff7a5a240 in __libc_start_main (main=0x55555555475e <main>, argc=1, argv=0x7fffffffcd58,
    init=0x555555554780 <__libc_csu_init>, fini=<optimized out>, rtld_fini=<optimized out>,
    stack_end=0x7fffffffcd48) at ../csu/libc-start.c:247
#3  0x000055555555461a in _start ()
可以看到foo最终被__libc_csu_init调用
__libc_csu_init在glibc/csu/elf-init.c,其中调用foo函数为以下几行代码
  const size_t size = __init_array_end - __init_array_start;
  for (size_t i = 0; i < size; i++)
      (*__init_array_start [i]) (argc, argv, envp);
__init_array_end和__init_array_start符号是在链接控制脚本中定义的
使用$ ld -verbose查看当前使用的链接控制脚本
...
  .init_array     :
  {
    PROVIDE_HIDDEN (__init_array_start = .);
    KEEP (*(SORT_BY_INIT_PRIORITY(.init_array.*) SORT_BY_INIT_PRIORITY(.ctors.*)))
    KEEP (*(.init_array EXCLUDE_FILE (*crtbegin.o *crtbegin?.o *crtend.o *crtend?.o ) .ctors))
    PROVIDE_HIDDEN (__init_array_end = .);
  }
...
它们的值分别是.init_array的起始地址的结束地址
查看.init_array的16进制数据
$ readelf -x .init_array a.out

Hex dump of section '.init_array':
  0x00200dc8 f0060000 00000000 20070000 00000000 ........ .......
可以看到0x2007(小端)即是函数foo的地址0x720,即.init_array存放的就是构造函数的地址值
接下来分析将函数放在.init段情况,使用__attribute__((section(".init")))声明普通函数bar,测试代码如下
void
__attribute__((section(".init"))) bar()
{
    printf("%s...\n", __FUNCTION__);
}

int main()
{
    printf("main...\n");
    return 0;
}
查看.init段内容,可以看到该函数存在于.init段
$ objdump -d -j .init a.out

a.out:     file format elf64-x86-64

Disassembly of section .init:

0000000000000598 <_init>:

 598:    48 83 ec 08              sub    $0x8,%rsp

 59c:    48 8b 05 3d 0a 20 00     mov    0x200a3d(%rip),%rax        # 200fe0 <__gmon_start__>

 5a3:    48 85 c0                 test   %rax,%rax

 5a6:    74 02                    je     5aa <bar>

 5a8:    ff d0                    callq  *%rax

00000000000005aa <bar>:

 5aa:    55                       push   %rbp

 5ab:    48 89 e5                 mov    %rsp,%rbp

 5ae:    48 8d 35 86 02 00 00     lea    0x286(%rip),%rsi        # 83b <__FUNCTION__.2213>

 5b5:    48 8d 3d 6c 02 00 00     lea    0x26c(%rip),%rdi        # 828 <_IO_stdin_used+0x8>

 5bc:    b8 00 00 00 00           mov    $0x0,%eax

 5c1:    e8 2a 00 00 00           callq  5f0 <printf@plt>

 5c6:    90                       nop

 5c7:    5d                       pop    %rbp

 5c8:    c3                       retq

 5c9:    48 83 c4 08              add    $0x8,%rsp

 5cd:    c3                       retq
使用gdb查看调用堆栈
(gdb) b _init

Breakpoint 1 at 0x598

(gdb) b bar

Breakpoint 2 at 0x5ae: file test.c, line 15.

(gdb) start

Temporary breakpoint 3 at 0x782: file test.c, line 30.

Starting program: /home/cike/a.out

Breakpoint 1, _init (argc=1, argv=0x7fffffffcd58, envp=0x7fffffffcd68) at ../csu/init-first.c:52

52    ../csu/init-first.c: No such file or directory.

(gdb) c

Continuing.

Breakpoint 1, 0x0000555555554598 in _init ()

(gdb) bt

#0  0x0000555555554598 in _init ()

#1  0x00005555555547d1 in __libc_csu_init ()

#2  0x00007ffff7a5a240 in __libc_start_main (main=0x55555555477e <main>, argc=1, argv=0x7fffffffcd58,

    init=0x5555555547a0 <__libc_csu_init>, fini=<optimized out>, rtld_fini=<optimized out>,

    stack_end=0x7fffffffcd48) at ../csu/libc-start.c:247

#3  0x000055555555463a in _start ()

(gdb) s

Single stepping until exit from function _init,

which has no line number information.

bar () at test.c:14

14    {

(gdb) bt

#0  bar () at test.c:14

#1  0x00007fffffffcd58 in ?? ()

#2  0x00005555555547d1 in __libc_csu_init ()

#3  0x00007ffff7a5a240 in __libc_start_main (main=0x55555555477e <main>, argc=1, argv=0x7fffffffcd58,

    init=0x5555555547a0 <__libc_csu_init>, fini=<optimized out>, rtld_fini=<optimized out>,

    stack_end=0x7fffffffcd48) at ../csu/libc-start.c:247

#4  0x000055555555463a in _start ()
可以看出调用堆栈为
#0 func1()
#1 _init()
#2 __libc_csu_init ()
#3 __libc_start_main()
#4 _start ()
上面gdb在_init打断点再使用s命令继续执行是为了证明#1 0x00007fffffffcd58 in ?? ()的??是_init
_init函数定义在glibc/sysdeps/x86_64/crti.S
且从__libc_csu_init代码可以看出.init段中的函数是在__init_array_start函数指针调用之前调用的
void __libc_csu_init (int argc, char **argv, char **envp)
{
...
  _init ();
  const size_t size = __init_array_end - __init_array_start;
  for (size_t i = 0; i < size; i++)
      (*__init_array_start [i]) (argc, argv, envp);
...
}
值得注意的是,将bar函数指定存放在.init段执行会导致程序崩溃
《程序员的自我修养》第11.2.3节:
普通函数放在.init是会破坏它们的结构的,因为函数的返回指令使得_init()函数会提前返回,必须使用汇编指令,不能让编译器产生ret指令
分析了__attribute__((constructor))和__attribute__((section(".init"))),其实__attribute__((destructor))和__attribute__((section(".fini")))的实现原理也类似,.fini对应.init, .fini_array对应.init_array,且这些函数都是通过__cxa_atexit函数进行注册,最终在程序调用exit()时被调用
在学习过程中还了解到.ctors和.dctors段,但是在实际编译过程却未见到这两个段,应该是跟gcc版本有关系,可参考以下链接 __do_global_ctors_aux not shown in objdump Why does GCC put calls to constructors of global instances into different sections (depending on the target)? Can't find .dtors and .ctors in binary
备注
普通函数放在.init是会破坏它们的结构的,因为函数的返回指令使得_init()函数会提前返回,必须使用汇编指令,不能让编译器产生ret指令
你好,关于这部分如何使用汇编将函数写入init节中有简单的demo吗,比如在init节中调用c语言的一个函数
可以在.init中添加一段调用指定C函数的汇编代码call hello_init,参考How can I use .init and .finit section of ELF shared object?这篇文章
示例代码如下
__asm__ (".section .init \n call bar \n");

void bar() {
        printf("%s...\n", __FUNCTION__);
}

int main()
{
	 printf("main...\n");
	     return 0;
}
这里解释一下:__attribute__((section(".init"))) bar()会崩溃而上述代码不会崩溃是因为上述代码使用了call指令调用bar函数而不是je,call会将函数调用返回地址入栈,所以bar函数的retq指令可以正确返回