valgrind使用方法
十二月 08, 2024 [Linux 与系统] #Linux #Shell 与命令行 #obsidian #操作系统原理valgrind使用方法
1. Preface
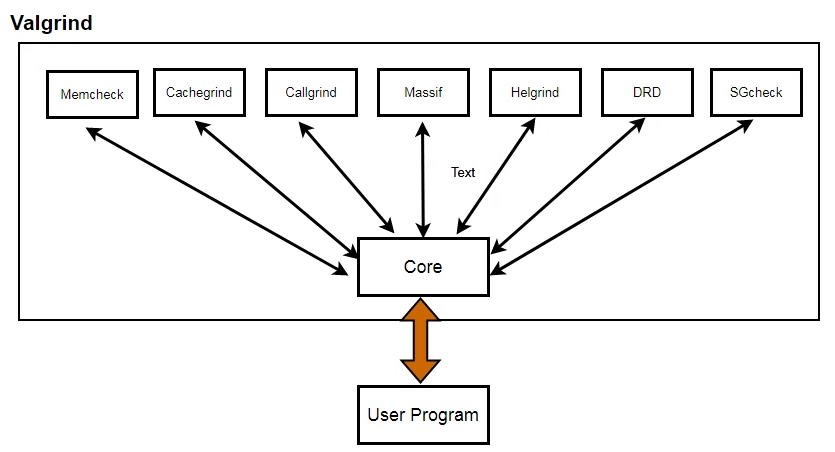
valgrind是一套Linux下开源的程序仿真调试和分析工具的集合;集合中的每个工具负责执行某种类型的仿真,调试,或者分析任务;它的主要结构包括一个内核(软件模拟CPU环境)以及一系列的小工具。
valgrind包含的工具主要如下:
-
Memcheck
主要针对C和C++程序的内存管理和分配错误;Memcheck会检测运行程序对内存所有的读写操作,包括(new/delete 和 malloc/free),Memcheck会对一下错误进行检测: (1) 访问非法的内存(未分配,已释放,堆边界以外的区域,栈不可访问的区域) (2) 以不安全的方式使用未初始化的值 (3) 内存泄漏 (4) 对内存释放异常(多次释放) (5) 向memcpy()函数传递的src和dst内存有重叠 对于上述相关的错误,Memcheck会给出在源代码中的出错位置以及对应的调用栈信息
-
Cachegrind
Cache分析器,它能够模拟CPU中的一级缓存L1,D1和二级缓存,且能够精确指出程序中cache的命中和丢失,此外还可以给出cache丢失次数;Cachegrind还可以给出每行代码,每个函数,每个模块,和整个程序的内存引用次数以及指令数;有利于优化程序;
-
Callgrind
Callgrind相当于Cachegrind的一个扩展,它除了能够给出Cachegrind提供的所有信息之外,还可以给出程序的调用图;此外它还可作为一个独立的工具进行使用,可用于可视化的展示Callgrind收集到的数据;也可用于可视化的展示Cachegrind的输出信息;
-
Massif
堆分析器,Massif通过程序的堆内存快照技术,实现堆内存的分析;Massif会生成一张表示程序运行过程中堆内存使用情况的图,包括在运行过程中哪个模块占用的堆内存最多等信息;生成的图以文本文件或者html文件呈现
-
Helgrind
Helgrind是线程调试器,用于检测多线程程序中出现的数据竞争问题,Helgrind会去查找被多个线程访问的内存区域,且检测这些内存区域在使用时是否进行了线程同步,如果没有,则这些内存区域会是潜在的隐患,可能会造成一些非常棘手的问题。
-
DRD
功能与Helgrind类似,但是占用内存更少;
-
SGcheck
用于检测栈和全局数组溢出
2. valgrind安装
源码下载地址:Valgrind官方网站
wget http://www.valgrind.org/downloads/valgrind-3.14.0.tar.bz2
2.1 解压安装包
tar -xvf valgrind-3.20.0.tar.bz2
2.2 运行autogen.sh
cd valgrind-3.20.0./autogen.sh
如果提示缺少相应的autotools系列工具,则执行:
sudo apt get install autoconf
autotools系列工具包括如下子工具:
- aclocal
- autoscan
- autoconf
- autoheader
- automake
2.3 运行configure脚本
./configure
2.4 编译安装
make sudo make install
3. valgrind使用
使用格式:
valgrind [options] prog-and-args
options选项:
- -tool=<toolname> 选择valgrind工具集中的工具,默认为memcheck
- -v/--version 显示版本信息
- -h/--help 显示帮助信息
- -q/--quiet 安静模式,只打印错误信息
- -v/--verbose 打印详细信息
- --trace-children=no|yes 是否跟踪子进程,默认值no
- --trace-fds=no|yes 是否跟踪打开的文件描述符,默认值no
- --time-stamp=no|yes 是否在打印的信息前面加上时间戳,默认值no
关于输出的选线:
- --log-fd=<num> 输出Log信息到指定的文件描述符(0,1,2 /stdin,stdout,stderr)
- --log-file=<file> 将Log信息输出到指定文件
- --log-socket=ipAddr:Port 将Log输出到指定的socket
4. Memcheck的使用
-
--leak-check=no|summary|full 在退出时是否查找内存泄漏
no表示不检查 summary表示输出概括性的信息 full表示输出详细信息
-
--leak-resolution=<low|med|high>
表示是否将内存检查的结果进行合并展示,只会影响展示,不影响内存检查的结果(英文大概是这个意思)
-
--show-leak-kinds=<set>
指定显示内存泄漏的种类 可选值:definite,indirect,possible,reachable,all
其他的参数可查阅说明书:https://valgrind.org/docs/manual/mc-manual.html#mc-manual.overview
Memcheck可检测的错误包括:
1.非法的读写错误
在程序读写Memcheck认为不合法的地址时,会输出类似的错误,例如访问已经释放的内存,以及非法的栈地址;
测试代码:
#include <stdlib.h>int main(int argc, char* argv[]){ int* p = (int*)malloc(sizeof(int)); *p = 1; *(p+1) = 2; // 非法地址,未经过分配 free(p); return 0;}
Memcheck Log输出信息:
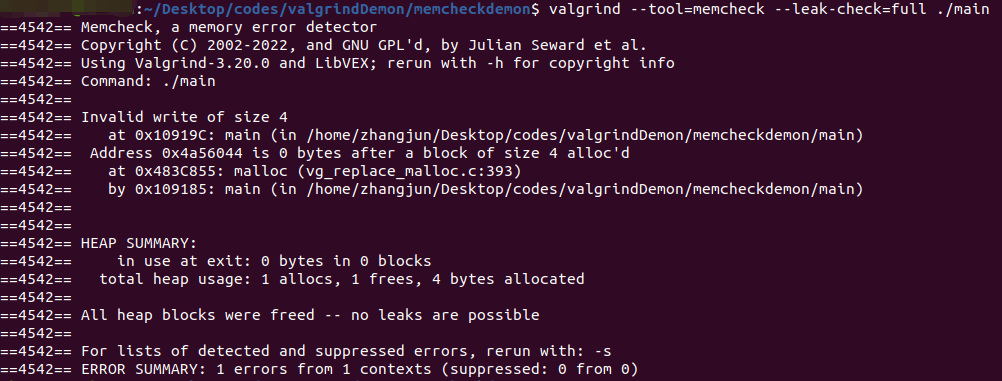
输出信息中需要注意如果ERROE SUMMARY: 后的错误数量不为0,则仔细查看输出的日志信息;
2.使用未初始化的值
测试代码:
#include <stdio.h>int main(int argc, char* argv[]){ int x; printf("The value is %d\n", x); return 0;}
Memcheck Log输出信息:
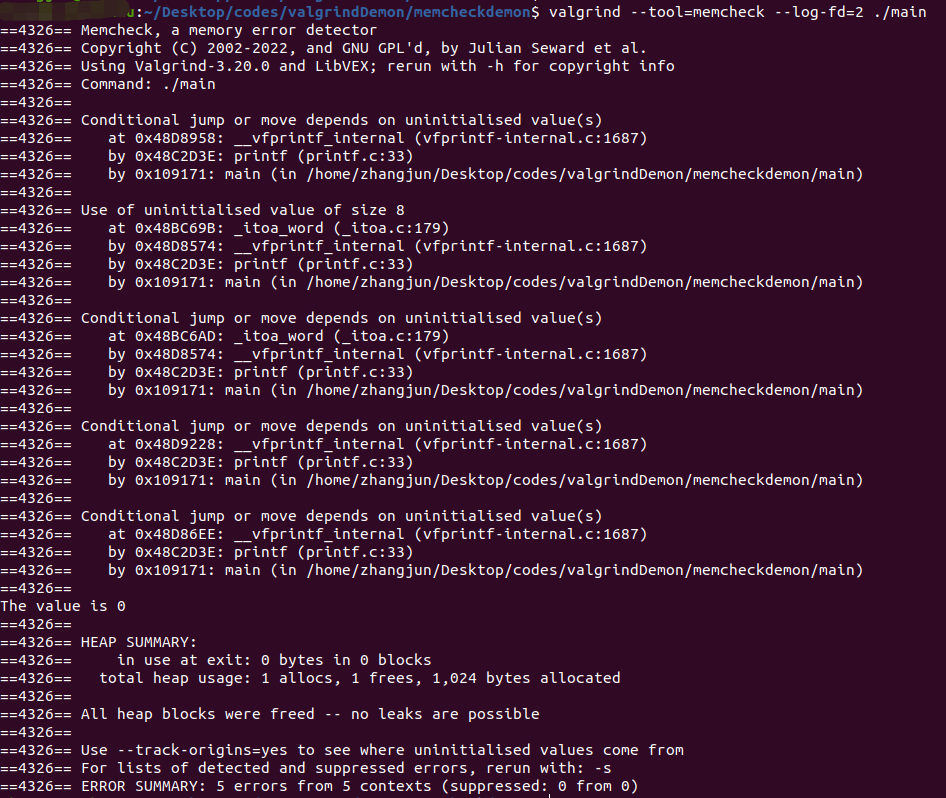
如果不想Memcheck检测此类错误,可以添加参数设置:
--undef-value-errors=no
3.未初始化或者在系统调用中无法寻址的变量
Memcheck会检测所有系统调用涉及到的参数,包括如下:
- 如果系统调用需要从程序提供的缓冲区中读取数据,那么memcheck会检测缓冲区的地址是否有效以及缓冲区中的数据是否进行了初始化
- 如果系统调用需要从程序提供的缓冲区中写入数据,则memcheck会检测缓冲区地址的有效性
测试代码:
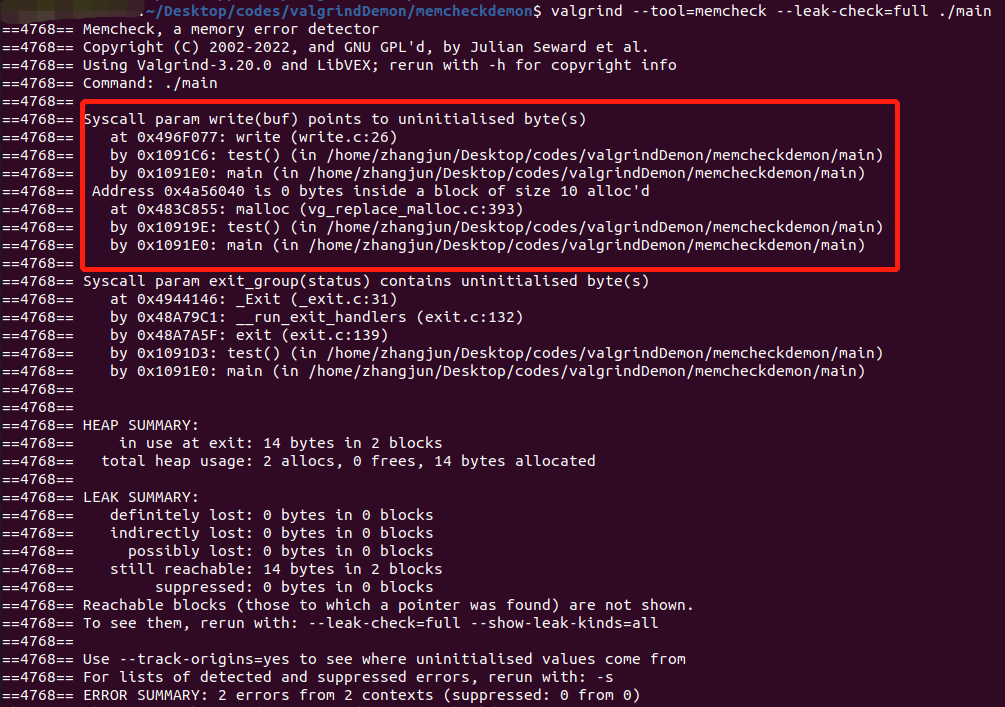
#include <stdlib.h>#include <unistd.h>void test(){ char* arr = (char*)malloc(10); int* arr2 = (int*)malloc(sizeof(int)); write( 1 /* stdout */, arr, 10 ); exit(arr2[0]); // arr2[0]无法进行寻址}int main(void){ test();}
Memcheck输出信息:
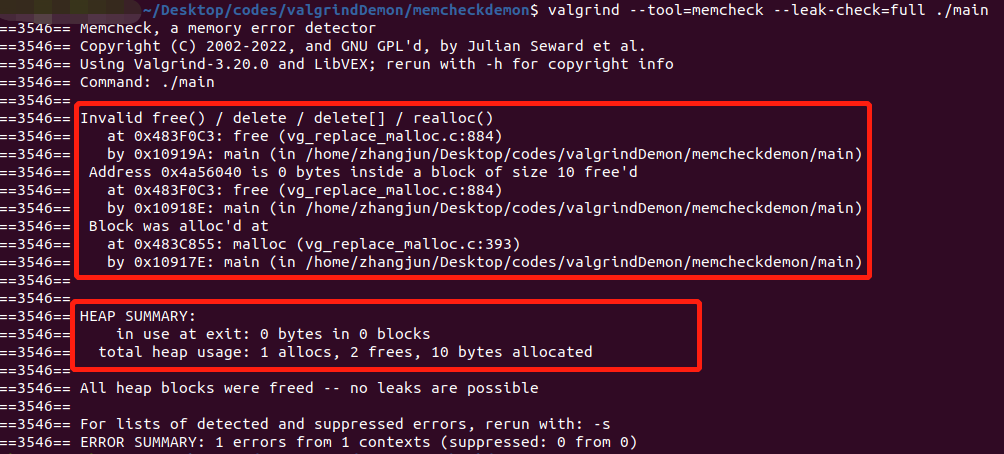
4. 非法的内存释放
Memcheck会对程序中使用new/malloc分配的内存进行持续追踪,因此它能够检测出传递给free/delete的内存地址是否是合法的;例如对同一块动态分配的内存执行两次释放;则第二次释放,free/delete的参数(地址)就是不合法的
测试程序:
#include <stdlib.h>#include <unistd.h>int main(void){ char* arr = (char*)malloc(10); free(arr); free(arr); // 重复释放内存 return 0;}
5. 堆内存释放和分配函数不匹配
在c++中,内存的分配与释放函数必须匹配:
- 使用
malloc, calloc, realloc, valloc, memalign分配的内存,必须使用free进行释放 - 使用
new分配的内存必须使用delete进行释放 - 使用
new []分配的内存必须使用delete []进行释放
#include <stdlib.h>#include <unistd.h>#include <malloc.h>int main(void){ char* arr = (char*)malloc(10); delete arr; return 0;}
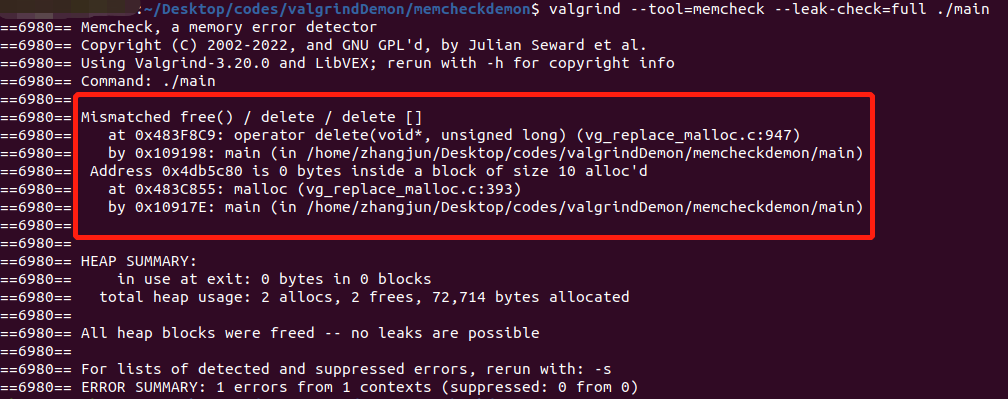
备注:在Linux平台上混用new和free并不会导致出错,但是在其他的平台上却不一定,可能会导致程序crash;
The reason behind the requirement is as follows. In some C++ implementations, delete[] must be used for objects allocated by new[] because the compiler stores the size of the array and the pointer-to-member to the destructor of the array's content just before the pointer actually returned. delete doesn't account for this and will get confused, possibly corrupting the heap. <from: https://valgrind.org/docs/manual/mc-manual.html#mc-manual.bad-syscall-args>
6. 源地址和目标地址的出现内存覆盖(overlapping)
c/c++语言可直接对内存进行操作,提供了许多的内存拷贝函数,memcpy, strcpy, strncpy, strcat, strncat,POSIX标准规定,如果对象之间的内存拷贝出现相互覆盖,则将导致最后的结果是不确定的;
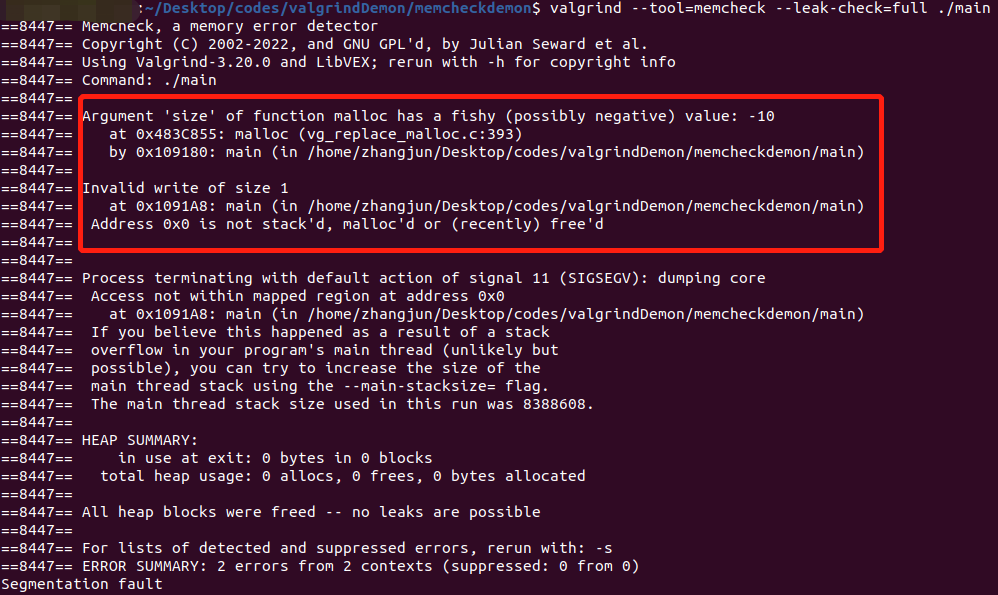
7. 分配内存的参数不合法(fishy argument)
在分配内存时需要指定内存的大小,如果指定内存大小的参数不合法(负值或者过大的值2^64),则memcheck会指出不合法的内存值;memcheck对下列函数的参数都会进行校验:
malloc, calloc, realloc, memalign, new, new []. __builtin_new, __builtin_vec_new
#include <stdlib.h>#include <unistd.h>#include <malloc.h>#include <string.h>int main(void){ char* arr = (char*)malloc(-10); for (size_t i = 0; i < 10; i++) { /* code */ arr[i] = i+1; } free(arr); return 0;}
8. 内存泄漏检测
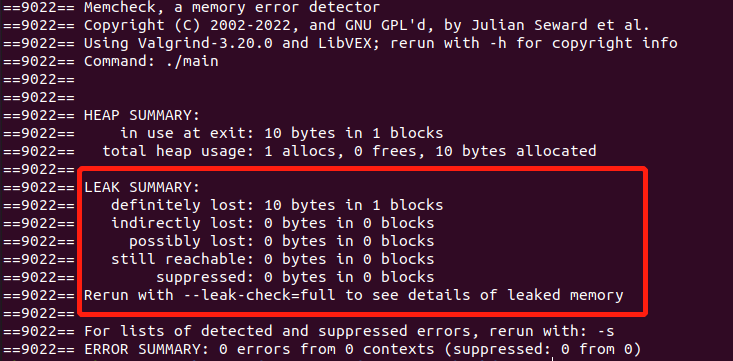
memcheck会在程序运行过程中追踪所有堆内分配的内存,因此在程序退出的时候,它能够知到哪些动态分配的内存还没有被释放;
可通过以下两种方式访问分配的内存:
- start-pointer: 此类指针指向内存的起始位置(连续内存);
- interior-pointer:此类指针指向内存中间的某个位置(连续内存);
interior-pointer例子: 指向std::string的指针。在stdString中,前3个word用来存储字符串的长度,容量,以及引用计数,后续才是字符串的实际内容,所以指向stdString的指针,实际的起始位置是存储位置中3个word之后的位置。
通过增加参数--leak-check=full,memcheck可以给出内存泄漏的详细描述信息,可能导致内存泄漏的情况如下所示:
Pointer chain AAA Leak Case BBB Leak Case ------------- ------------- -------------(1) RRR ------------> BBB DR(2) RRR ---> AAA ---> BBB DR IR(3) RRR BBB DL(4) RRR AAA ---> BBB DL IL(5) RRR ------?-----> BBB (y)DR, (n)DL(6) RRR ---> AAA -?-> BBB DR (y)IR, (n)DL(7) RRR -?-> AAA ---> BBB (y)DR, (n)DL (y)IR, (n)IL(8) RRR -?-> AAA -?-> BBB (y)DR, (n)DL (y,y)IR, (n,y)IL, (_,n)DL(9) RRR AAA -?-> BBB DL (y)IL, (n)DLPointer chain legend:- RRR: a root set node or DR block- AAA, BBB: heap blocks- --->: a start-pointer- -?->: an interior-pointerLeak Case legend:- DR: Directly reachable- IR: Indirectly reachable- DL: Directly lost- IL: Indirectly lost- (y)XY: it's XY if the interior-pointer is a real pointer- (n)XY: it's XY if the interior-pointer is not a real pointer- (_)XY: it's XY in either case
memcheck官方手册对其描述为:
-
Still-reachable
针对情况(1)(2),指向内存的指针依然存在,此类问题非常常见,且从理论上来说,在程序退出之前任然可以通过指针释放对应的内存,因此通常认为不是严重问题,memcheck默认不会单独报告此类错误;
-
Definitely lost
针对情况(3),不再有指针指向对应的内存块,指向内存的指针值已经被修改为其他值,导致在程序退出之前无法再通过指针去释放对应的内存块;此类问题是需要编程者去修复的问题;
-
Indirectly lost
针对情况(4)和(9),例如对于一棵二叉树,如果二叉树的根节点指针值被修改,则其对应的所有子节点内存便无法访问,此时子节点的内存就是Indirectly lost,此类问题在恢复根节点指针之后便可修复,memcheck默认不会单独报告此类问题;
-
Possibly lost
针对情况(5)~(8),在指针链中,有一个或者多个指针是interior-pointer类型的指针,需要看这个指针的值是一个有效的interior-pointer,还是内存中一个凑巧和interior-pointer值相等的随机数,(This means that a chain of one or more pointers to the block has been found, but at least one of the pointers is an interior-pointer. This could just be a random value in memory that happens to point into a block, and so you shouldn't consider this ok unless you know you have interior-pointers.)
参数: --show-leak-kinds=definite,possible,(all).可指定显示特定类型内存泄露错误;
5. DRD的使用
DRD主要用于检查多线程c和c++程序中的错误;适用于使用POSIX标准线程的程序或者是基于POSIX标准多线程概念设计的程序;
POSIX标准多线程概念具备如下特点:
- 地址空间共享:所有的线程在同一进程中运行且共享同一地址空间,且所有数据无论被线程共享与否,都是通过地址进行标识;
- 读写共享内存的操作都是在同一线程内完成
多线程程序存在的问题包括:
- 数据竞争
- 锁竞争
- POSIX线程API使用不当
- 死锁
常用参数:
-
--check-stack-var=<yes|no> [default:no]
控制DRD是否检测栈内存上的数据竞争,此选项默认为no,因为大部分程序不会在线程之间共享栈内存上的数据
-
--exclusive-threshold= [default:off]>> 如果互斥量mutex或者写锁的Lock时间大于指定的时间n(单位:ms),则会打印处对应的错误;
-
--shared-threshold= [default: off]>> 如果读锁的Lock时间大于指定的时间n(单位:ms),则会打印处对应的错误;
-
--show-confl-seg=<yes|no> [default: yes]
显示冲突的段信息,显示冲突的段信息可以发现数据竞争的原因,所以此选项默认为开启
-
--join-list-vol= [default: 10]>> 如果在线程join之后立即丢弃线程的内存访问信息,则可能会错过一个线程末尾和另一个线程之间发生的数据竞争。此选项允许指定应保留多少个join之后的线程的内存访问信息。
-
--show-stack-usage=<yes|no> [default: no]
在线程退出时,打印栈内存的使用情况。当程序创建大量的线程时,限制为线程栈内存分配的虚拟内存非常重要,通过这个参数可以观察到用户程序的每个线程使用了多少栈内存。
-
--trace-addr=<address> [default: none]
追踪指定地址上的数据加载和存储活动,可多次指定。
-
--ptrace-addr=<address> [default: none]
追踪指定地址上的数据加载和存储活动,即使指定的地址被释放或者重新分配,依然会保持追踪
-
--trace-alloc=<yes|no> [default: no]
追踪程序中所有的内存分配和回收活动
-
--trace-cond=<yes|no> [default: no]
追踪程序中所有条件变量的变化
-
--trace-fork-join=<yes|no> [default: no]
追踪程序中所有线程的创建和终止事件
-
--trace-mutex=<yes|no> [default: no]
追踪程序中所有互斥量的活动
-
--trace-rwlock=<yes|no> [default: no]
追踪程序中所有读写锁的活动
-
--trace-semaphore=<yes|no> [default: no]
追踪程序中所有信号量的活动
DRD可以查看互斥量的占用时间,示例代码:
#define _GNU_SOURCE 1#include <assert.h>#include <pthread.h>#include <stdio.h>#include <stdlib.h>#include <time.h>#include <unistd.h>static void delay_ms(const int ms) { struct timespec ts; assert(ms >= 0); ts.tv_sec = ms / 1000; ts.tv_nsec = (ms % 1000) * 1000 * 1000; nanosleep(&ts, 0);}void lock_mutex(const int ms) { pthread_mutex_t mutex; fprintf(stderr, "Locking mutex ...\n"); pthread_mutex_init(&mutex, NULL); pthread_mutex_lock(&mutex); delay_ms(ms); pthread_mutex_unlock(&mutex); pthread_mutex_destroy(&mutex);}int main(int argc, char** argv) { int interval = 0; int optchar; while ((optchar = getopt(argc, argv, "i:")) != EOF) // 处理命令行参数,指定延时时间 { switch (optchar) { case 'i': interval = atoi(optarg); break; default: fprintf(stderr, "Usage: %s [-i <interval time in ms>].\n", argv[0]); break; } } lock_mutex(interval); fprintf(stderr, "Done.\n"); return 0;}
编译代码:
gcc -g -lpthread ./main.cpp -o main
通过参数--exclusive-threshold=<n>检查独占锁占用的时间,通过如下命令检测独占锁占用时间是否超过10ms:
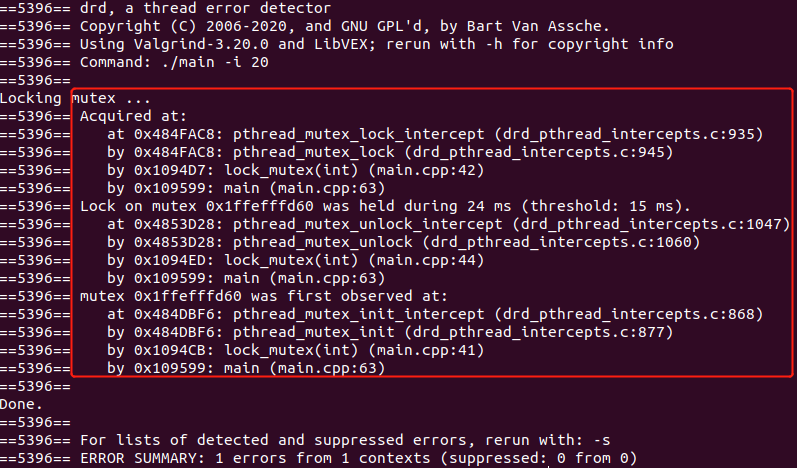
valgrind --tool=drd --exclusive-threshold=15 ./main -i 20
输出:可以看到在上图中,(互斥量)独占锁被占用了22ms,大于在DRD中设置的阈值15ms,因此会给出提示;
调整参数:
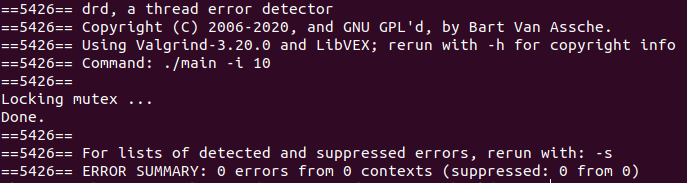
valgrind --tool=drd --exclusive-threshold=15 ./main -i 10
输出:可以看到在上图中,独占锁被占的时间没有超过15ms的,因此不会给出提示:
除了检测互斥量的占用时间,还可以检测读写锁的占用时间,示例代码如下:
#define _GNU_SOURCE 1#include <assert.h>#include <pthread.h>#include <stdio.h>#include <stdlib.h>#include <time.h>#include <unistd.h>static void delay_ms(const int ms) { struct timespec ts; assert(ms >= 0); ts.tv_sec = ms / 1000; ts.tv_nsec = (ms % 1000) * 1000 * 1000; nanosleep(&ts, 0);}void write_lock(const int ms){ pthread_rwlock_t rwlock; // 读写锁 fprintf(stderr, "Locking rwlock exclusively ...\n"); pthread_rwlock_init(&rwlock, NULL); pthread_rwlock_wrlock(&rwlock); delay_ms(ms); pthread_rwlock_unlock(&rwlock); pthread_rwlock_destroy(&rwlock);}int main(int argc, char** argv) { int interval = 0; int optchar; while ((optchar = getopt(argc, argv, "i:")) != EOF) // 处理命令行参数,指定延时时间 { switch (optchar) { case 'i': interval = atoi(optarg); break; default: fprintf(stderr, "Usage: %s [-i <interval time in ms>].\n", argv[0]); break; } } write_lock(interval); fprintf(stderr, "Done.\n"); return 0;}
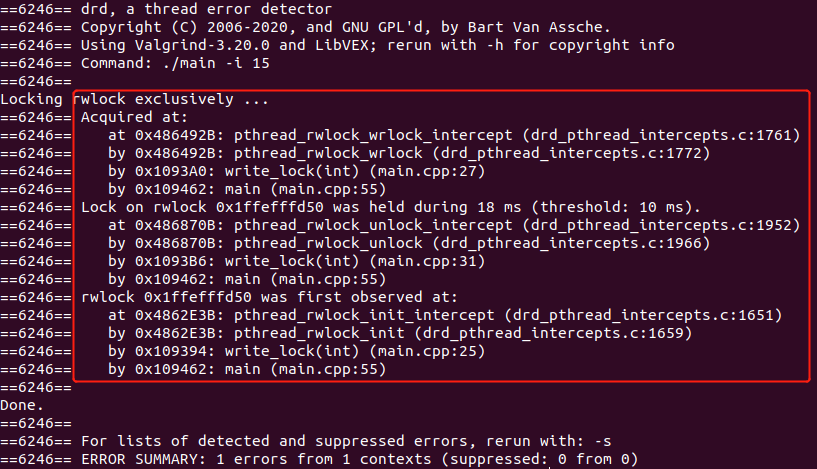
使用DRD进行检测:valgrind --tool=drd --exclusive-threshold=10 ./main -i 20
输出:
检测读锁的占用时间,示例代码如下所示:
#define _GNU_SOURCE 1#include <assert.h>#include <pthread.h>#include <stdio.h>#include <stdlib.h>#include <time.h>#include <unistd.h>static void delay_ms(const int ms) { struct timespec ts; assert(ms >= 0); ts.tv_sec = ms / 1000; ts.tv_nsec = (ms % 1000) * 1000 * 1000; nanosleep(&ts, 0);}void read_lock(const int ms){ pthread_rwlock_t readLock; fprintf(stderr, "Locking rwlock exclusively ...\n"); pthread_rwlock_init(&readLock, NULL); pthread_rwlock_rdlock(&readLock); pthread_rwlock_rdlock(&readLock); delay_ms(20); pthread_rwlock_unlock(&readLock); // 读锁不是独占锁 pthread_rwlock_unlock(&readLock); pthread_rwlock_destroy(&readLock);}int main(int argc, char** argv) { int interval = 0; int optchar; while ((optchar = getopt(argc, argv, "i:")) != EOF) // 处理命令行参数,指定延时时间 { switch (optchar) { case 'i': interval = atoi(optarg); break; default: fprintf(stderr, "Usage: %s [-i <interval time in ms>].\n", argv[0]); break; } } read_lock(interval); fprintf(stderr, "Done.\n"); return 0;}
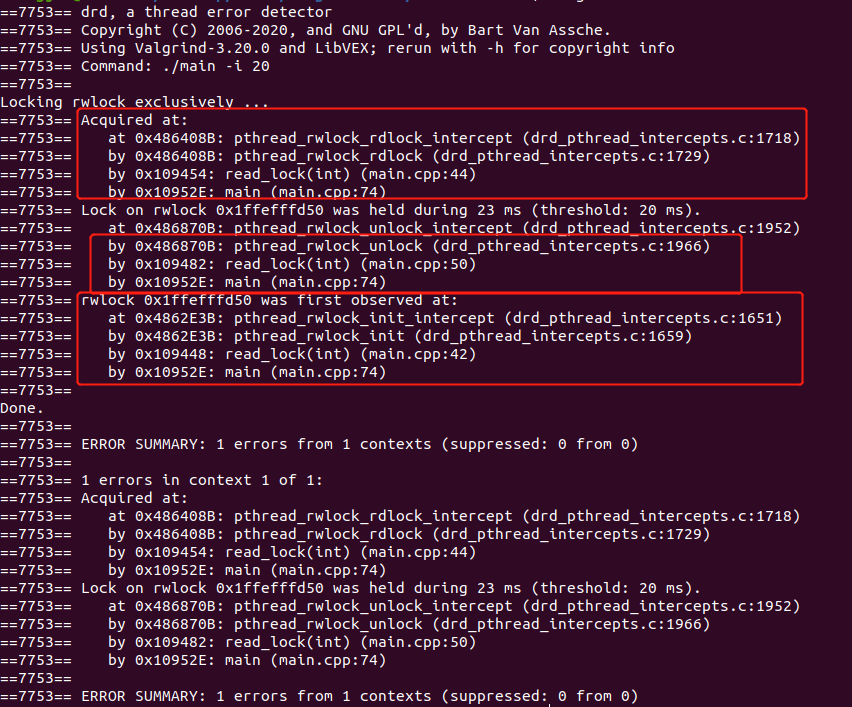
读锁不是独占锁,所以需要使用参数--shared-threshold=<n>来进行分析:
增加参数-s,可在结果中展示具体的错误信息:valgrind --tool=drd --shared-threshold=20 -s ./main -i 20
对于非独占锁,如果lock的次数与unlock的次数不一致,也会进行提示:
void read_lock(const int ms){ pthread_rwlock_t readLock; fprintf(stderr, "Locking rwlock exclusively ...\n"); pthread_rwlock_init(&readLock, NULL); pthread_rwlock_rdlock(&readLock); pthread_rwlock_rdlock(&readLock); delay_ms(ms); pthread_rwlock_unlock(&readLock); // 仅释放一次 //pthread_rwlock_unlock(&readLock); pthread_rwlock_destroy(&readLock);}
DRD检测命令:valgrind --tool=drd --shared-threshold=20 -s ./main -i 10
检测输出结果:
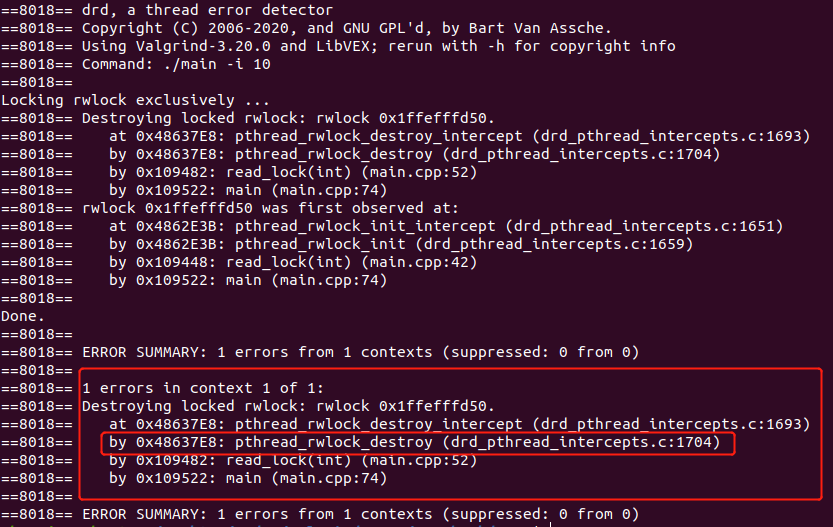
如上图所示,输出结果提示,第52行的destory出错,是因为destory上面缺少一个unlock操作;