【qemu】qemu网络配置
九月 20, 2024 [虚拟化与容器] #obsidian #硬件 #网络 #虚拟化【qemu】qemu网络配置
1. 术语
| name | description |
|---|---|
| virtual networking device / NIC | qemu 模拟网卡 |
| network backend | qemu 网络后端 |
2. 基本介绍
QEMU 网络包含两个部分:
- 提供给 guset 的模拟网卡(例如,PCI网卡);
- 与模拟网卡交互的网络后端(例如,将数据包放入主机网络)
每个部分都有一系列选项。默认情况下(即使不加任何 network 相关的参数),QEMU 将为 guest 创建:
- SLiRP 用户网络后端
- 合适的虚拟网络设备(例如,用于大多数 x86 PC guest 的 E1000 PCI 网卡)
注意:如果在命令行(通过 -net(已废弃)、-nic或 -netdev)指定任何网络选项,那么 QEMU 将要求您提供足以定义和连接这两个部分的选项。(忘记指定网络后端或网络虚拟设备会给出警告信息,如“Warning: netdev mynet0 has no**peer** ”,“Warning: hub 0 is not connected to host network” 或者**“Warning: hub 0 with no nics”,** 然后 VM 将启动,但是没有正常运行的网络) 注意:如果您使用(默认)SLiRP 用户网络,则 ping(ICMP)将不起作用,但 TCP 和 UDP 将起作用。不要尝试使用 ping 来测试您的 QEMU 网络配置。
3. 快速配置
QEMU配置网络环境通常有两种方式:
- 可插拔网卡(pluggable NIC)
-device DEVNAME,netdev=NET-ID,... \
-netdev TYPE,id=NET-ID,...
注意:“-device ?”可以查看机器支持的设备(包含网卡设备)
- 板载网卡(On-board NIC)
-nic TYPE,model=DEVNAME,...
注意:“-nic model=?”可以查看机器支持的 NIC 设备。
QEMU 支持的网络选项可通过“--help”来查看:
Network options:
-netdev user,id=str[,ipv4=on|off][,net=addr[/mask]][,host=addr]
         [,ipv6=on|off][,ipv6-net=addr[/int]][,ipv6-host=addr]
         [,restrict=on|off][,hostname=host][,dhcpstart=addr]
         [,dns=addr][,ipv6-dns=addr][,dnssearch=domain][,domainname=domain]
         [,tftp=dir][,tftp-server-name=name][,bootfile=f][,hostfwd=rule][,guestfwd=rule] [,smb=dir[,smbserver=addr]]
                configure a user mode network backend with ID 'str',
                its DHCP server and optional services
-netdev tap,id=str[,fd=h][,fds=x:y:...:z][,ifname=name][,script=file][,downscript=dfile]
         [,br=bridge][,helper=helper][,sndbuf=nbytes][,vnet_hdr=on|off][,vhost=on|off]
         [,vhostfd=h][,vhostfds=x:y:...:z][,vhostforce=on|off][,queues=n]
         [,poll-us=n]
                configure a host TAP network backend with ID 'str'
                connected to a bridge (default=br0)
                use network scripts 'file' (default=/usr/local/etc/qemu-ifup)
                to configure it and 'dfile' (default=/usr/local/etc/qemu-ifdown)
                to deconfigure it
                use '[down]script=no' to disable script execution
                use network helper 'helper' (default=/usr/local/libexec/qemu-bridge-helper) to
                configure it
                use 'fd=h' to connect to an already opened TAP interface
                use 'fds=x:y:...:z' to connect to already opened multiqueue capable TAP interfaces
                use 'sndbuf=nbytes' to limit the size of the send buffer (the
                default is disabled 'sndbuf=0' to enable flow control set 'sndbuf=1048576')
                use vnet_hdr=off to avoid enabling the IFF_VNET_HDR tap flag
                use vnet_hdr=on to make the lack of IFF_VNET_HDR support an error condition
                use vhost=on to enable experimental in kernel accelerator
                    (only has effect for virtio guests which use MSIX)
                use vhostforce=on to force vhost on for non-MSIX virtio guests
                use 'vhostfd=h' to connect to an already opened vhost net device
                use 'vhostfds=x:y:...:z to connect to multiple already opened vhost net devices
                use 'queues=n' to specify the number of queues to be created for multiqueue TAP
                use 'poll-us=n' to specify the maximum number of microseconds that could be
                spent on busy polling for vhost net
-netdev bridge,id=str[,br=bridge][,helper=helper]
                configure a host TAP network backend with ID 'str' that is
                connected to a bridge (default=br0)
                using the program 'helper (default=/usr/local/libexec/qemu-bridge-helper)
-netdev l2tpv3,id=str,src=srcaddr,dst=dstaddr[,srcport=srcport][,dstport=dstport]
         [,rxsession=rxsession],txsession=txsession[,ipv6=on|off][,udp=on|off]
         [,cookie64=on|off][,counter][,pincounter][,txcookie=txcookie]
         [,rxcookie=rxcookie][,offset=offset]
                configure a network backend with ID 'str' connected to
                an Ethernet over L2TPv3 pseudowire.
                Linux kernel 3.3+ as well as most routers can talk
                L2TPv3. This transport allows connecting a VM to a VM,
                VM to a router and even VM to Host. It is a nearly-universal
                standard (RFC3931). Note - this implementation uses static
                pre-configured tunnels (same as the Linux kernel).
                use 'src=' to specify source address
                use 'dst=' to specify destination address
                use 'udp=on' to specify udp encapsulation
                use 'srcport=' to specify source udp port
                use 'dstport=' to specify destination udp port
                use 'ipv6=on' to force v6
                L2TPv3 uses cookies to prevent misconfiguration as
                well as a weak security measure
                use 'rxcookie=0x012345678' to specify a rxcookie
                use 'txcookie=0x012345678' to specify a txcookie
                use 'cookie64=on' to set cookie size to 64 bit, otherwise 32
                use 'counter=off' to force a 'cut-down' L2TPv3 with no counter
                use 'pincounter=on' to work around broken counter handling in peer
                use 'offset=X' to add an extra offset between header and data
-netdev socket,id=str[,fd=h][,listen=[host]:port][,connect=host:port]
                configure a network backend to connect to another network
                using a socket connection
-netdev socket,id=str[,fd=h][,mcast=maddr:port[,localaddr=addr]]
                configure a network backend to connect to a multicast maddr and port
                use 'localaddr=addr' to specify the host address to send packets from
-netdev socket,id=str[,fd=h][,udp=host:port][,localaddr=host:port]
                configure a network backend to connect to another network
                using an UDP tunnel
-netdev vhost-user,id=str,chardev=dev[,vhostforce=on|off]
                configure a vhost-user network, backed by a chardev 'dev'
-netdev vhost-vdpa,id=str,vhostdev=/path/to/dev
                configure a vhost-vdpa network,Establish a vhost-vdpa netdev
-netdev hubport,id=str,hubid=n[,netdev=nd]
                configure a hub port on the hub with ID 'n'
-nic [tap|bridge|user|l2tpv3|vhost-user|socket][,option][,...][mac=macaddr]
                initialize an on-board / default host NIC (using MAC address
                macaddr) and connect it to the given host network backend
-nic none      use it alone to have zero network devices (the default is to
                provided a 'user' network connection)
-net nic[,macaddr=mac][,model=type][,name=str][,addr=str][,vectors=v]
                configure or create an on-board (or machine default) NIC and
                connect it to hub 0 (please use -nic unless you need a hub)
-net [user|tap|bridge|socket][,option][,option][,...]
                old way to initialize a host network interface
                (use the -netdev option if possible instead)
这里以 sifive 公司提供的 riscv 架构虚拟机 sifive_u 为例,介绍两种基本的配置模式:user 和 tap。
3.1 user 模式
已验证的选项配置参数:
id=STR: 网络唯一标识
net=ADDR[/MASK]: 子网段
host=ADDR: DHCP服务器地址(需与net保持对应)
hostname=HOST:
restrict=[on|off]: 是否与主机网络隔离
dhcpstart=ADDR: DHCP分配的起始地址(需与net保持对应)
dns=ADDR: 虚拟DNS服务器地址(需与net保持对应)
dnssearch=DOAMIN:
domainname=DOMAIN:
tftp=DIR: host端本地目录(这里仅使用tftp协议传输文件,未使用host端的tftpd-hpa服务)
tftp-server-name=NAME:
bootfile=FILE: 启动镜像的名称(针对u-boot)
hostfwd=RULE: host端口转发
guestfwd=RULE:
smb=DIR[,smbserver=ADDR]:
mac=MACADDR:
举例:
qemu-system-riscv64 -M sifive_u -m 256M -bios uboot.bin -nic user,model=cadence_gem,id=net001,net=192.168.1.0/24,dhcpstart=192.168.1.1,dns=192.168.1.3,host=192.168.1.2,hostfwd=tcp::2021-:2021,tftp=/home/user/share/
qemu-system-riscv64 -M sifive_u -m 256M -bios uboot.bin -nic user,model=cadence_gem,id=net001,net=192.168.1.0/24,dhcpstart=192.168.1.1,dns=192.168.1.3,host=192.168.1.2,hostfwd=tcp::2021-:2021,tftp=/home/user/share/ ——指定启动 sifive_u 虚拟机,全写为 -machine sifive_uqemu-system-riscv64 -M sifive_u -m 256M -bios uboot.bin -nic user,model=cadence_gem,id=net001,net=192.168.1.0/24,dhcpstart=192.168.1.1,dns=192.168.1.3,host=192.168.1.2,hostfwd=tcp::2021-:2021,tftp=/home/user/share/ ——指定分配 256M RAM
qemu-system-riscv64 -M sifive_u -m 256M -bios uboot.bin -nic user,model=cadence_gem,id=net001,net=192.168.1.0/24,dhcpstart=192.168.1.1,dns=192.168.1.3,host=192.168.1.2,hostfwd=tcp::2021-:2021,tftp=/home/user/share/ ——指定启动 u-boot 镜像
qemu-system-riscv64 -M sifive_u -m 256M -bios uboot.bin -nic user,model=cadence_gem,id=net001,net=192.168.1.0/24,dhcpstart=192.168.1.1,dns=192.168.1.3,host=192.168.1.2,hostfwd=tcp::2021-:2021,tftp=/home/user/share/ ——指定开启型号为 cadence_gem 的网卡,以 user 模式进行网络配置
qemu-system-riscv64 -M sifive_u -m 256M -bios uboot.bin -nic user,model=cadence_gem,id=net001,net=192.168.1.0/24,dhcpstart=192.168.1.1,dns=192.168.1.3,host=192.168.1.2,hostfwd=tcp::2021-:2021,tftp=/home/user/share/ ——指定网络标识
qemu-system-riscv64 -M sifive_u -m 256M -bios uboot.bin -nic user,model=cadence_gem,id=net001,net=192.168.1.0/24,dhcpstart=192.168.1.1,dns=192.168.1.3,host=192.168.1.2,hostfwd=tcp::2021-:2021,tftp=/home/user/share/ ——划分子网段
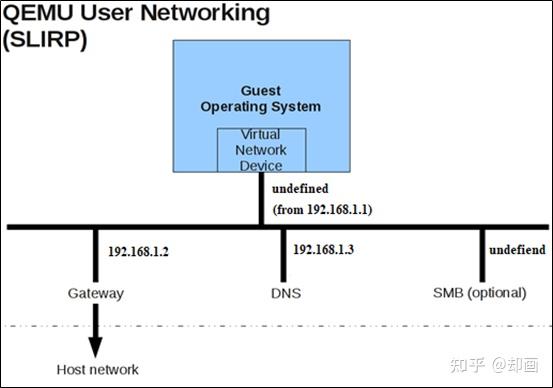
qemu-system-riscv64 -M sifive_u -m 256M -bios uboot.bin -nic user,model=cadence_gem,id=net001,net=192.168.1.0/24,dhcpstart=192.168.1.1,dns=192.168.1.3,host=192.168.1.2,hostfwd=tcp::2021-:2021,tftp=/home/user/share/ ——如果 guest 存在dhcp client,将会从 192.168.1.1 为 guest 分配ip
qemu-system-riscv64 -M sifive_u -m 256M -bios uboot.bin -nic user,model=cadence_gem,id=net001,net=192.168.1.0/24,dhcpstart=192.168.1.1,dns=192.168.1.3,host=192.168.1.2,hostfwd=tcp::2021-:2021,tftp=/home/user/share/ ——指定 dns 服务器 ip
qemu-system-riscv64 -M sifive_u -m 256M -bios uboot.bin -nic user,model=cadence_gem,id=net001,net=192.168.1.0/24,dhcpstart=192.168.1.1,dns=192.168.1.3,host=192.168.1.2,hostfwd=tcp::1993-:2021,tftp=/home/user/share/ ——指定 guest 网关,即 host 在子网段中的 ip
qemu-system-riscv64 -M sifive_u -m 256M -bios uboot.bin -nic user,model=cadence_gem,id=net001,net=192.168.1.0/24,dhcpstart=192.168.1.1,dns=192.168.1.3,host=192.168.1.2,hostfwd=tcp::1993-:2021,tftp=/home/user/share/ ——转发 host 机的 tcp:1993 至 guest 机的 tcp:2021,即将 guest 机的 tcp:2021 映射至 host 机的 tcp:1993
qemu-system-riscv64 -M sifive_u -m 256M -bios uboot.bin -nic user,model=cadence_gem,id=net001,net=192.168.1.0/24,dhcpstart=192.168.1.1,dns=192.168.1.3,host=192.168.1.2,hostfwd=tcp::1993-:2021,tftp=/home/user/share/ ——QEMU 内部模拟 tftp 服务器,指定相关目录
借助官方提供的一张图描述本次实验的网络拓扑结构:
对于启动的 u-boot 镜像,可以采用静态配置的方式启动 kernel 镜像:
(u-boot) setenv ipaddr 192.168.1.1
(u-boot) setenv netmask 255.255.255.0
(u-boot) setenv gatewayip 192.168.1.2
(u-boot) setenv loadaddr 0x8xxxxxxx
(u-boot) setenv serverip localhost
(u-boot) setenv bootfile uImage_name
(u-boot) tftpboot
也可以采用动态获取的方式启动 kernel 镜像:(前提是已经在qemu参数中配置了 bootfile=uImage_name)
(u-boot) dhcp 0x8xxxxxxx
Limitations
slirp 架构(user networking)的网络拓扑作为默认开启选项,本质上是QEMU内置的DHCP服务器,配置简单,但延展性不强,不支持ICMPv6,性能和实用性均受到局限,See User-mode networking for more details,并且它是以 NAT(Network Address Translation)为基础实现的,其中存在的问题和限制,请参slirp#limitations 或 Issues and limitations。
3.2 tap 模式
已验证的选项参数:
id=STR: 网络唯一标识
fd=H:
fds=X:Y:…:Z:
ifname=NAME: tap设备的名称
script=FILE:
downscript=DFILE:
br=BRIDGE:
helper=HELPER:
sndbuf=NBYTES:
vnet_hdr=[on|off]:
vhost=[on|off]:
vhostfd=H:
vhostfds=x:y:...:z:
vhostforce=[on|off]:
queues=n:
poll-us=n:
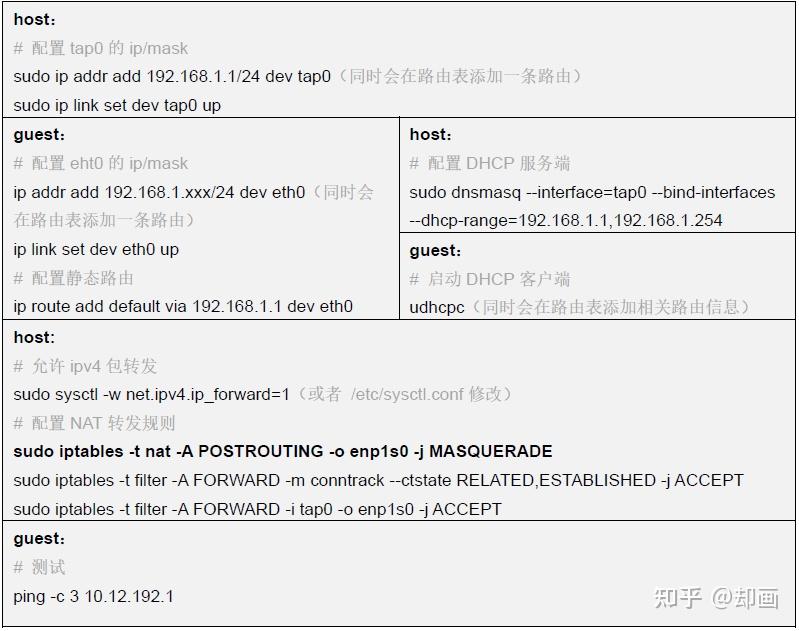
举例:(搭建类似 SLiRP 架构的网络,与 host 主机外网连通)
sudo qemu-system-riscv64 -M sifive_u -m 256M -bios fw_payload.elf -kernel uImage -nic tap,id=net0,ifname=tap0,script=no,downscript=no
通过该方式启动QEMU并不会配置完整的拓扑网络。
在本次测试中,相关的 interface 名称:
| interface | description |
|---|---|
| enp1s0 | host 物理网卡 |
| tap0 | qemu 创建的分路设备 |
| eth0 | guest 虚拟网卡 |
相关的ip/mask 信息:
| ip/mask | description |
|---|---|
| 10.12.192.1/20 | host gateway |
| 10.12.192.96/20 | host ip/mask |
| 192.168.1.1/24 | tap0 ip/mask |
| http://192.168.1.xxx/24 | guest ip/mask |
相关的操作: