Linux 副屏方案合集
六月 12, 2024 更新: 六月 13, 2024 [Linux 与系统] #Linux #obsidian #发行版 #合集 #桌面应用 #编译链接How to Use Your Tablet as a Second Monitor on Ubuntu
I’m surprised just how easy it is to use an iPad or an Android tablet as a second monitor with Ubuntu 22.04 LTS.
Not just mirror your desktop on a mobile device but use the mobile device screen to extend your desktop, like a physically connected external monitor would.
I’m supposed to be on the pulse when it comes to stuff like this. Yet here I am, monsieur slow-train, only just learning of this capability thanks to a casual comment I saw on Reddit.
Naturally I had to try it out for myself. I’ve wanted to be able to use a tablet as an external monitor for my Ubuntu laptop for ages — not out of any major need for a second monitor of course, more the satisfaction of knowing “anything Apple can do…” Linux can do too!
Good news: it works pretty well — see it in action in this (hastily recorded) video:
[▶ YouTube 视频(需科学上网):https://www.youtube.com/watch?v=qNZlVAVjsLI]
A short demo (filmed in a hurry)
GNOME developers are to thank for this.
Among new features in GNOME 42 were backend tweaks to the remote desktop protocol (RDP) and screen sharing support. Amongst which the ability to extend the GNOME desktop to virtual monitors like a real one.
Latency is a big ask. Using a tablet as an external monitor over RDP is an entirely different use case to simply accessing a desktop over RDP, which is notoriously laggy.
So offset that, GNOME devs added frame-tracking and enhanced hardware acceleration. This delivers a smooth-as-possible experience (though as the feature is network dependant don’t expect flawless fluidity on poor/slow connections).
In a nutshell, any Linux distro with GNOME 42 (or later) can use a RDP-supported device (e.g., Android tablet, iPad, or another computer) as an external monitor, similar to Apple’s SideCar feature (which lets macOS lets users extend their desktop to an iPad screen wirelessly).
Virtual monitors behave like regular monitors. You can reposition virtual monitors from the Settings > Display panel like physical ones, and set a virtual monitor’s screen resolution independently of your main display.
While this sort of feature is not new new (it’s been possible to use tablets as external monitors for a while, including on Linux) what is new is that all of relevant pieces to make this work are now baked into GNOME desktop.
Enabling Virtual Monitors in GNOME
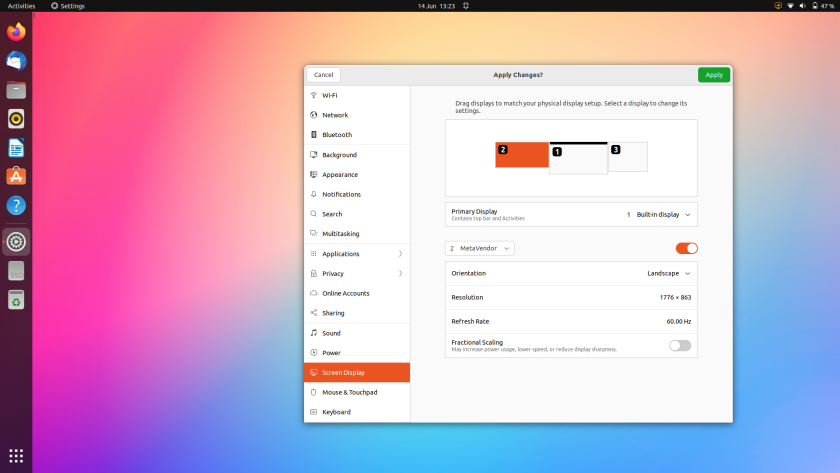 You can connect multiple virtual displays
You need to be using Ubuntu 22.04 LTS (or a Linux distribution based on GNOME 42) or later. The various low-level pieces which make virtual monitors possible are not present in earlier versions of the desktop.
Note: I tested this in an Ubuntu Wayland session but it should work in legacy X11/Xorg one too.
First step, open a Terminal window and run: gsettings set org.gnome.desktop.remote-desktop.rdp screen-share-mode extend.
This command is needed to enable extendable virtual monitors over RDP. At present the feature is hidden (because it’s not considered polished enough for the masses to make use of yet, so be aware).
Once you’ve run that command you need to enable Remote Desktop sharing.
- On Ubuntu 22.04 LTS open Settings>Sharing panel and turn on Sharing. Then, when it appears, turn on the Remote Desktop option. Set up a username and password to allow you to securely connect from your tablet/phone.
- On Ubuntu 24.04 LTS open Settings > System and click on the Remote Desktop entry. On the page that slides in (make sure the Desktop Sharing tab) turn on the Desktop Sharing option. Set up a username and password.
Now all you need is an an RDP client on your tablet or phone. I used Microsoft’s free Remote Desktop Mobile (available for Android and iOS) to connect to Ubuntu from my iPad. I needed to enter my IP1 address and login credentials.
Other apps may need/prefer other information, like your computer’s hostname and port number. in Ubuntu 24.04 LTS both of those details are shown the Remote Desktop sharing settings page.
Once you’re connected over RDP go back to your Ubuntu machine and open Settings > Display. Reposition your virtual monitor (i.e. left or right), set a screen resolution, and make any other adjustments that are possible.
Any multi-monitor behaviours you’ve tweaked elsewhere (e.g., ‘show dock on all monitors’) will also be respected by your virtual monitors, which is handy.
A few caveats
Once you are connected to your Ubuntu laptop or PC through an RDP app on your iPad everything will “just work”.
Be aware that RDP is a slow protocol. Even with a great Internet connection the experience won’t be fast enough to allow you to use your iPad as a virtual playback monitor for video editing, watching media, or gaming on content as frame rate lag will spoil it.
And you can’t use touch on your tablet to interact with Ubuntu apps or the desktop UI, nor use the input, like an Apple Pencil or equivalent, to interact with apps.
When you’re not using RDP be sure to turn off remote desktop in the sharing app. It’s unlikely anyone nearby could access your computer using it but risk reduction never hurts.
- To find your IP in Ubuntu go to Settings > Network, click the cog icon next to the active network, and find your IP in the ‘Details’ pane. ↩︎
Linux下查看本机显示器分辨率(xrandr)_linux 获取当前屏幕分辨率
Linux下查看本机显示器分辨率:
$ xrandr
Screen 0: minimum 8 x 8, current 1920 x 1080, maximum 32767 x 32767
DVI-D-0 disconnected (normal left inverted right x axis y axis)
HDMI-0 connected primary 1920x1080+0+0 (normal left inverted right x axis y axis) 553mm x 309mm
   1920x1080      60.0*+   59.9     50.0     60.0     50.0
   1680x1050      60.0
   1440x900       59.9
   1280x1024      75.0     60.0
   1280x960       60.0
   1280x720       60.0     59.9     50.0
   1024x768       75.0     70.1     60.0
   800x600        75.0     72.2     60.3     56.2
   720x576        50.0
   720x480        59.9
   640x480        75.0     72.8     59.9     59.9
DP-0 disconnected (normal left inverted right x axis y axis)
DP-1 disconnected (normal left inverted right x axis y axis)
DP-2 disconnected (normal left inverted right x axis y axis)
DP-3 disconnected (normal left inverted right x axis y axis)
DP-4 disconnected (normal left inverted right x axis y axis)
DP-5 disconnected (normal left inverted right x axis y axis)
我的显示器目前设定的分辨率为 1920×1080 (16:9) 。
我还试着按照教程来修改显示器分辨率,但是修改失败了。等后面再来尝试。
$ cvt 2560 1440
## 2560x1440 59.96 Hz (CVT 3.69M9) hsync: 89.52 kHz; pclk: 312.25 MHz
Modeline "2560x1440_60.00"  312.25  2560 2752 3024 3488  1440 1443 1448 1493 -hsync +vsync

$ xrandr --newmode "2560x1440_60.00"  312.25  2560 2752 3024 3488  1440 1443 1448 1493 -hsync +vsync

$ xrandr --addmode DP-0 "2560x1440_60.00"
X Error of failed request:  BadMatch (invalid parameter attributes)
  Major opcode of failed request:  140 (RANDR)
  Minor opcode of failed request:  18 (RRAddOutputMode)
  Serial number of failed request:  43
  Current serial number in output stream:  44
gnome virtual monitor: How to Share Virtual Extended Screen in Ubuntu 22.04 | 24.04
This simple tutorial shows how to enable RDP remote desktop for extended screen in Ubuntu 22.04, Ubuntu 24.04, and Ubuntu 23.10 with default GNOME desktop.
Since Ubuntu 22.04, the default GNOME desktop has built-in RDP support. The function has feature to share screen in ‘extend’ mode.
In this mode, Ubuntu won’t mirror the primary display, but create virtual extended screens for remote access.
Each remote connection is limited to its own virtual screen. You can drag and drop any app windows to that screen, allowing remote users to see and/or manipulate, while keeping sensitive data un-accessible in primary screen.
Or, you can use remote client PC/laptop’s monitor wirelessly to setup multiple screens for the Ubuntu machine. Though, operating in the virtual external monitors will be a bit laggy.
In the screenshot below, there are 2 machines connected to my Ubuntu PC via RDP remote desktop protocol. So, there are 2 virtual displays created. Each remote machine can access Ubuntu through its own virtual screen. While, user in front of Ubuntu can operate all the 3 screens (if 2 other monitors are sitting nearby).
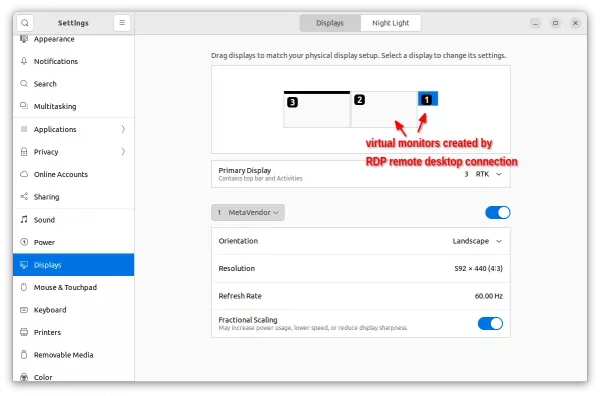
Step 1: Enable RDP remote desktop
Firstly, open Settings and navigate to ‘Sharing‘. Then, click open ‘remote desktop’ configuration dialog. Enable that function and leave ‘Enable legacy vnc protocol’ disabled. Also, toggle remote control and setup password according to your need.
For Ubuntu 24.04, go to Settings -> System -> Remote Desktop, then enable “Desktop Sharing” and configure other options as you want.
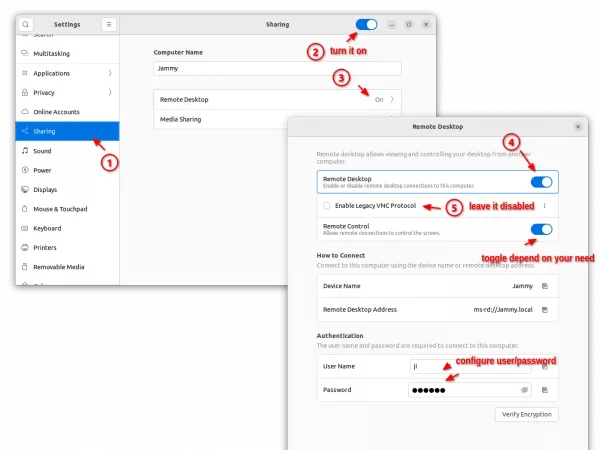
Step 2: Setting Screen Sharing Mode
Then, search for and install Dconf Editor (if you don’t have it) from Ubuntu Software.
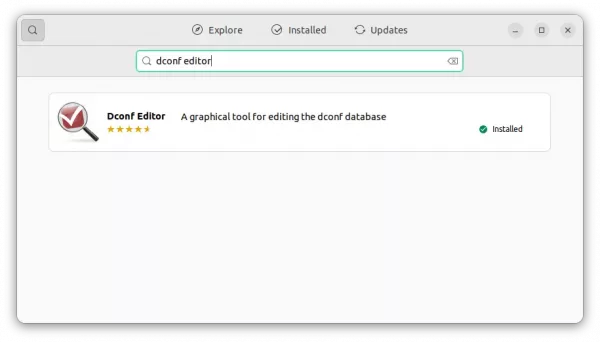
Then, launch ‘Dconf Editor’ and navigate to /org/gnome/desktop/remote-desktop/rdp/screen-share-mode. Finally, turn off ‘Use default value’ and set Custom value toextend.
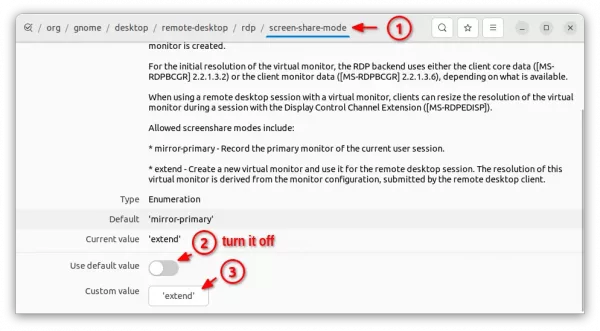
For those who are familiar with Linux command, this step can be done by opening terminal (Ctrl+Alt+T) and running a single command:
gsettings set org.gnome.desktop.remote-desktop.rdp screen-share-mode 'extend'
Finally, you can share your IP address, user and password you set in step 1 to your friends for accessing remotely.
In addition:
To access outside of home/local network, you need to setup either DMZ host or IP port forwarding (3389 in the case). The setting varies depends on your router, so I won’t cover it here.
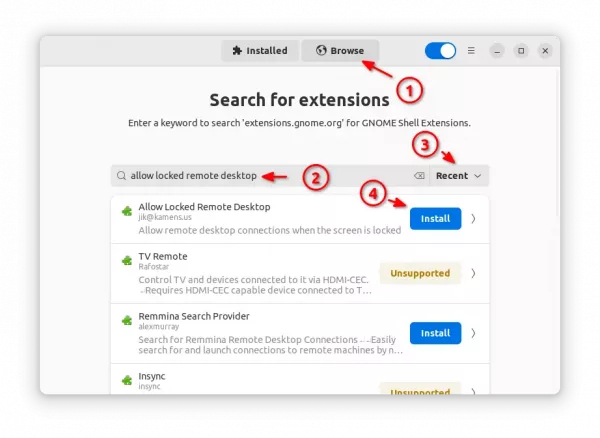
Also, if you don’t plan to sit in front of the Ubuntu machine all the time, install the “Allow Locked Remote Desktop” could be useful to prevent connection lost due to screen lock.
To do so, install and open “Extension Manager” from Ubuntu Software. Then, use it to search and install the extension from ‘Browse’ tab.
TMP BUGFIX: Mouse cursor not visible in extend mode over RDP
I'm trying to use gnome-remote-desktop to extend to a virtual display over RDP (which I then connect to using a tablet) - it works admirably BTW and the setup couldn't be easier; kudos.
However having tried on several machines (Fedora and Manjaro, both running GNOME 43 and gnome-remote-desktop 43.2.1) and several RDP clients (Microsoft RD client on iOS and Android, Remmina on Fedora) I have the same issue; cursor movement is not visible on the virtual display. I can see a static local cursor which correctly changes state (e.g. loading icon, move icon, etc) but no cursor icon at the actual mouse location.
Is there a setting I should be using to send the remote cursor? From what I can tell from the RDP spec this is determined at the server end, and from demos I've seen using the same setup (and RDP client) the cursor should be visible... But unfortunately I'm not sufficiently well versed in the tech to figure it out.
In the meantime this extension might be helpful: https://extensions.gnome.org/extension/3139/eye-extended/ https://github.com/alexeylovchikov/eye-extended-shell-extension
Works for me, but wouldn't it be better to put a mouse pointer on the pointer mouse (like they do it with the circle in this extension)?
使用 FreeRDP 远程连接 Windows 机器
前言:
远程控制已成为 IT 人员和企业用户在处理日常任务时不可或缺的工具。无论是进行系统管理、支持远程工作,还是协助解决技术问题,一个可靠且高效的远程桌面工具都是业务连续性的关键。开始我个人使用了todesk(也曾鲜想过向日葵,但是向日葵只能ubuntu环境下使用,redhat系列没有兼容),但是todesk 很耗费资源。在此,我们将详细探讨如何在Rockylinux(CentOS,redhat) 系统上,通过使用功能强大的 FreeRDP 客户端,实现对Windows 机器的远程管理。
注:后之后觉,freerdp 分辨率显示也比todesk好多了......
一、FreeRDP 的安装
适用于Rockylinux(CentOS,redhat)的 FreeRDP 安装过程简单快捷。打开您的 Rockylinux(CentOS,redhat)终端,并基于您使用的 Rockylinux(CentOS,redhat) 版本执行相应的命令。
对于 Rockylinux 8 用户:
sudo yum install freerdp
对于 Rockylinux 9 用户:
sudo dnf install freerdp

注: 其实上面两条命名都适用!
二、启动远程连接
有了 FreeRDP,我们可以一条命令便简洁地启动到 Windows 机器的远程会话。
xfreerdp /u:用户名 /p:密码 /v:远程机器IP地址
📄 [图片文字版] 用 xfreerdp 连接 Windows 远程桌面:终端执行 xfreerdp /u:zhangpeng /p:****** /v:10.10.20.2:3389,日志显示加载 cliprdr、rdpdr、rdpsnd 等通道,本地 framebuffer 为 PIXEL_FORMAT_BGR32、远端 RGB32,连接成功后弹出远程桌面窗口。
参数 /u、/p 和 /v 分别代表远程机器的用户名、密码和 IP 地址。如果您不想在命令中包含密码,也可以省略 /p:密码,系统会在连接时提示您输入。屏幕分辨率会稍微让人有点强迫症!
三、调整远程桌面分辨率
大屏幕时代,如何调整远程桌面分辨率至关重要。FreeRDP 拥有灵活的分辨率设置选项:
xfreerdp /u:用户名 /p:密码 /v:远程机器IP地址 /w:1920 /h:1080
📄 [图片文字版] xfreerdp 指定分辨率:完整命令 xfreerdp /u:zhangpeng /p:****** /v:10.10.20.2:3389 /w:1920 /h:1080(图中箭头所指即追加的 /w /h 参数),日志显示自签名证书告警(CN = DESKTOP-FQAH3KI)、本地 BGR32 / 远端 RGB32 framebuffer 及各通道加载。
如需全屏体验,请使用 /f 参数:
xfreerdp /u:用户名 /p:密码 /v:远程机器IP地址 /f
也体验了一下全屏,但是没有能退出...最后尝试在windows 远程桌面下kill 调xfreerdp进程!
我现在用的参数:
xfreerdp /u:用户名 /p:密码 /v:远程机器IP地址 /w:1920 /size:1080p
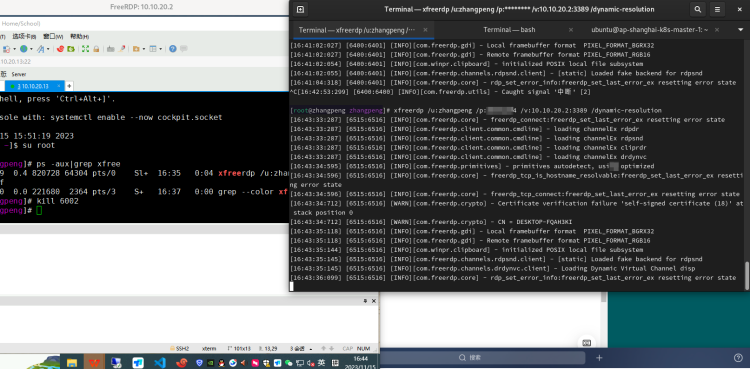
看起来比较顺眼一下,具体参数可以自己实践一下!
四、开启动态调整分辨率
为了更为智能和灵活的远程体验,FreeRDP 提供了 /dynamic-resolution 功能,它将根据本地窗口的尺寸自动调整远程桌面的分辨率。
xfreerdp /u:用户名 /p:密码 /v:远程机器IP地址 /dynamic-resolution
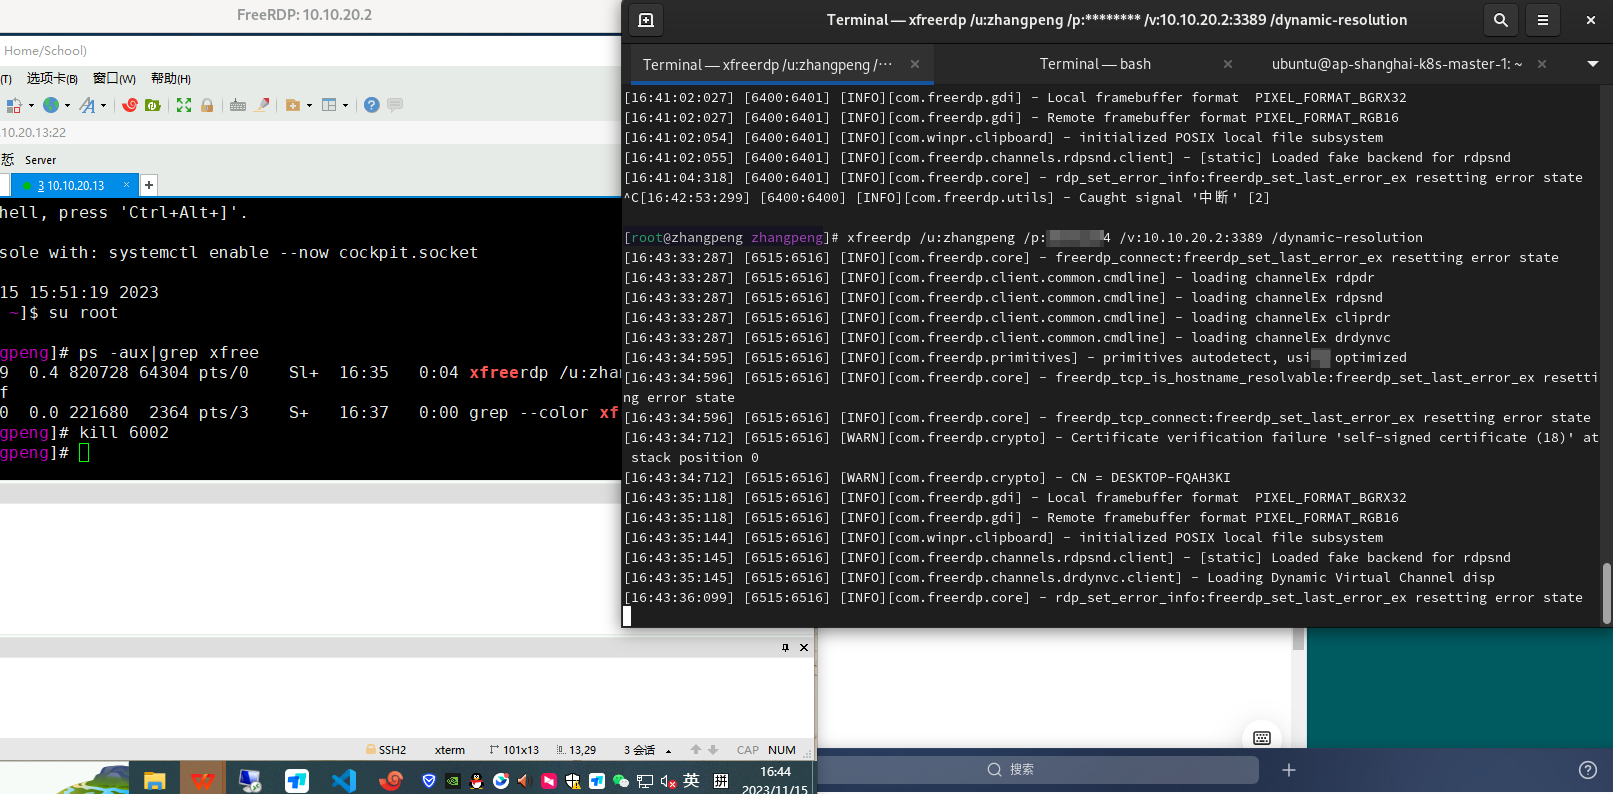
image.png
这样更合理一些了推荐这样去操作!
五、其他实用参数推荐
/clipboard:无缝共享剪贴板。/drive:本地驱动名称,本地路径:在远程会话中映射本地驱动。/sound:在本地设备上播放远程机器的声音。
xfreerdp /u:用户名 /v:远程机器IP地址 /clipboard /drive:data,/home/user/data /sound:local
六、可替代的远程桌面方案
尽管 FreeRDP 优秀,但它并非唯一的选择。以下是一些其他的远程桌面客户端,可以在 Rockylinux(CentOS,redhat) 上使用:
- Remmina: 这是一个多协议的远程桌面客户端,支持 RDP、VNC、SSH 等。提供了更为丰富的图形界面。 安装 Remmina:
xfreerdp /u:用户名 /v:远程机器IP地址 /clipboard /drive:data,/home/user/data /sound:local
- rdesktop: 一个较为轻量级的 RDP 客户端,可从命令行运行。 安装 rdesktop:
sudo yum install rdesktop
#or
sudo dnf install rdesktop
- Vinagre:GNOME 桌面环境的一部分,支持多种远程连接协议。 安装 Vinagre:
sudo yum install vinagre
#or
sudo dnf install vinagre
七、安全连接与最后的提示
当使用远程桌面工具时,特别是经由公共网络,安全是至关重要的。确保开启了 Windows 机器的远程桌面功能并进行适当的加密和认证。考虑到使用 V** 来保护传输通道。
通过本文,您已经学会了如何在 CentOS 系统上通过 FreeRDP 客户端连接至 Windows 机器。无论您是通过命令行喜好的高级用户,还是对图形界面有更多偏好的普通用户,Rockylinux(CentOS,redhat) 都提供了多种工具来满足您的远程桌面需求。现在,您可以享受跨操作系统界限的高效远程工作了!
注: 以上文档基于chatgpt生成可替代方案请自行验证,FreeRDP已经验证
在 Linux 上使用 Sunshine 把安卓平板作为虚拟副屏,画面清晰延迟极低
两年前我曾经发表过使用 X11 虚拟显示器和 Deskreen 的 WebRTC 虚拟副屏方案,该方案有较多缺陷,如画面码率低延迟高、挑显卡、不支持 Wayland 等。随着开源串流工具 Sunshine 的完善,可以使用该工具来把安卓平板当作虚拟副屏了。
🌞 安装 Sunshine
前往 https://github.com/LizardByte/Sunshine/releases/nightly-dev 选择对应发行版的安装包安装即可。
比如我是 Arch Linux,就可以使用这条命令安装:
1 | sudo pacman -U https://github.com/LizardByte/Sunshine/releases/download/nightly-dev/sunshine.pkg.tar.zst |
|---|
⚠️ 注意
如果你的虚拟副屏是竖屏,就不要安装稳定版 Sunshine(如 latest release 中的版本或 AUR / chaotic-aur 软件仓库的 sunshine 或 sunshine-bin 软件包),因为稳定版的 Sunshine 不支持竖屏串流。 请使用 sunshine-git 或上面 GitHub 链接中的版本。
🌝 安装 Moonlight
前往这期视频的简介获取 UP 主“阿西西的日常”修改版的 Moonlight,该版本支持竖屏串流。
🔌 配置虚拟显示器
🔌 显卡欺骗器
如果你使用 X11,请参考往期博客。
在 Wayland 下并不能使用修改 X11 配置文件的方法创建虚拟显示器,krfb-virtualmonitor 创建的虚拟显示器也不能被 Sunshine 检测到,于是之前的方法悉数失效。
我的解决方案是花几块钱买一个显卡欺骗器,有的商家也称之为虚拟显示器。
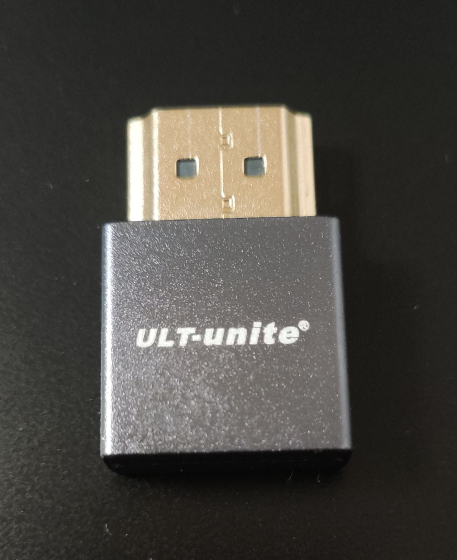
把它插上电脑,在弹出的提示框中选择“向左扩展”或“向右扩展”即可。
🛠️ 覆盖 EDID
由于显卡欺骗器内置的分辨率都为横屏,且并不能满足我的需求(我想使用 800x1280),所以需要覆盖它的 EDID。 EDID 可以理解为显示器的身份信息,包含该显示器的型号、支持的分辨率等。需要用一个 800x1280 分辨率显示器的 EDID 文件覆盖显卡欺骗器的,以让其支持 800x1280 分辨率。
万幸的是,已经有人整理好了各型号显示器的 EDID 文件,我们可以直接下载。
首先在此网页中找到需要的分辨率,然后前往 GitHub 仓库的 Digital 文件夹中下载对应的 EDID 文件。
(原文配图 net-img-pin 在剪藏时保存失败——文件实为 HTML,无法恢复)
提到 800x1280 这个分辨率,我第一反应就是某阀门公司的游戏掌机,而这个仓库中也恰好有对应的 EDID 文件。
在找到 EDID 文件之后,复制该文件中 edid-decode (hex) 部分的十六进制码,使用任意十六进制编辑器(如 hexed.it)将其写入一个 bin 后缀的文件。
之后把得到的这个 128B 大小的 bin 文件放到 /usr/lib/firmware/edid 文件夹中。若文件夹不存在请自行创建。
最后,编辑内核参数,加入一行drm.edid_firmware=HDMI-A-2:edid/vlv3001.bin。
其中,HDMI-A-2 为显卡欺骗器对应的显示器编号(可用 xrandr 命令查看), vlv3001.bin 为上一步得到的 bin 文件。
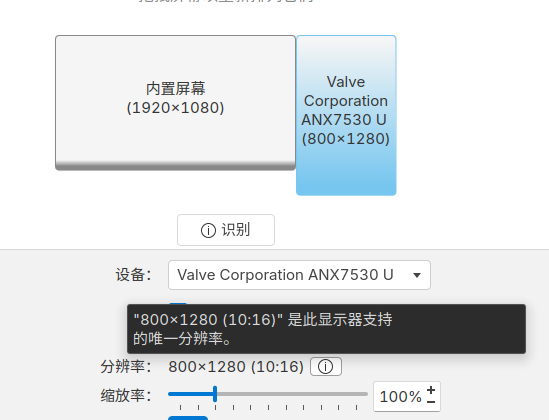
覆盖 EDID 之后的效果如图所示。可以看到,系统已经成功地把我的显卡欺骗器当成了某阀门掌机的显示器。
🌻 配置 Sunshine
接下来就可以配置 Sunshine 了。在启动 Sunshine 后点击托盘图标即可打开配置界面。
首先是常规的设置用户名密码,之后打开 Configuration 进行配置。
- 关闭 Input 中的手柄、键盘和鼠标选项,因为把 Sunshine 当作虚拟显示器的话,触摸会错位,所以需要关掉来避免误触。
- 在 Audio/Video 中设置好显示器编号(Display Number)和分辨率(Advertised Resolutions)。
- 在 Advanced 中设置好屏幕捕获方式(Force a Specifig Capture Method),如果你是台式电脑,只使用 NVIDIA 独立显卡,那么可以安装 nvlax 补丁 并使用 NvFBC 模式,否则就使用 KMS 模式。
🥮 配置 Moonlight
在安卓平板端 Moonlight 的设置中找到“自定义分辨率”,并输入需要使用的分辨率(我这里使用 800x1280),并且按需开启“竖屏显示模式”。之后,重启一次 Moonlight,就可以在设置界面最上面的“视频分辨率”中找到刚才设置的分辨率。
之后打开“将画面拉伸至全屏”,关掉“输入设置”的三个选项。
Moonlight 可以自动检测到局域网下的电脑,直接连接上就可以使用了。
🖼️ 效果图
📄 [图片文字版] 副屏方案效果实拍:主屏全屏运行游戏《崩坏:星穹铁道》,右侧竖立的安卓平板作为副屏显示 Telegram 的 Arch Linux 中文群聊天界面,说明平板副屏可边打游戏边聊天。
在 Wayland 下对某会议软件的屏幕共享方案,以及一些笔记
众所周知,某会议软件推出的 Linux 版本在 Wayland session 下是拿不到屏幕的信息的(虽然某种程度上,能有 Linux 版本就已经很不错了)。本文提出了一种扭曲但是可行性更高且更加可靠的方法,并且包括了一些相关的笔记,以及我的一些推测,以备参考。
我也传了一份到 A 站上:https://www.acfun.cn/v/ac41424863
为什么不是传到 B 站上?我其实一开始想这么搞,但是发现现在 B 站的投稿已经没有分 P 功能了(我上次上传视频得好几年以前了),然后合集功能还要「达到一定电磁力」(这玩意和用户等级还是两个不同的东西)才能用。我又不想在别人的 timeline 上蹦出七个怪视频,所以就算了。B 站的产品经理可能脑子有大病吧。
A 站的快手服务器好像有点问题,我这里太大的视频传的时候会卡住,但是至少分 P 功能还在,不是不能用。
而 YouTube 对应的功能是「播放列表」,而且我可以设置视频不列出在频道里面,所以没有问题。而且原始录制的视频有点大,直接塞个 video 标签,然后让人一开页面就下载几百兆的东西显然不是什么明智的选择。
不过说句题外话,A 站好像也挺惨的,我之前注册账号主要是为了看《摇曳露营》,然后被搞出先审后播之后就没新番了,在竞争上处于明显的劣势。
简单来说,该会议软件只能在 rootful xwayland 下才能获取到 xwayland 整个屏幕的信息。你可以先开个 nested wayland compositor(比如说 weston),也可以直接开这个 rootful xwayland(我不清楚 Server-Side Decoration 下直接开有没有边框,不过如果是 CSD-only 的环境(aka, GNOME)的话,需要编译的时候带上 libdecor 参数。作为参考,可以使用我打的 AUR 包:xwayland-standalone-with-libdecor)
在这个 rootful xwayland 下面就可以做很多传统 X 的事情了,比如说开个 WM(我推荐用 OpenBox)之类的。
最后缺失的一环是把外面的内容传进来,而 xdg portal 暴露了屏幕共享的接口,可以输出一个 pipewire fd,之后 gstreamer 可以把这个 fd 输出到一个 X 窗口,于是就实现了这个目标。xdp-screen-cast.py 脚本就帮忙完成了写 DBus 请求等等的麻烦事。
不太好的方案
虚拟摄像头?
这种方法似乎是在使用 native 客户端的前提下最可行的。我没有测试过这种方案(因为不想装 dkms),但是有一点不能忽略的是:摄像头的视频编码和屏幕共享的视频编码参数肯定是不同的。摄像头拍到的人脸糊一点,artifacts 多一点,其实问题都不算大;但是屏幕共享糊一点的话,屏幕上的字都看不清楚了,这在很多场景下都是不能接受的。
xwaylandvideobridge?
看起来很完美,但是在这里唯一的问题是:它不能用(至少我本地测试是如此)。因为它解决的是使用了 XRecord 扩展的软件的录屏问题,但是某会议软件似乎并没有使用 XRecord 扩展。 使用 XRecord 扩展来判断程序是否在录屏(使用 X 混成扩展重定向窗口内容),但是这里似乎检测不到。
AUR 的评论区里前几天有人说可以,我不太确定可信度(可能是我打开的方式不对?),如果有人测试过可行的话可以告诉我一下。 问了一下,确实是不行的。
Windows VM + OBS/RDP?
大概也算是一种勉强能用的方案。OBS + rtmp 推流会有 2s 的延迟,如果走 RDP 延迟会好一些(GNOME 用的是 gnome-remote-desktop,其他的桌面环境应该有类似的方案)。但是:
- 更耗电;
- 如果是 KVM 用户,且没有显卡虚拟化,只有 QXL 2D 加速,那么投屏的时候 Windows 的 CPU 占用率会奇高。
Proposal
调研过 Wayland 的 Portal 投屏的用户可能都看过这个 snippet: https://gitlab.gnome.org/-/snippets/19。
它的工作原理是:
- 和对应的 DBus 接口通信,拿到一个 pipewire 的 fd(well,我不关心具体是怎么调用这个 portal 的);
- 用 GStreamer 打开这个 fd,然后经过一个 pipeline 之后用
xvimagesink播放(显示在弹出的窗口中)。
而 xvimagesink 是一个使用 XVideo 扩展 显示视频流的 X11 窗口,所以理论上我们可以在一个独立的 X display 里面运行某会议软件,然后让 xvimagesink 播放到这个 display 里面,这样的话就可以识别到了。
x11docker & GStreamer?
如果要说再跑一个 X session 的话,x11docker 应该是一个不错的选择,基于容器隔离,并且有一大堆自定义的参数可以选择。然后接下来的问题就是怎么把 GStreamer 的视频流传输到 x11docker 的 X display 里面。由于用户权限等问题,直接在外面 DISPLAY 感觉不太像是一个靠谱的主意,因此我当时的想法是,通过网络把视频流传到容器里面的 GStreamer,然后由它显示出来。
这不是最终的解决方案,如果只想看解决方案,可以直接拉到下一大节。
GStreamer 101
GStreamer 我感觉资料不多,并且诡异的是,在我搜索的时候,可以在 StackOverflow 上找到一些 GStreamer 标签的问题,但是它们大多不约而同没有任何人回答。所以我觉得可能有必要写一下我在倒腾的时候的一些认识,虽然我不能保证它们完全正确。
首先我们基本不需要去写代码,大部分工作都可以通过构建 pipeline 解决。GStreamer 的 pipeline 有一点像 Unix 的管道机制。开头是一个生产多媒体流的 “source”,中间会经过一些 “filter” 对多媒体流做一些处理,最后 “sink” 是这个流的消费者。这些组成 pipeline 的源部件被称为「元素」(Element)。
我们可以用 gst-launch-1.0 做简单的测试用途。一个最简单的例子是:
gst-launch-1.0 videotestsrc ! autovideosink
这里 videotestsrc 是产生测试图像信号的 source,而 autovideosink 是 sink,会根据平台选择最合适的 video sink 展示给用户。
之后可以放一点我们自己的视频。filesrc location=path/to/file 是从文件中读取数据的 source,于是这样就可以了吗?
gst-launch-1.0 filesrc location=./test.mp4 ! autovideosink
执行会发现:
Setting pipeline to PAUSED ...
Pipeline is PREROLLING ...

(gst-launch-1.0:1107112): GStreamer-Video-CRITICAL **: 13:46:40.380: gst_video_info_to_caps: assertion 'info->finfo != NULL' failed
ERROR: from element /GstPipeline:pipeline0/GstAutoVideoSink:autovideosink0/GstXvImageSink:autovideosink0-actual-sink-xvimage: Internal error: can't allocate images
Additional debug info:
../gstreamer/subprojects/gst-plugins-base/sys/xvimage/xvimagesink.c(1169): gst_xv_image_sink_show_frame (): /GstPipeline:pipeline0/GstAutoVideoSink:autovideosink0/GstXvImageSink:autovideosink0-actual-sink-xvimage:
We don't have a bufferpool negotiated
ERROR: pipeline doesn't want to preroll.
Setting pipeline to NULL ...
ERROR: from element /GstPipeline:pipeline0/GstFileSrc:filesrc0: Internal data stream error.
Additional debug info:
../gstreamer/subprojects/gstreamer/libs/gst/base/gstbasesrc.c(3132): gst_base_src_loop (): /GstPipeline:pipeline0/GstFileSrc:filesrc0:
streaming stopped, reason error (-5)
ERROR: pipeline doesn't want to preroll.
Freeing pipeline ...
这是因为 filesrc 产生的数据类型和视频文件的编码一致,而 autovideosink(实际上是 xvimagesink)接收的数据类型是 video/x-raw,所以我们需要添加一个解码的 filter: decodebin。
gst-launch-1.0 filesrc location=./test.mp4 ! decodebin ! autovideosink
对于上面的 xdp-screen-cast 的 snippet,我们可以看到它的 pipeline 是:
pipewiresrc fd=%d path=%u ! videoconvert ! xvimagesink
这里 videoconvert 是用来在 raw 视频流之间做色彩空间转换的。但是 pipewiresrc 输出的视频流到底是什么样的呢?pipewiresrc 不是 GStreamer 官方的插件,所以如果要看它的文档,需要使用 gst-inspect-1.0。
gst-inspect-1.0 pipewiresrc
虽然看不到有效的信息:
Pad Templates:
  SRC template: 'src'
    Availability: Always
    Capabilities:
      ANY

Clocking Interaction:
  element is supposed to provide a clock but returned NULL
Element has no URI handling capabilities.

Pads:
  SRC: 'src'
    Pad Template: 'src'
估计它的输出的类型和 pipewire 源有关系,我们可以修改 xdp-screen-cast 的代码,加上一些用来输出相关信息的代码。
gst_command = "pipewiresrc fd=%d path=%u name=pwsrc0 ! videoconvert ! xvimagesink"
gst_command = gst_command % (fd, node_id)

pipeline = Gst.parse_launch(gst_command)

def pad_func(pad, info, user_data):
    caps = pad.get_current_caps()
    if caps:
        print("Video stream type:", caps.to_string())
    else:
        print("No caps available")
    return Gst.PadProbeReturn.PASS

pwsrc = pipeline.get_by_name("pwsrc0")
srcpad = pwsrc.get_static_pad("src")
srcpad.add_probe(Gst.PadProbeType.EVENT_DOWNSTREAM, pad_func, None)

pipeline.set_state(Gst.State.PLAYING)
## ...
这里我们给 pipewiresrc 加上了一个名字 pwsrc0,然后在播放这个 pipeline 之前获取了它的 “src” pad,然后为这个 pad 加上了一个 probe,这个类似钩子的东西会调用 pad_func() 函数,函数内会输出 “pad” 的 “caps”。
这里,“pad” 可以看作是让数据输入或者输出元素的通道,而 pad 的 “caps” (capabilities) 则代表了哪些类型的数据可以被对应的 pad 处理。在上面的代码中我们添加的 probe 则是一类用来通知应用程序数据流状态的 callback。而 “EVENT_DOWNSTREAM” 则代表在这个 pipeline 中从上游 (source) 到下游 (sink) 的事件。
执行可以看到:
session /org/freedesktop/portal/desktop/session/1_5365/u1 created
sources selected
streams:
stream 144
No caps available
Video stream type: video/x-raw, format=(string)BGRx, width=(int)1920, height=(int)1200, framerate=(fraction)0/1, max-framerate=(fraction)15729223/262144
Video stream type: video/x-raw, format=(string)BGRx, width=(int)1920, height=(int)1200, framerate=(fraction)0/1, max-framerate=(fraction)15729223/262144
由此可以知道,这里 pipewiresrc 的输出是一个 1920*1080 大小的,像素格式为 BGRx 的 raw 视频流。对 xvimagesink 做相似的修改,可以观察到输出的视频流是:
Video stream type: video/x-raw, width=(int)1920, height=(int)1200, framerate=(fraction)0/1, max-framerate=(fraction)15729223/262144, format=(string)YV12
因此 videoconvert 在中间将 BGRx 转换为了 YV12 的格式。同样的,如果你有摄像头,也可以试一下下面这个 pipeline:
gst-launch-1.0 v4l2src device=/dev/video0 ! videoconvert ! autovideosink
另外,调试的时候可以加 GST_DEBUG="3" 环境变量以输出错误信息(增大数字可以输出更多的信息)。
GStreamer 与网络传输 (1)
如果两端都安装了 GStreamer,那么可以比较方便地实现网络传输视频流。以 UDP 为例子,发送端需要将数据流扔给 udpsink,而接收端需要从 udpsrc 读取这个数据流。但是直接 naively 加上是不工作的:
> gst-launch-1.0 videotestsrc ! udpsink host=127.0.0.1 port=5000
Setting pipeline to PAUSED ...
Pipeline is PREROLLING ...
Pipeline is PREROLLED ...
Setting pipeline to PLAYING ...
Redistribute latency...
New clock: GstSystemClock
WARNING: from element /GstPipeline:pipeline0/GstUDPSink:udpsink0: Attempting to send a UDP packets larger than maximum size (614400 > 65507)
Additional debug info:
../gstreamer/subprojects/gst-plugins-good/gst/udp/gstmultiudpsink.c(684): gst_multiudpsink_send_messages (): /GstPipeline:pipeline0/GstUDPSink:udpsink0:
Reason: Error sending message: Message too long
WARNING: from element /GstPipeline:pipeline0/GstUDPSink:udpsink0: Attempting to send a UDP packets larger than maximum size (614400 > 65507)
Additional debug info:
../gstreamer/subprojects/gst-plugins-good/gst/udp/gstmultiudpsink.c(684): gst_multiudpsink_send_messages (): /GstPipeline:pipeline0/GstUDPSink:udpsink0:
Reason: Error sending message: Message too long
## 以下省略
UDP 的单个包大小有上限。那么有人会说,能不能用 TCP 呢?
> gst-launch-1.0 videotestsrc ! tcpserversink host=127.0.0.1 port=5000
Setting pipeline to PAUSED ...
Pipeline is PREROLLING ...
Pipeline is PREROLLED ...
Setting pipeline to PLAYING ...
Redistribute latency...
New clock: GstSystemClock
0:00:04.3 / 99:99:99.
## 好像没问题?开个新窗口看看接收端
> gst-launch-1.0 tcpclientsrc port=5000 ! autovideosink
Setting pipeline to PAUSED ...
Pipeline is PREROLLING ...

(gst-launch-1.0:1188556): GStreamer-Video-CRITICAL **: 02:14:55.643: gst_video_info_to_caps: assertion 'info->finfo != NULL' failed
ERROR: from element /GstPipeline:pipeline0/GstAutoVideoSink:autovideosink0/GstXvImageSink:autovideosink0-actual-sink-xvimage: Internal error: can't allocate images
Additional debug info:
../gstreamer/subprojects/gst-plugins-base/sys/xvimage/xvimagesink.c(1169): gst_xv_image_sink_show_frame (): /GstPipeline:pipeline0/GstAutoVideoSink:autovideosink0/GstXvImageSink:autovideosink0-actual-sink-xvimage:
We don't have a bufferpool negotiated
ERROR: pipeline doesn't want to preroll.
ERROR: from element /GstPipeline:pipeline0/GstTCPClientSrc:tcpclientsrc0: Internal data stream error.
Additional debug info:
../gstreamer/subprojects/gstreamer/libs/gst/base/gstbasesrc.c(3132): gst_base_src_loop (): /GstPipeline:pipeline0/GstTCPClientSrc:tcpclientsrc0:
streaming stopped, reason error (-5)
ERROR: pipeline doesn't want to preroll.
Setting pipeline to NULL ...
Freeing pipeline ...
即使能发出去,接收端也无法正常播放,因为它对视频流的属性一无所知。即使我们加上了相关的属性,得到的视频流输出也是没法用的:
## 发送端?
> gst-launch-1.0 videotestsrc ! videoconvert ! video/x-raw,format=BGRx,width=100,height=100,framerate=24/1 ! tcpserversink host=127.0.0.1 port=5000
## 接收端?
> gst-launch-1.0 tcpclientsrc port=5000 ! video/x-raw,format=BGRx,width=100,height=100,framerate=24/1 ! videoconvert ! autovideosink
得到的输出是绿屏,可能的原因是这里接收端没有足够多的信息判断每一帧怎么划分。
对于 UDP,为了让视频流能够正确在网络通讯中存活,一般的做法是用 RTP 包一层。发送的时候用 rtpvrawpay 包,接收的时候用 rtpvrawdepay 解包。
## 发送端
## RTP 不支持上面例子的 BGRx,所以这里换成了 BGR
## 因为 videotestsrc 支持很多格式,所以 format 随便填一个应该就行
> gst-launch-1.0 videotestsrc ! videoconvert ! video/x-raw,format=BGR,width=100,height=100,framerate=24/1 ! rtpvrawpay ! udpsink host=127.0.0.1 port=5000
## 接收端
## rtpvrawdepay 要求上游给属性,这里 udpsrc 接收到的是 rtp 包(而不是直接的 raw),所以得按照 rtp 的格式写
## caps 对类型的要求比较严格,如果 width/height 不声明为 `string` 会报错,而且得加上 GST_DEBUG 才能知道是这里的问题
## 只能参考文档猜字符串要怎么写,有些默认值这里省略了,其他的教程可能会写进去
> gst-launch-1.0 udpsrc port=5000 caps='application/x-rtp,sampling=(string)BGR,width=(string)100,height=(string)100,depth=(string)8' ! rtpvrawdepay ! videoconvert ! autovideosink
这也太麻烦了,如果搜过会发现,好像编码成 H.264 之后就不用写(猜)这么一长串格式了:
## 发送端
## 这里 tune=zerolatency 先加上了,否则延迟可能难以接受
> gst-launch-1.0 videotestsrc ! videoconvert ! x264enc tune=zerolatency ! rtph264pay ! udpsink host=127.0.0.1 port=5000
## 接收端
> gst-launch-1.0 udpsrc port=5000 caps='application/x-rtp,encoding-name=(string)H264' ! rtph264depay ! avdec_h264 ! videoconvert ! autovideosink
或者 MJPEG 也可以:
## 发送端
> gst-launch-1.0 videotestsrc ! videoconvert ! jpegenc ! rtpjpegpay ! udpsink host=127.0.0.1 port=5000
## 接收端
> gst-launch-1.0 udpsrc port=5000 caps='application/x-rtp,encoding-name=(string)JPEG' ! rtpjpegdepay ! jpegdec ! videoconvert ! autovideosink
而对于 TCP,因为 TCP 是流式的(它关心的只是怎么传输一个字节流),而不是像 UDP 那样一个包一个包界限分明,但是 RTP 依赖于 UDP 的这个性质,所以 TCP 下需要用某种编码包一层,或者用 GDP (GStreamer Data Protocol) 包一层:
## 发送端
> gst-launch-1.0 videotestsrc ! videoconvert ! video/x-raw,format=BGRx,width=100,height=100,framerate=24/1 ! gdppay ! tcpserversink host=127.0.0.1 port=5000
## 接收端
> gst-launch-1.0 tcpclientsrc port=5000 ! gdpdepay ! video/x-raw,format=BGRx,width=100,height=100,framerate=24/1 ! videoconvert ! autovideosink
视频编码?
看起来视频编码是一个不错的主意,但是我们需要考虑两点问题:
- 视频编码的质量、延迟
- 视频编码的性能开销
带宽占用可能也是一个值得关注的问题,不过我们这里的场景是本地传输,所以甚至直接传 raw stream 都是可以接受的。
我们可以在 pipeline 中添加先编码然后直接解码后输出到 xvimagesink 的过程。rtp pay 和 depay 的损耗几乎可以忽略不计,所以这里就不放了。
## H.264
pipewiresrc fd=%d path=%u ! videoconvert ! x264enc tune=zerolatency ! avdec_h264 ! videoconvert ! xvimagesink
## MJPEG
pipewiresrc fd=%d path=%u ! jpegenc ! jpegdec ! videoconvert ! xvimagesink
首先可以发现的是,默认参数下,H.264 + zerolatency 的效果非常非常糊:
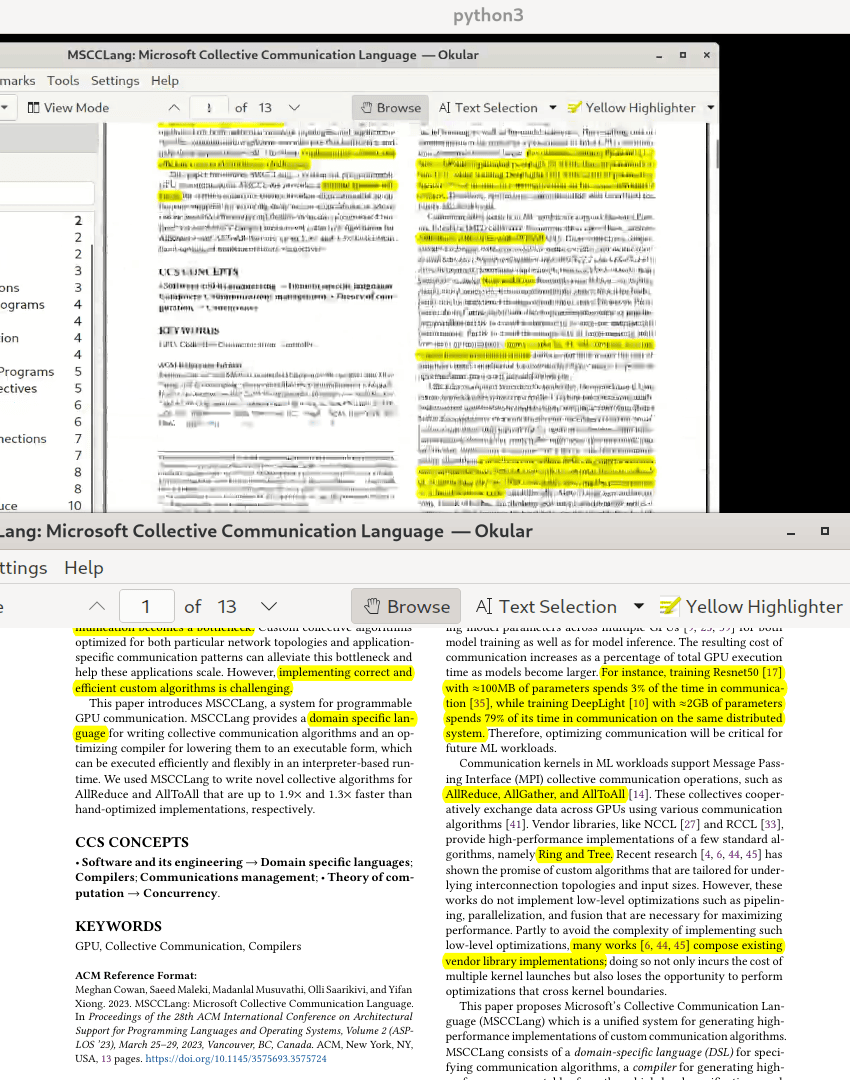
和朋友讨论了之后发现是默认码率的问题。GStreamer 的 x264enc 的默认码率是 2048 Kbps。这个码率用在摄像头上大概可以勉强看清人脸,然后在屏幕共享的场合就很不够用了。尤其是这里还开了 zerolatency,把很多非实时场景下能用的优化都关掉了,所以需求的码率更高。
(其实可能可以妥协少量的延迟来做一些帧间优化,但是我不太熟悉怎么去调参数,所以就跳过吧)
将码率调高之后画质的问题有所改善,但是还是不怎么跟手。如果只是共享 slides 之类的话可能问题不算很大,不过如果要以很低的延迟共享游戏的屏幕流的话,恐怕都不太合适。
以下是 MJPEG, H.264 (30000 Kbps) 和不编码/解码的时候延迟与 CPU 使用量的直观对比,其中右下角是 xvimagesink:
[▶ YouTube 视频(需科学上网):https://www.youtube.com/watch?v=YeZQ-kd2_mA]
MJPEG
[▶ YouTube 视频(需科学上网):https://www.youtube.com/watch?v=E2uFver-_Jc]
H.264 (30000 Kbps)
[▶ YouTube 视频(需科学上网):https://www.youtube.com/watch?v=MXF5kQh9jvM]
直接输出
如果开个游戏的话,延迟带来的效果就更加显著:
[▶ YouTube 视频(需科学上网):https://www.youtube.com/watch?v=c-p4l0GqAKo]
MJPEG,某个(被)弹幕(打的)游戏的 screencast
所以显然转码和解码会带来一定的开销,并且这样的开销有的时候无法忽略——不过如果需要考虑网络传输的开销的话,MJPEG 相比来讲仍然是一个比较均衡的方案,所以仍然需要视场景选择。
有读者可能会问:为什么不用硬件加速?GStreamer 确实支持基于 VAAPI 的硬件加速,但是它的 H.264 硬件加速编码器不支持 zerolatency,实际效果反而更卡;而 MJPEG 我没有找到相关的硬件加速方案,不过 VAAPI 支持其他类型的编解码加速,这就需要有兴趣的人自己测试了。
另外再次需要注意的是,这里考虑的是一个极端的场合(需要很小的延迟)。在直播之类的场景下反而 H.264(以及其他更先进的编码)是更好的选择,因为几秒的延迟已经足够做优化,并且这个时候也可以用上硬件编码。
网络传输 (2)
这个问题听起来很简单——毕竟前面已经知道怎么在 GStreamer 里面使用 UDP/TCP 来传输视频流了,那么直接用上不就行了?让我们先拿个视频文件试试吧!
## 发送端 (UDP)
> gst-launch-1.0 filesrc location=./test.mp4 ! decodebin ! videoconvert ! jpegenc ! rtpjpegpay ! udpsink host=127.0.0.1 port=5000  # MJPEG
> gst-launch-1.0 filesrc location=./test.mp4 ! decodebin ! videoconvert ! x264enc tune=zerolatency bitrate=30000 ! rtph264pay ! udpsink host=127.0.0.1 port=5000  # H.265
> gst-launch-1.0 filesrc location=./test.mp4 ! decodebin ! videoconvert ! rtpvrawpay ! udpsink host=127.0.0.1 port=5000  # RAW
## 接收端 (UDP)
> gst-launch-1.0 udpsrc port=5000 caps='application/x-rtp,encoding-name=(string)JPEG' ! rtpjpegdepay ! jpegdec ! videoconvert ! autovideosink  # MJPEG
> gst-launch-1.0 udpsrc port=5000 caps='application/x-rtp,encoding-name=(string)H264' ! rtph264depay ! avdec_h264 ! videoconvert ! autovideosink  # H.265
> gst-launch-1.0 udpsrc port=5000 caps='application/x-rtp,sampling=(string)YCbCr-4:2:0,width=(string)1920,height=(string)1012,depth=(string)8' ! rtpvrawdepay ! videoconvert ! autovideosink  # RAW
## emmm 一个麻烦的事情是,如果要用 rtp 传 raw stream,你要想办法知道这个 rtp 的属性
## 可以在发送端调高 GST_DEBUG 来判断 video/x-raw 的属性,但是有时候需要一些额外的知识
## 比如说我用来测试的视频里面的像素格式是 "I420",它对应的 rtp sampling 是 "YCbCr-4:2:0"
## 这是一个大坑点,不去搜资料是很难知道的
结果……emmmm……(视频来源)
[▶ YouTube 视频(需科学上网):https://www.youtube.com/watch?v=pEqO3zchRFs]
MJPEG,没错不是你这里卡住了
[▶ YouTube 视频(需科学上网):https://www.youtube.com/watch?v=9T82V-qzGiY]
H.264,不少 artifacts
[▶ YouTube 视频(需科学上网):https://www.youtube.com/watch?v=TdL_9TbpWjc]
直接传会出现大量的细线
TCP 是没有这个问题的。有经验的读者应该能猜到是什么问题了,不过既然 UDP 在 lo 上有问题,那么我们就需要检查相关的丢包情况了。以 MJPEG 为例,观察 /proc/net/udp,可以发现在卡顿的时候是有丢包的情况的:
> cat /proc/net/udp
   sl  local_address rem_address   st tx_queue rx_queue tr tm->when retrnsmt   uid  timeout inode ref pointer drops
 2609: 00000000:1388 00000000:0000 07 00000000:00000000 00:00000000 00000000  1000        0 696929 2 0000000057310d4f 11233
 # 这一行最后一个数值不断增长。以下省略
搜索可以发现需要增加接收端的缓冲区大小:
> sysctl net.core.rmem_max
net.core.rmem_max = 212992
## 修改到一个更大的值
> sudo sysctl -w net.core.rmem_max=10485760
net.core.rmem_max = 10485760
并且接收端的 udpsrc 也需要做配置:
## 类似于这样
> gst-launch-1.0 udpsrc port=5000 buffer-size=10485760 caps='application/x-rtp,encoding-name=(string)JPEG' ! rtpjpegdepay ! jpegdec ! videoconvert ! autovideosink
(至于定多少就需要自己慢慢调了)
x11docker 的使用
x11docker 需要一段时间自己摸索,并且为了好用,桌面环境的容器需要在 x11docker 已有的容器基础上自己打包(一个可供参考的 Dockerfile)。
然后 x11docker 需要自己选一个 X server 的实现。尽管官方文档推荐 Xephyr,但是实际上根据我本地的测试,它对 XVideo 扩展的支持相当差,xvimagesink 无法正常播放视频。有可能这也是 x11docker 把 xephyr 的 XVideo 关了的原因。
令人惊讶的是,用 weston 里面跑一个 xwayland 的方式出人意料地不错(唯一的缺点是不能调 weston 的窗口大小),XVideo 是正常的,里面的桌面环境跑起来也没有问题。尽管 x11docker 默认会启动一个 X 后端的 weston(很奇怪,而且我这里鼠标移动会出问题),不过直接改 x11docker 脚本,强制 weston 以 wayland 后端启动就能缓解。
所以为什么这里 xwayland 就能让它成功屏幕共享?我的推测是,xwayland 在正常使用的时候都是以 rootless 模式启动的 (Run Xwayland rootless, so that X clients integrate seamlessly with Wayland clients in a Wayland desktop),这个模式下可能是无法正常获取整个屏幕的信息的。而这里 xwayland 以 non-rootless 模式启动,所以屏幕的信息是完整可以被应用获取的。
最后的启动命令大概是这个样子:
x11docker --gpu -I --weston-xwayland --size=1920x1080 --home --clipboard --desktop --pulseaudio=host --webcam --sudouser -i local/wemeet-x11
不过我最后没有用这个方案,原因是某会议软件在这个环境里面拒绝启动麦克风,原因不明,我也懒得拿个 IDA 去逆向。刚好之前试过 Flatpak 版本除了屏幕共享都是正常的,所以之后我实际采用的方案可能已经能猜到了。
扭曲的最终方案
Update 1 (2023-08-25): xorg-xwayland 更新到 23.2.0 之后 rootful 模式处理大小的方式出现了变化,因此下面的内容有修改:
Xwayland需要添加一个-fullscreen参数,否则启动的 X 的大小不对;- mutter 换成了 openbox,因为 mutter 开出来之后会自己把分辨率调到 5120x2880,然后窗口就特别小,不知道是什么原因。
Update 2 (2023-08-26): 最新版的 xorg-xwayland 做了 libdecor 的适配调整,添加了 resize 的支持,所以另一种思路是在编译 xorg-xwayland 时加上 libdecor 支持,然后扔掉 weston,直接启动 Xwayland。不过 Arch 编译的版本没有加 libdecor,所以我打了个 AUR 包自己用,加上 git 版带 GTK plugin 的 libdecor,显示的效果还挺不错。此外 openbox 修改配置也很方便,可以在它的菜单中配置在这个新的 X Display 里面可能要用到的东西。可以参考:我现在使用的启动脚本 和 我的 openbox 配置。
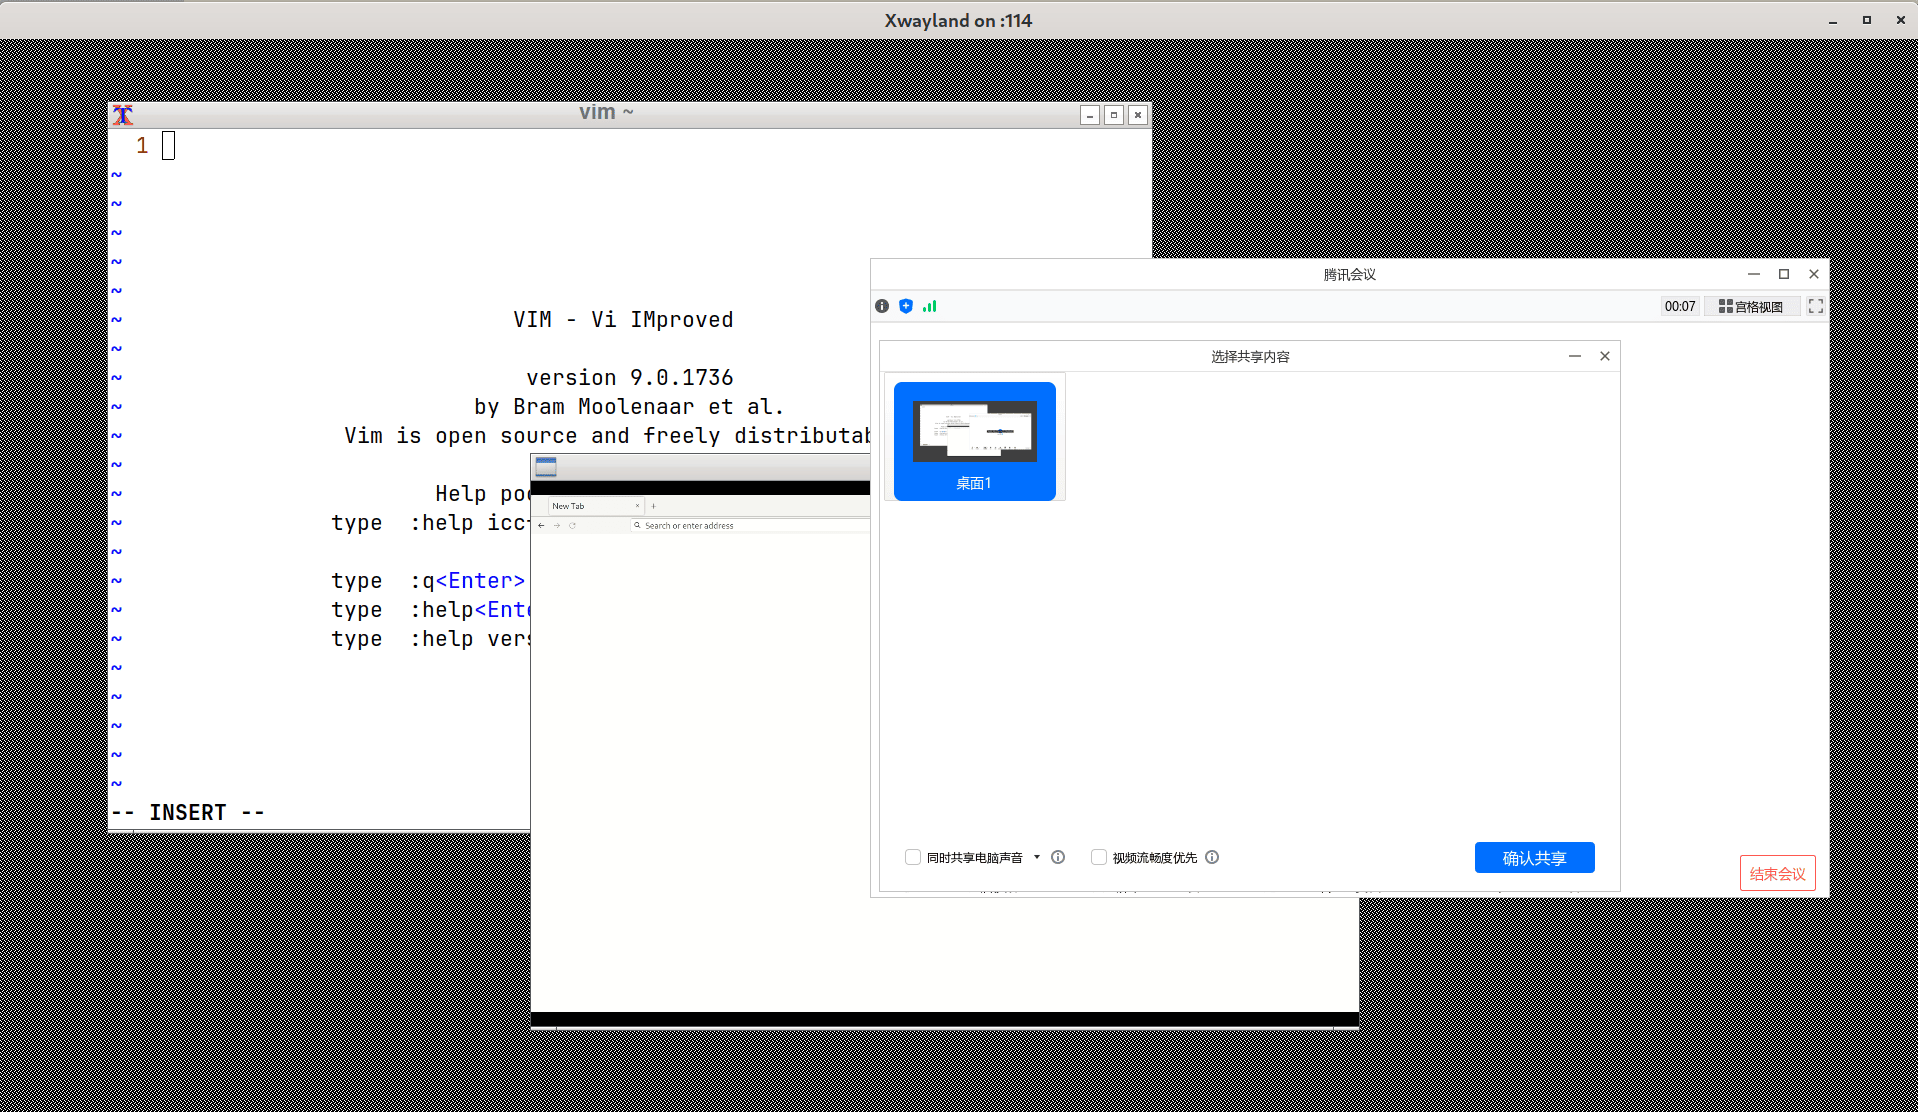
所以我们可以:
- 先开个 nested weston(别的 wayland compositor 应该也成)
- 在 weston 里面开个 non-rootless 的 xwayland
- 在 xwayland 里面开个窗口管理器(我这里用 mutter openbox,理论上随便找一个就行)
- 然后也在这个 xwayland 里面开某会议软件
- 最后把 xdp-screen-cast 输出(ximagesink)也开在这个 non-rootless 的 xwayland 里面,而且顺便还省去了 TCP/UDP 网络栈的开销
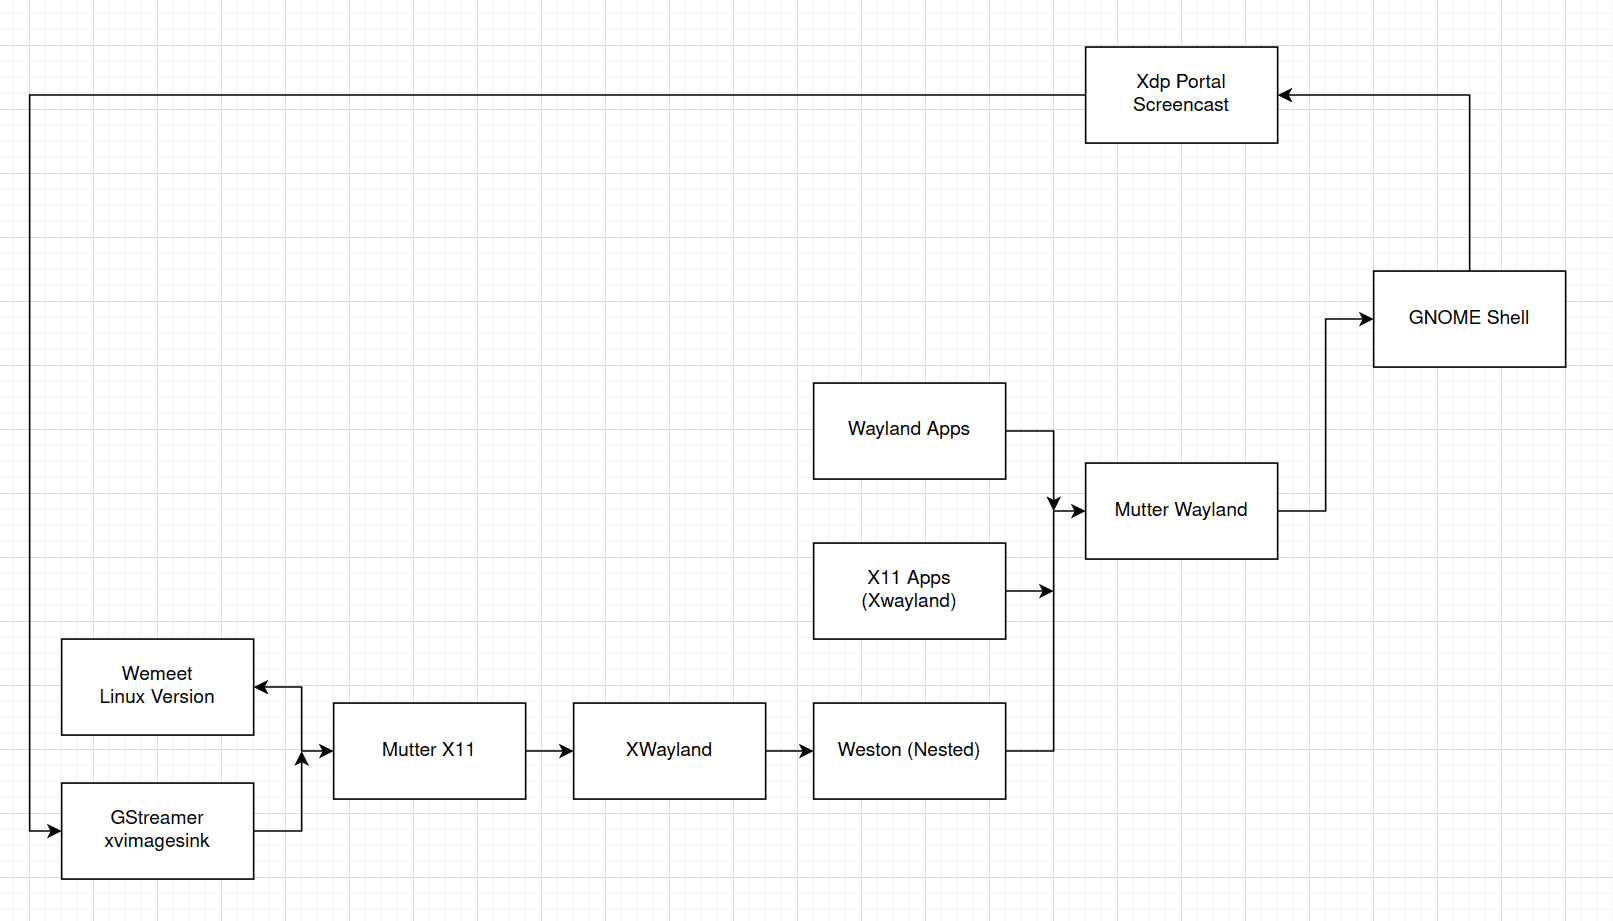
之前画的流程示意图,里面可能有的组件关系不够准确,但是我懒得改了。
启动脚本很简单,其中 Xwayland 的参数是从 x11docker 抄的:
#!/bin/sh -e

## Start weston
echo "Starting weston"
weston -c $(pwd)/weston.ini --socket=wayland-114 &

sleep 3

## Start xwayland
echo "Starting Xwayland"
WAYLAND_DISPLAY=wayland-114 Xwayland :114 -ac -retro +extension RANDR +extension RENDER +extension GLX +extension XVideo +extension DOUBLE-BUFFER +extension SECURITY +extension DAMAGE +extension X-Resource -extension XINERAMA -xinerama -extension MIT-SHM +extension Composite +extension COMPOSITE -extension XTEST -tst -dpms -s off -fullscreen &

sleep 3

## Start openbox and wemeet
echo "Starting openbox"
DISPLAY=:114 openbox &

echo "Starting wemeet"
DISPLAY=:114 flatpak run com.tencent.wemeet
其中 weston.ini 的内容也是从 x11docker 抄来的:
[core]
shell=desktop-shell.so
backend=wayland-backend.so
idle-time=0
[shell]
panel-location=none
panel-position=none
locking=false
background-color=0xff002244
animation=fade
startup-animation=fade
[keyboard]
[output]
name=WL1
mode=1920x1080
显示效果如下:
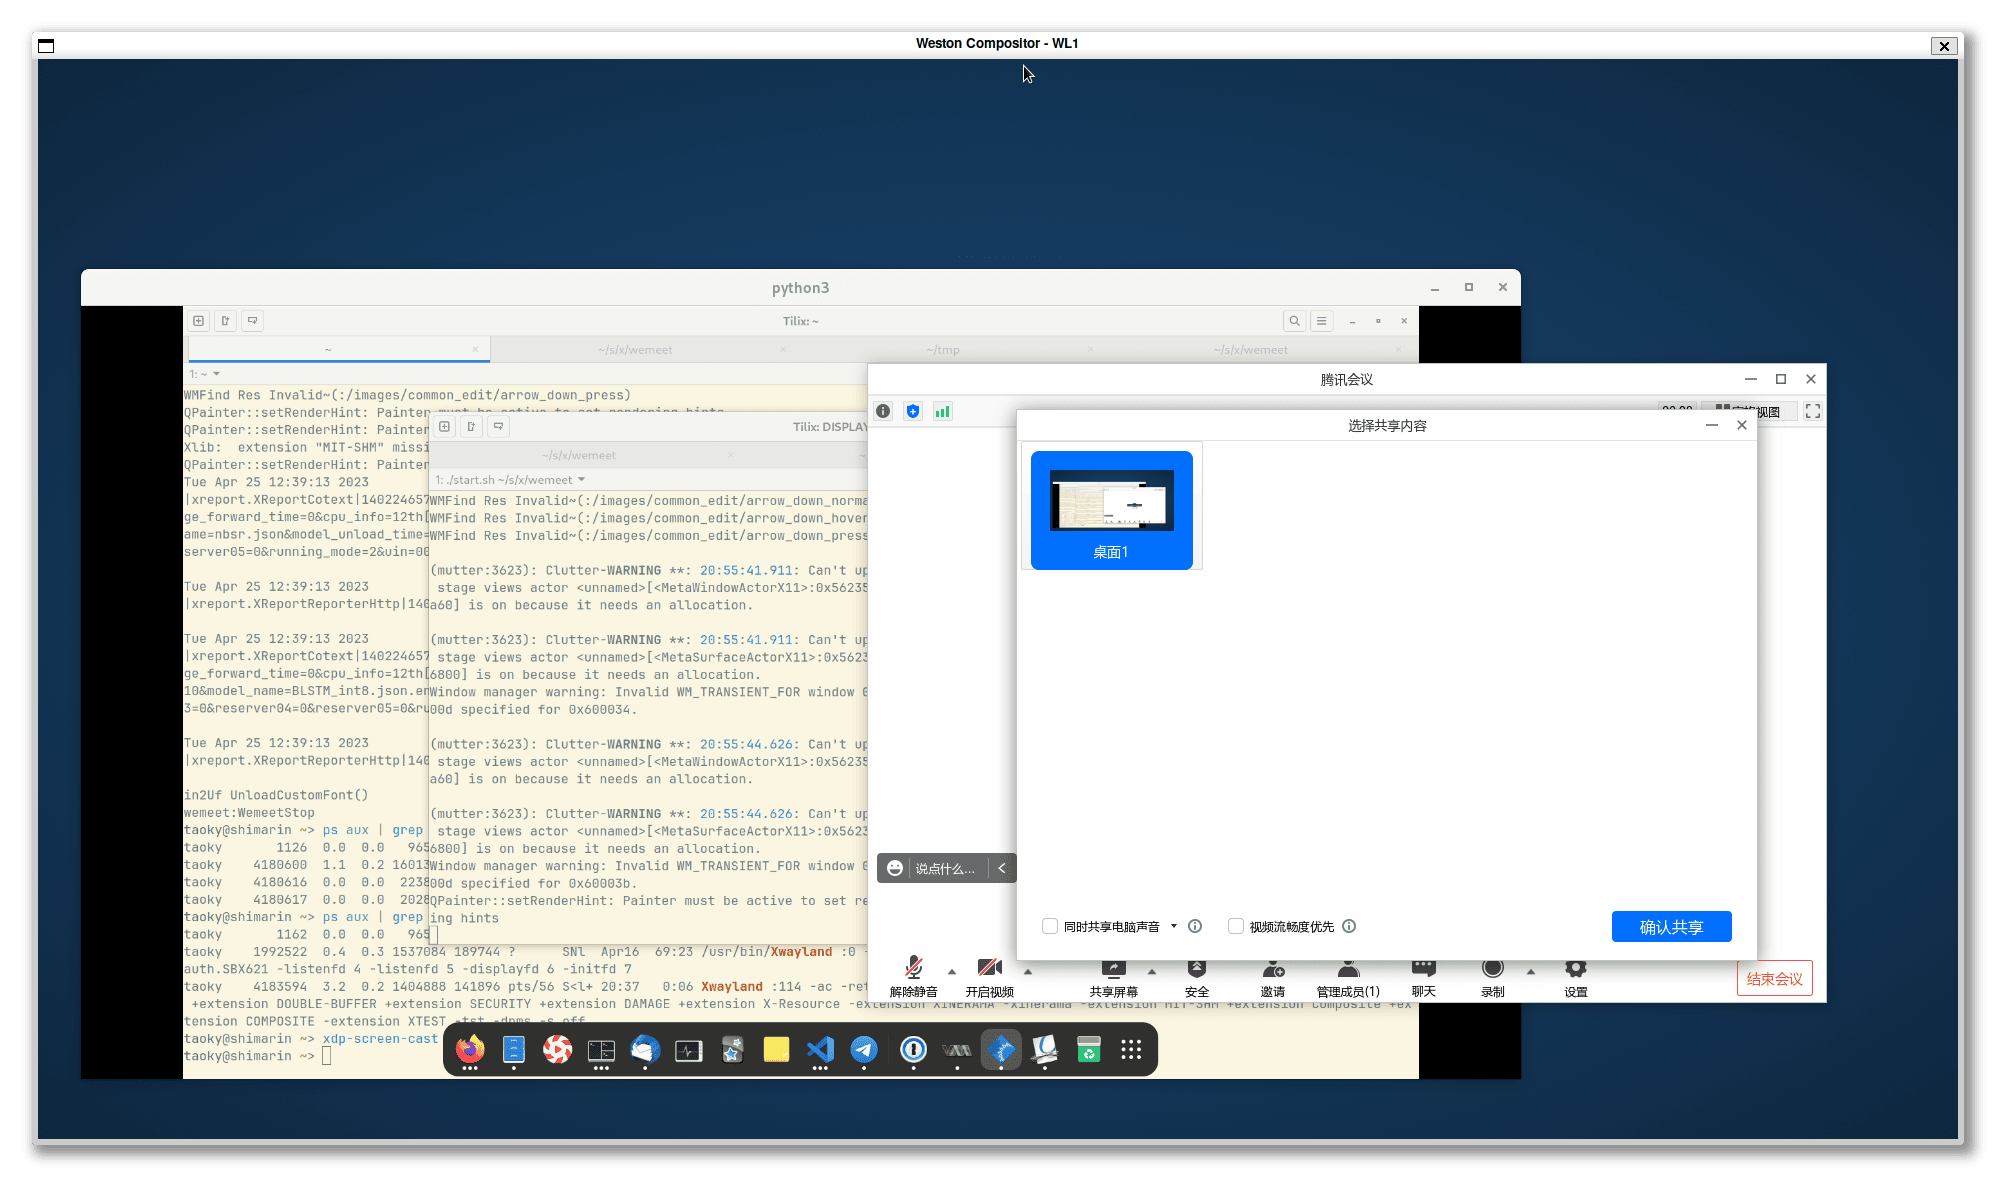
(换成 openbox 之后长得丑一些,X server 默认的黑白背景还在,不过也不是不能用)
特别地,在里面跑的 flatpak 应用需要开启后台运行权限,否则跑了几秒之后就会被杀掉。
这个方案的另一个问题是:剪贴板不能直接交互, 以及输入法也用不了了 输入法能用,不过 popup 位置有时候不对。一个 workaround 是用 剪贴板代替输入法xclip 替代剪贴板操作:
echo -n "不是不能用" | xclip -selection clipboard -i -display :114
## 从 :0 的剪贴板复制到 :114
xclip -selection clipboard -o -display :0 | xclip -selection clipboard -i -display :114
## 从 :114 的剪贴板复制到 :0
xclip -selection clipboard -o -display :114 | xclip -selection clipboard -i -display :0
总结
我用这个方案开过了几次会,还挺舒服的,相比于开个 VM 也更流畅。
其实如果某会议软件搞个 Web 版本就没这么多破事了。
技术|如何使用移动设备作为 Linux 副屏
作者: 曹阳
| 2021-07-25 22:48
由于工作的原因,经常会需要带着自己的笔记本到处跑。然后,作为程序员,总是渴望着更多的屏幕。比如一块屏幕用来看视频,一块用来看文档,一块用来写代码,一块用来做测试。这也是我比较喜欢 Emacs 编辑器和 Awesome 窗口管理器的原因。不过,在实际生活中,随时带着一块屏幕出门也不太现实,所以探索一下使用 iPad 或 Android 手机作为副屏的方式。
在这篇文章中,就大致介绍一下 VirtScreen 和 Deskreen 的使用和特点。
环境
本文使用的环境为,一台 ArchLinux + Awesome,一个 iPad 作为移动端,网络使用手机热点。
VirtScreen
VirtScreen 虚拟了一块虚拟屏,可以使用 xrandr 直接管理,就和直接外接了一块屏幕一样。
使用方式如下:
1、以 GUI 模式运行 VirtScreen
在我的环境下,直接运行 VirtScreen 无法正常打开窗口界面。使用 optirun virtscreen 解决。
2、在图形界面下设置显示参数
我的 iPad 应该是 2224*1668 分辨率,VirtScreen 最大支持 1920×1080 分辨率。不过移动设备一般 PPI 比较高,将分辨率设置为一半显示效果则刚好。
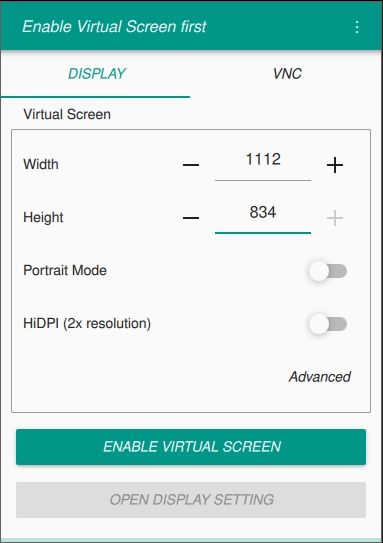
display config
设置完成后 “Enable VIRTUAL SCREEN” 即可。
3、在 VNC 下设置显示参数
根据需要配置 VNC 端口和密码。完成后 “START VNC SERVER” 或勾选 “Auto” 选项。如果不勾选 “Auto” 选项,VNC 连接终止后,VNC Server 也自动关闭。
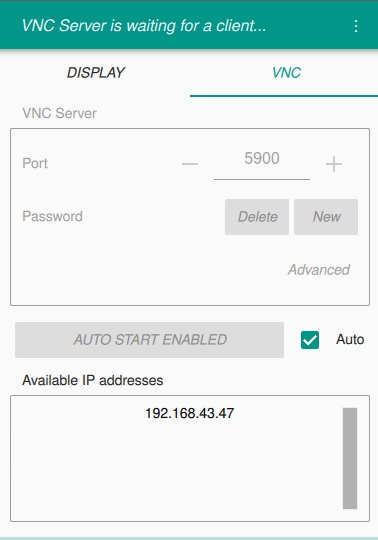
vnc config
4、移动设备连接 VNC
VNC 开启后,移动设备使用任意 VNC 客户端连接即可。这里我使用了 VNC Viewer.
5、配置副屏
这时候应该就可以使用任意配置工具配置屏幕了。我一般通过 xrandr 进行配置。
[spes@Gensoukyo ]</span><span class="pln">$ xrandr</span></code></p></li><li class="L1" data-node-id="20240613001945-qn3hxoj"><p><code><span class="typ">Screen</span><span class="pln"> </span><span class="lit">0</span><span class="pun">:</span><span class="pln"> minimum </span><span class="lit">8</span><span class="pln"> x </span><span class="lit">8</span><span class="pun">,</span><span class="pln"> current </span><span class="lit">3032</span><span class="pln"> x </span><span class="lit">1080</span><span class="pun">,</span><span class="pln"> maximum </span><span class="lit">32767</span><span class="pln"> x </span><span class="lit">32767</span></code></p></li><li class="L2"><p><code><span class="pln">eDP1 connected primary </span><span class="lit">1920x1080</span><span class="pun">+</span><span class="lit">0</span><span class="pun">+</span><span class="lit">0</span><span class="pln"> </span><span class="pun">(</span><span class="pln">normal left inverted right x axis y axis</span><span class="pun">)</span><span class="pln"> </span><span class="lit">350mm</span><span class="pln"> x </span><span class="lit">190mm</span></code></p></li><li class="L3" data-node-id="20240613001945-ijqn223"><p><code><span class="pln"> </span><span class="lit">1920x1080</span><span class="pln"> </span><span class="lit">59.93</span><span class="pun"> *+</span><span class="pln"> </span><span class="lit">59.93</span><span class="pln"> </span></code></p></li><li class="L4"><p><code><span class="pln"> </span><span class="lit">1680x1050</span><span class="pln"> </span><span class="lit">59.88</span><span class="pln"> </span></code></p></li><li class="L5" data-node-id="20240613001945-zmsrvti"><p><code><span class="pln"> </span><span class="lit">1400x1050</span><span class="pln"> </span><span class="lit">59.98</span><span class="pln"> </span></code></p></li><li class="L6"><p><code><span class="pln"> </span><span class="lit">1600x900</span><span class="pln"> </span><span class="lit">60.00</span><span class="pln"> </span><span class="lit">59.95</span><span class="pln"> </span><span class="lit">59.82</span><span class="pln"> </span></code></p></li><li class="L7" data-node-id="20240613001945-yrcbzjr"><p><code><span class="pln"> </span><span class="lit">1280x1024</span><span class="pln"> </span><span class="lit">60.02</span><span class="pln"> </span></code></p></li><li class="L8"><p><code><span class="pln"> </span><span class="lit">1400x900</span><span class="pln"> </span><span class="lit">59.96</span><span class="pln"> </span><span class="lit">59.88</span><span class="pln"> </span></code></p></li><li class="L9" data-node-id="20240613001945-06ro2sb"><p><code><span class="pln"> </span><span class="lit">1280x960</span><span class="pln"> </span><span class="lit">60.00</span><span class="pln"> </span></code></p></li><li class="L0"><p><code><span class="pln"> </span><span class="lit">1368x768</span><span class="pln"> </span><span class="lit">60.00</span><span class="pln"> </span><span class="lit">59.88</span><span class="pln"> </span><span class="lit">59.85</span><span class="pln"> </span></code></p></li><li class="L1" data-node-id="20240613001945-nrse6bj"><p><code><span class="pln"> </span><span class="lit">1280x800</span><span class="pln"> </span><span class="lit">59.81</span><span class="pln"> </span><span class="lit">59.91</span><span class="pln"> </span></code></p></li><li class="L2"><p><code><span class="pln"> </span><span class="lit">1280x720</span><span class="pln"> </span><span class="lit">59.86</span><span class="pln"> </span><span class="lit">60.00</span><span class="pln"> </span><span class="lit">59.74</span><span class="pln"> </span></code></p></li><li class="L3" data-node-id="20240613001945-kswpr7j"><p><code><span class="pln"> </span><span class="lit">1024x768</span><span class="pln"> </span><span class="lit">60.00</span><span class="pln"> </span></code></p></li><li class="L4"><p><code><span class="pln"> </span><span class="lit">1024x576</span><span class="pln"> </span><span class="lit">60.00</span><span class="pln"> </span><span class="lit">59.90</span><span class="pln"> </span><span class="lit">59.82</span><span class="pln"> </span></code></p></li><li class="L5" data-node-id="20240613001945-s91r57f"><p><code><span class="pln"> </span><span class="lit">960x540</span><span class="pln"> </span><span class="lit">60.00</span><span class="pln"> </span><span class="lit">59.63</span><span class="pln"> </span><span class="lit">59.82</span><span class="pln"> </span></code></p></li><li class="L6"><p><code><span class="pln"> </span><span class="lit">800x600</span><span class="pln"> </span><span class="lit">60.32</span><span class="pln"> </span><span class="lit">56.25</span><span class="pln"> </span></code></p></li><li class="L7" data-node-id="20240613001945-jtyaf13"><p><code><span class="pln"> </span><span class="lit">864x486</span><span class="pln"> </span><span class="lit">60.00</span><span class="pln"> </span><span class="lit">59.92</span><span class="pln"> </span><span class="lit">59.57</span><span class="pln"> </span></code></p></li><li class="L8"><p><code><span class="pln"> </span><span class="lit">640x480</span><span class="pln"> </span><span class="lit">59.94</span><span class="pln"> </span></code></p></li><li class="L9" data-node-id="20240613001945-vaxo97c"><p><code><span class="pln"> </span><span class="lit">720x405</span><span class="pln"> </span><span class="lit">59.51</span><span class="pln"> </span><span class="lit">60.00</span><span class="pln"> </span><span class="lit">58.99</span><span class="pln"> </span></code></p></li><li class="L0"><p><code><span class="pln"> </span><span class="lit">640x360</span><span class="pln"> </span><span class="lit">59.84</span><span class="pln"> </span><span class="lit">59.32</span><span class="pln"> </span><span class="lit">60.00</span><span class="pln"> </span></code></p></li><li class="L1" data-node-id="20240613001945-aufwbj9"><p><code><span class="pln">DP1 disconnected </span><span class="pun">(</span><span class="pln">normal left inverted right x axis y axis</span><span class="pun">)</span></code></p></li><li class="L2"><p><code><span class="pln">DP2 disconnected </span><span class="pun">(</span><span class="pln">normal left inverted right x axis y axis</span><span class="pun">)</span></code></p></li><li class="L3" data-node-id="20240613001945-cf1276y"><p><code><span class="pln">HDMI1 disconnected </span><span class="pun">(</span><span class="pln">normal left inverted right x axis y axis</span><span class="pun">)</span></code></p></li><li class="L4"><p><code><span class="pln">HDMI2 disconnected </span><span class="pun">(</span><span class="pln">normal left inverted right x axis y axis</span><span class="pun">)</span></code></p></li><li class="L5" data-node-id="20240613001945-4gq6kts"><p><code><span class="pln">VIRTUAL1 connected </span><span class="lit">1112x834</span><span class="pun">+</span><span class="lit">1920</span><span class="pun">+</span><span class="lit">0</span><span class="pln"> </span><span class="pun">(</span><span class="pln">normal left inverted right x axis y axis</span><span class="pun">)</span><span class="pln"> </span><span class="lit">0mm</span><span class="pln"> x </span><span class="lit">0mm</span></code></p></li><li class="L6"><p><code><span class="pln"> </span><span class="lit">1112x834</span><span class="pln">_virt </span><span class="lit">59.95</span><span class="pun">*</span><span class="pln"> </span></code></p></li><li class="L7" data-node-id="20240613001945-a0hhykb"><p><code><span class="pln">VIRTUAL2 disconnected </span><span class="pun">(</span><span class="pln">normal left inverted right x axis y axis</span><span class="pun">)</span></code></p></li><li class="L8"><p><code><span class="pln"> </span><span class="lit">1112x1080</span><span class="pln">_virt </span><span class="pun">(</span><span class="lit">0x306</span><span class="pun">)</span><span class="pln"> </span><span class="lit">99.250MHz</span><span class="pln"> </span><span class="pun">-</span><span class="typ">HSync</span><span class="pln"> </span><span class="pun">+</span><span class="typ">VSync</span></code></p></li><li class="L9" data-node-id="20240613001945-h4zhi5y"><p><code><span class="pln"> h</span><span class="pun">:</span><span class="pln"> width </span><span class="lit">1112</span><span class="pln"> start </span><span class="lit">1184</span><span class="pln"> </span><span class="kwd">end</span><span class="pln"> </span><span class="lit">1296</span><span class="pln"> total </span><span class="lit">1480</span><span class="pln"> skew </span><span class="lit">0</span><span class="pln"> clock </span><span class="lit">67.06KHz</span></code></p></li><li class="L0"><p><code><span class="pln"> v</span><span class="pun">:</span><span class="pln"> height </span><span class="lit">1080</span><span class="pln"> start </span><span class="lit">1083</span><span class="pln"> </span><span class="kwd">end</span><span class="pln"> </span><span class="lit">1093</span><span class="pln"> total </span><span class="lit">1120</span><span class="pln"> clock </span><span class="lit">59.88Hz</span></code></p></li><li class="L1" data-node-id="20240613001945-3nifs22"><p><code><span class="pun">[</span><span class="pln">spes@Gensoukyo </span><span class="pun">]$ xrandr --output VIRTUAL1 --right-of eDP1
在进行过一次 GUI 配置以后,VirtScreen 也可以以 CLI 模式启动,并且指定屏幕位置: virtscreen --right。
值得一提的是,VirtScreen 似乎默认副屏位于主屏左边,如果这时我用 xrandr 指定 right-of 参数时,显示就会变得很奇怪。
另外要注意的就是,VNC 客户端最好开启 “View Only” 模式。
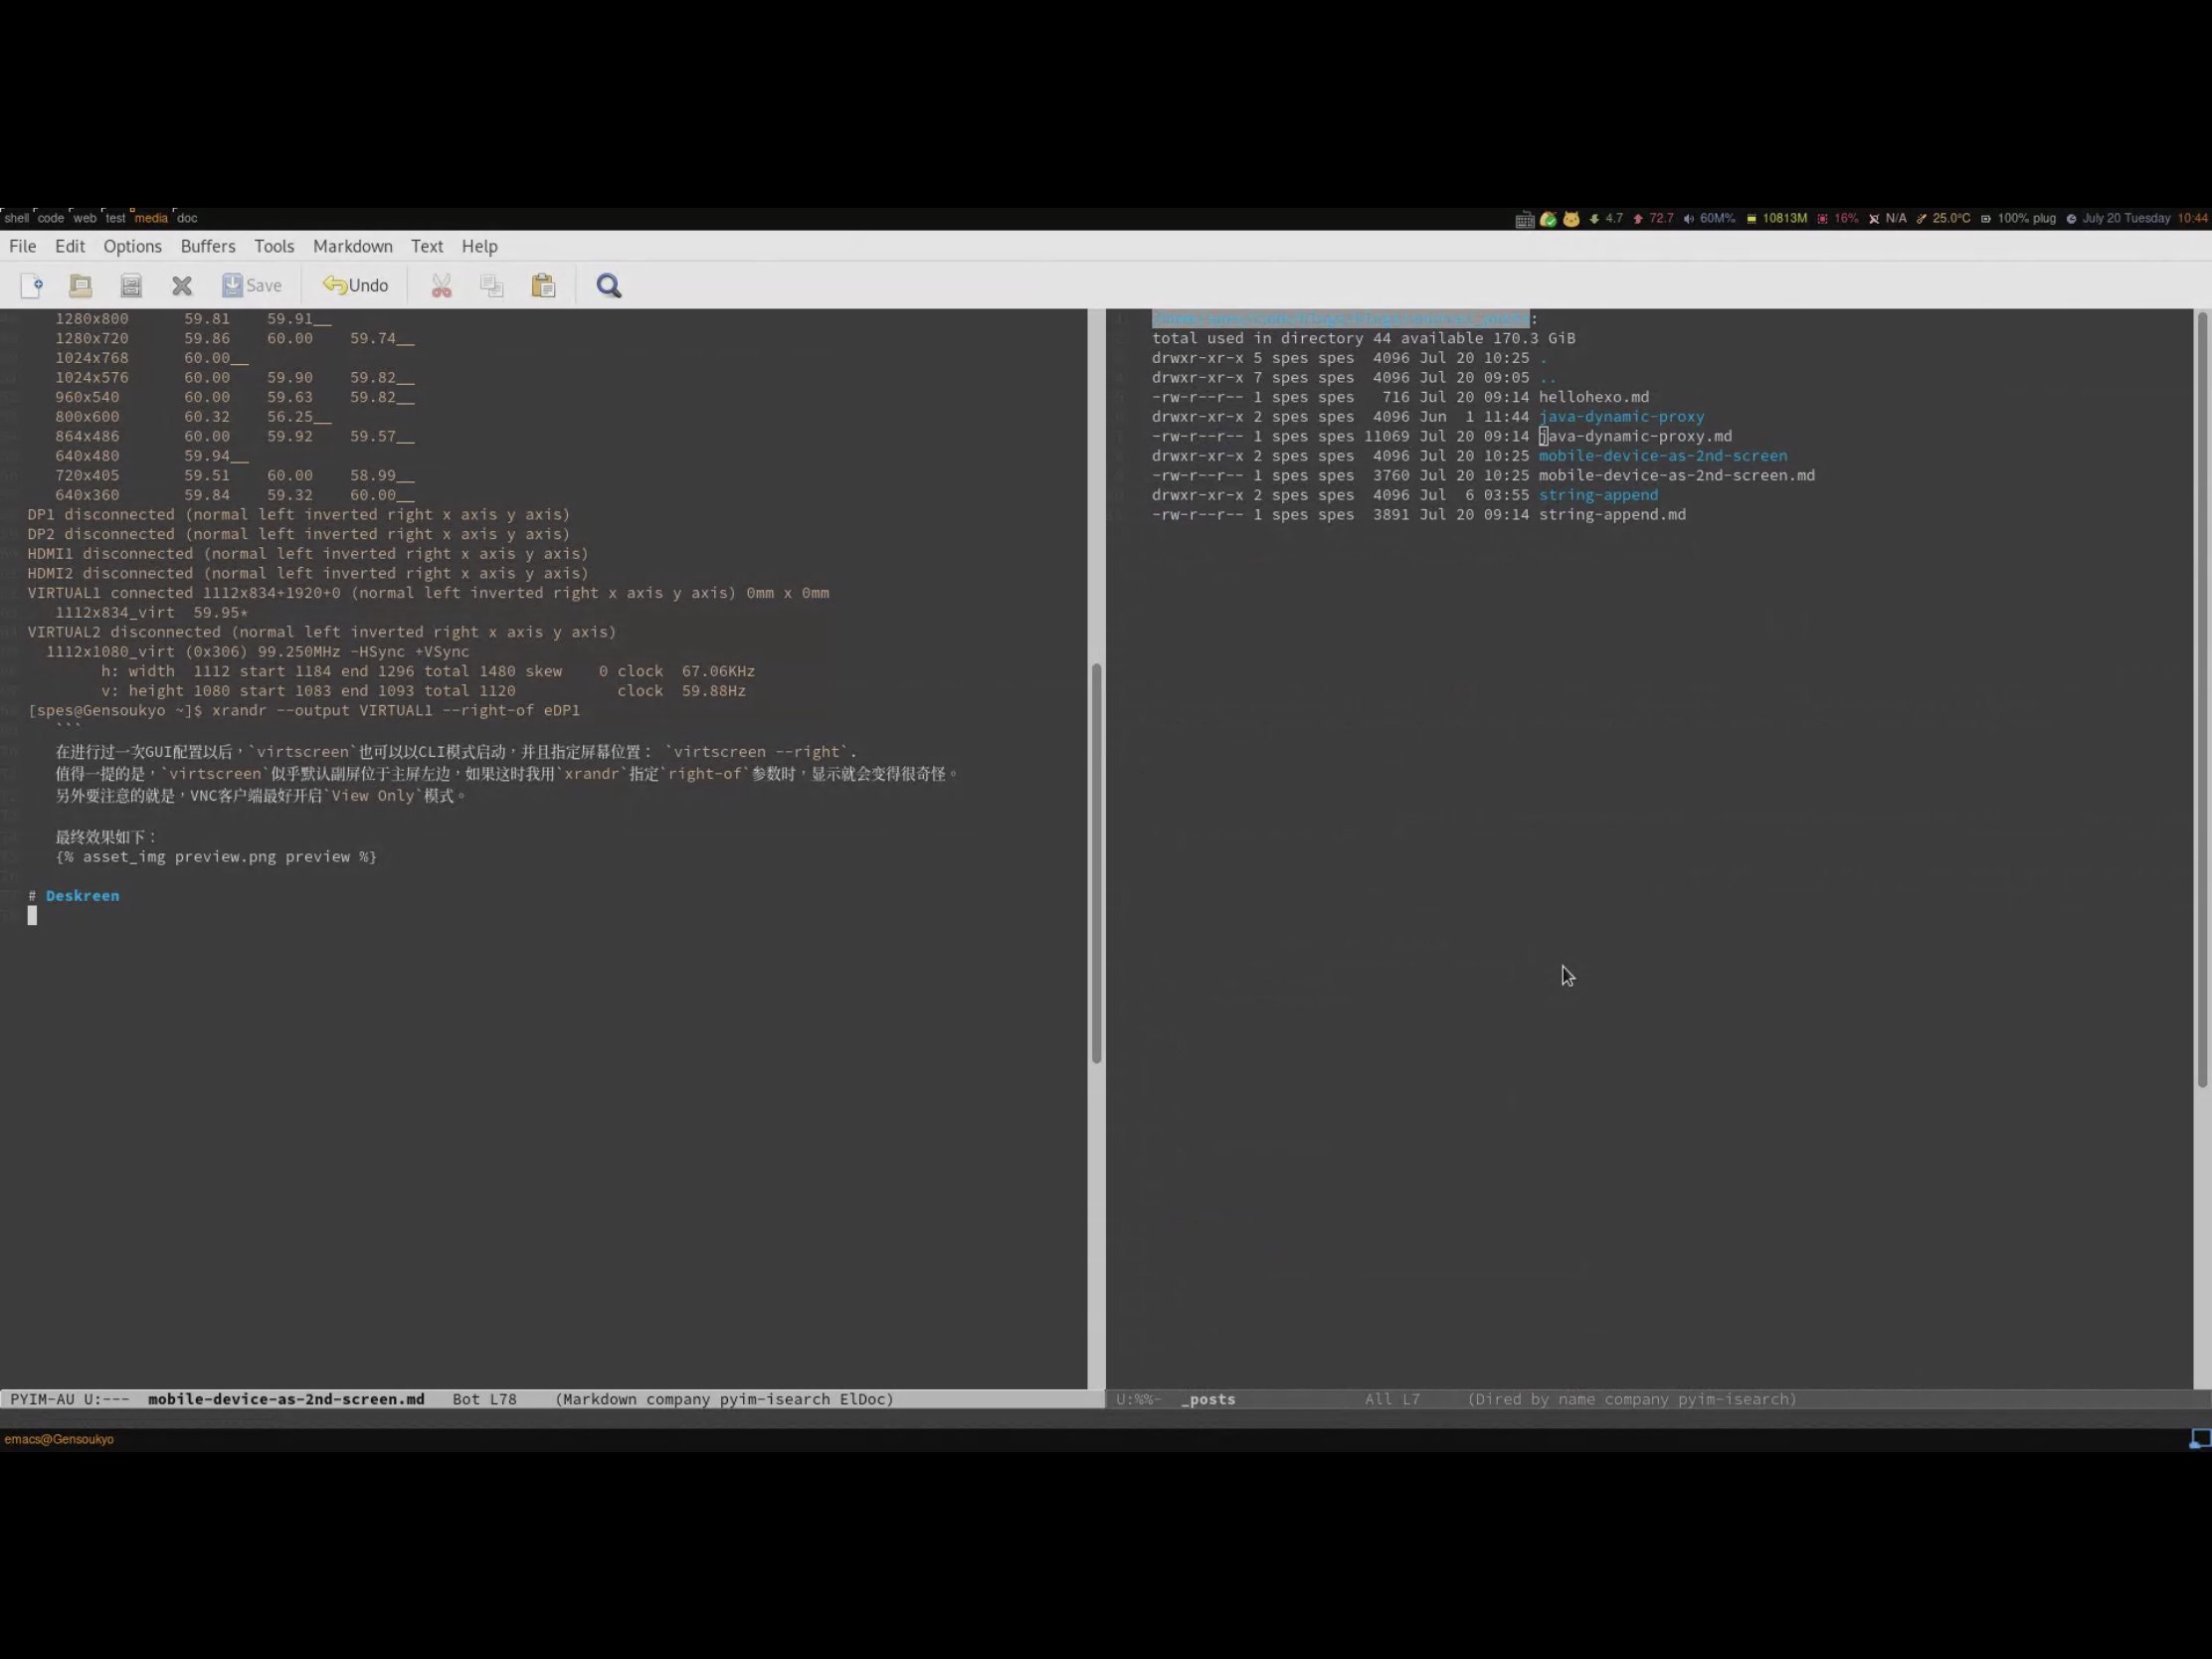
最终效果如下:
📄 [图片文字版] Emacs 中查看 xrandr 输出:物理输出 DP-1、HDMI1 均为 disconnected,仅虚拟输出 VIRTUAL1 挂有 1112x808_virt 模式(99.25MHz,行频 67.00KHz,刷新 59.60Hz,时序 1112/1184/1296/1488、808/811/817/848),配合 xrandr --addmode VIRTUAL1 1112x808_virt 与 --output VIRTUAL1 --right-of eDP1 把虚拟屏接到主屏右侧。
preview
Deskreen
与 VirtScreen 不同,Deskreen 使用类似直播的方式进行屏幕分享。
使用方式也非常简单。运行 deskreen,然后使用任意浏览器访问它提供的地址即可。
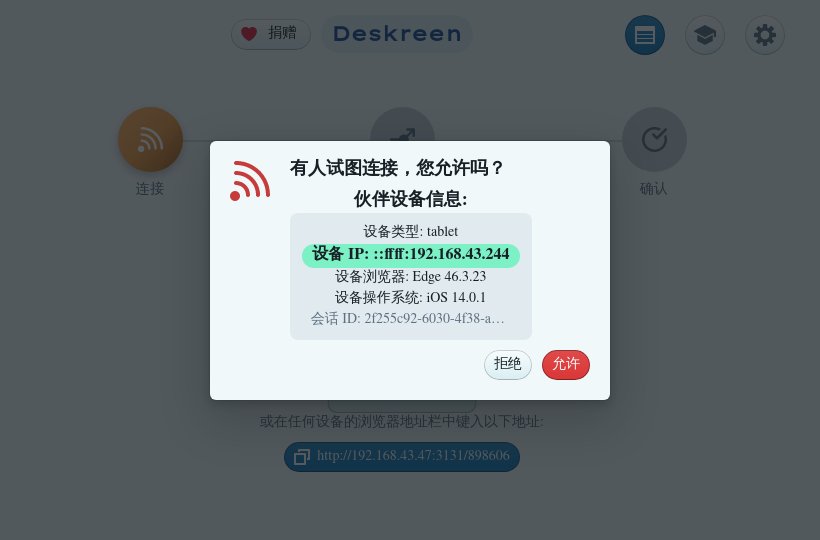
connect
iPad 上查看分享的屏幕和窗口如下:
 > 📄 [图片文字版] 终端运行 deskreen 启动 Deskreen:日志显示 Deskreen signaling server 已在端口 3131 上线,提示 APPIMAGE 环境变量未定义(非 AppImage 方式启动),并反复输出 Electron contextIsolation 默认值将由 false 改为 true 的弃用警告(node:176234)。
100% screen
由于我使用的是 AwesomeWM,在一个标签下打开了窗口并使用 Deskreen 进行共享后,完全可以再切换到另一个标签下做别的事。所以用这种方式将移动设备作为监控,查看系统或状态、日志等倒是很不错。不过共享的窗口不能最小化,否则就什么都看不到了。
但是这种使用方式其实不能算真正的“副屏”,所以可以参考“Using xrandr to create a virtual display (Linux)”的方式拓展虚拟屏幕并共享。但是在此过程中我还是遇到了一些问题。
首先,我使用的 Deskreen 版本是 1.0.11-1。如同上面链接中一样,对于我的机器已经存在的输出方式,如 DP、HDMI 等,就算 “addmode” 或是设置显示方式,这块屏幕仍然会处于 “disconnected”状态,需要修改 xorg.conf。但是由于之前折腾 Nvidia 显卡的经历,目前我还是十分抗拒再去修改这个文件的。然后,对于添加的虚拟输出,如 VIRTUAL1 等,Deskreen 却无法识别。
对比和总结
首先由于工作原因,大部分时间我是使用手机热点,所以带宽不是很高,使用这两种方式的时候都出现了不同程度的卡顿和延迟。VirtScreen 的卡顿略微小一点。一方面,感觉 Deskreen 的桢率是要高于 VirtScreen 的,纵使有延迟,移动设备上的显示也十分顺滑;另一方面,Deskreen 使用 WebRTC 的话,带宽要求应该本身就高于 VNC。所以在热点下使用的话,Deskreen 还是不太令人满意。想象一下,自己如丝般顺滑的进行了一系列操作,屏幕上先是静止不动,然后突然象打鸡血一样疯狂操,画面太美不忍直视啊。不过如果是在正常的网络环境,使用普通的路由器,这两种方式都是没有问题的。
然后,Deskreen 的主要问题我认为还是无法识别虚拟输出,导致我无法把它当作一个正常的副屏来使用,顶多算一个监视器。希望以后能修复吧。
VirtScreen 使用 VNC 会导致屏幕上出现很多鼠标指针,虽然不影响使用,但是也算略有瑕疵。不过,从另一种角度来看的话,这也是一种特性了 :D
本文发表于 blogs.lifesucks.cn,经作者授权转载。